
The PDF file is a 50 pages document that contains all information to install a cloud management gateway with SCCM. Use our products page or use the button below to download it. We can also set up a Cloud Management Gateway for your organization through our consulting services. See our Fixed Price Plan page to see our prices. |
|---|
If you’re using SCCM 1806 or later, see our updated post on how to setup a cloud management gateway using SCCM 1806 and later
Starting with SCCM version 1610, cloud management gateway introduces a new way to manage internet clients. This method is different than the “traditional” Internet-based client management (ICBM). Cloud Management Gateway uses a combination of a cloud service deployed in Microsoft Azure and a new site system role that communicates with that service. Clients then use the service to communicate with SCCM.
The main advantage of a cloud management gateway is that it doesn’t expose your SCCM servers to the internet but the downside is that it requires an Azure subscription which brings recurring monthly costs. If you’re still unsure which method to use, you can read the Microsoft documentation and see our blog post about internet client management. Make sure that you understand the limitation of using internet clients. We strongly encourage to use this new method if you’ll be managing client on the internet since this feature will evolve with time and the traditional way support should go away with time. You’ll also need a Cloud Management Gateway if you’re planning to use the new Windows 10 Co-Management features.
For clients to access Cloud Management Gateway, an SSL certificate is required to authenticate computers and encrypt communications. You will also need to create a custom SSL certificate on the Certificate Authority for the CMG. An Azure management certificate is also required to deploy the Cloud Management Gateway.
For now, Cloud management gateway only supports the Management Point and Software Update point roles.
If you already set up a Cloud Distribution Point before, the certificate requirements are quite similar
Here are the high-level steps for deploying Cloud Management Gateway:
- Verify a unique Azure cloud service URL
- Create and issue a custom SSL certificate for the Cloud Management Gateway
- Request the Cloud Management Gateway certificate from the Certification Authority
- Export the custom Web Certificate
- Create a client authentication certificate
- Create an Auto-Enroll Group Policy
- Export the client certificate’s root
- Upload the Cloud Management Gateway management certificate to Azure
- Create the Cloud Management Gateway in the SCCM console
- Add the Cloud Management Gateway Connector Point role
- Configure the Primary Site for client certification authentication
- Configure roles for cloud management gateway traffic
- Verify Client Communication with the SCCM Cloud Management Gateway
Verify a unique Azure cloud service URL
We don’t need to create the cloud service in Azure, the Cloud Management Gateway setup will create the service. We just need to verify that the Azure cloud service URL is valid and unique.
- Log in the Azure portal
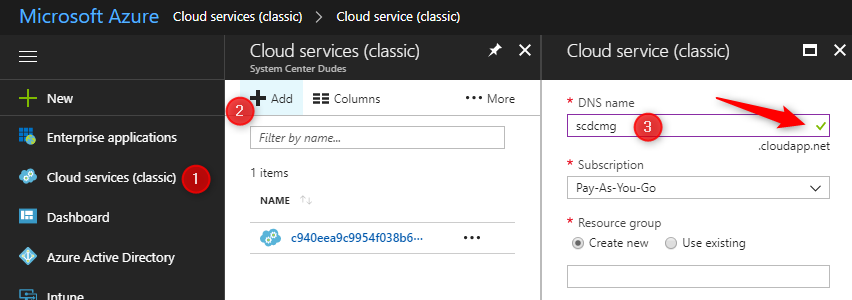
- In the Azure Portal, select Cloud Services on the left, click Add
- Enter the desired DNS name
- Validate that there’s a green check mark on the right. If your name is not valid, a red X will display, choose a different name if it’s the case
- Once your name is valid, take note of the name as it will be needed later. We will use SCDCMG as for our example
- Close the window, do not create the service now
Create and Issue a Custom Web Server Certificate Template on your Certification Authority
This procedure creates a custom certificate template that is based on the web server certificate template. The certificate will be used for the installation of the SCCM cloud management gateway and the private key must be exportable as it will be asked during installation.
- In Active Directory, create a security group named SCCM Site Servers that contain your SCCM Primary Site server computer account
- On the server running the Certification Authority, open the Certification Authority console (certsrv.mmc), right-click Certificate Templates and select Manage
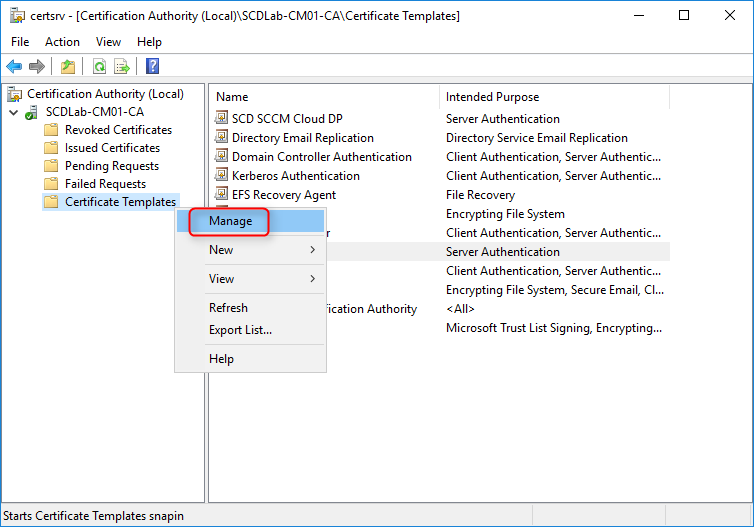
- The Certificate Templates management console opens
- Right-click the Web Server template and then select Duplicate Template
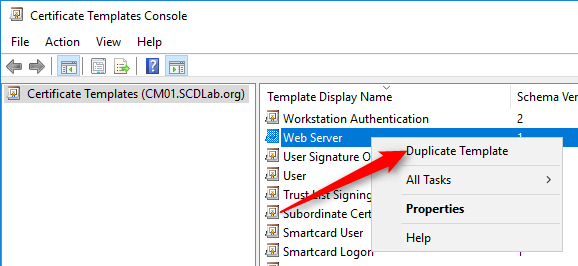
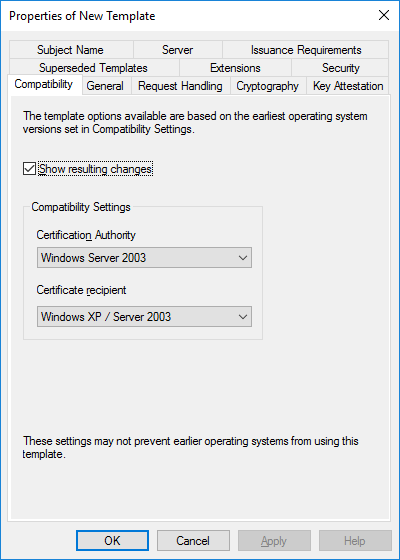
- In the Duplicate Template dialog box, ensure that Windows 2003 Server, Enterprise Edition is selected in Certification Authority
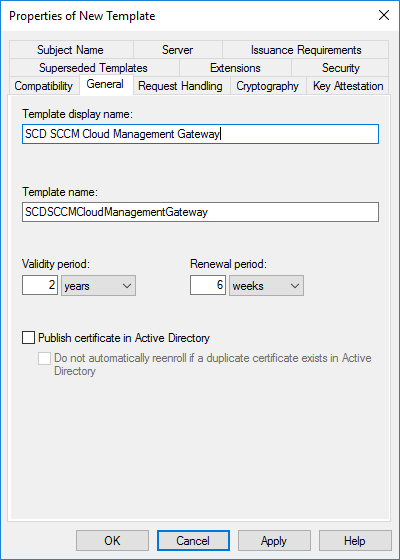
- In the General tab, enter a template name, like SCD SCCM Cloud Management Gateway. Change the validity period if needed. As a best-practice, the longer the validity period, the less secure is your certificate
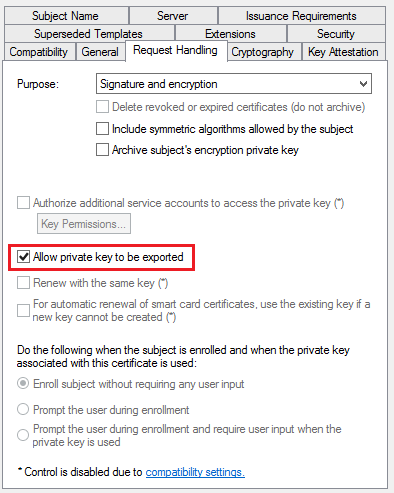
- In the Request Handling tab, select Allow private key to be exported
- In the Security tab, remove the Enroll permission from the Enterprise Admins security group
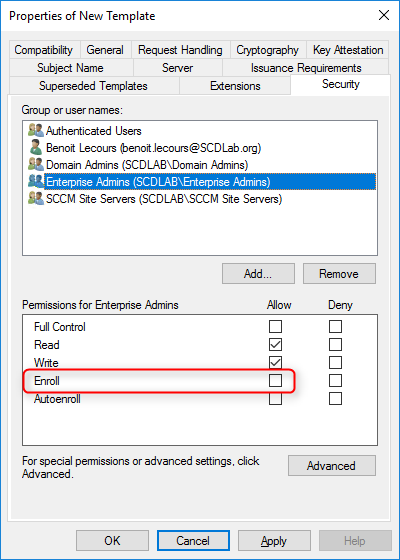
- Choose Add, enter SCCM Site Servers in the text box, and then choose OK
- Select the Enroll and Read permission for this group
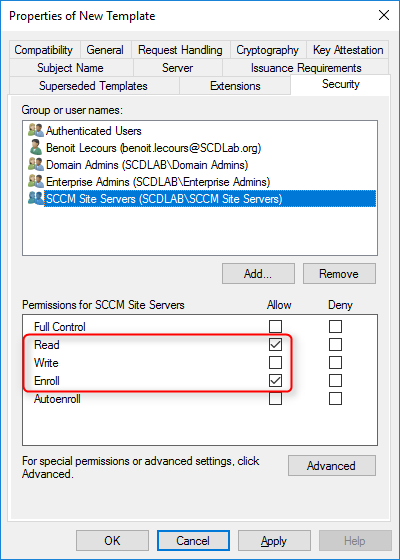
- Choose OK, close Certificate Templates Console
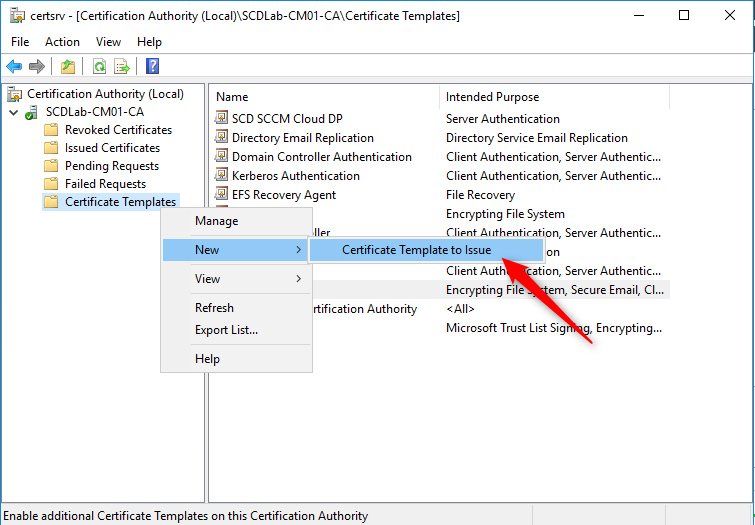
- Back in the Certification Authority (certsrv.mmc) console, right-click Certificate Templates, select New / Certificate Template to Issue
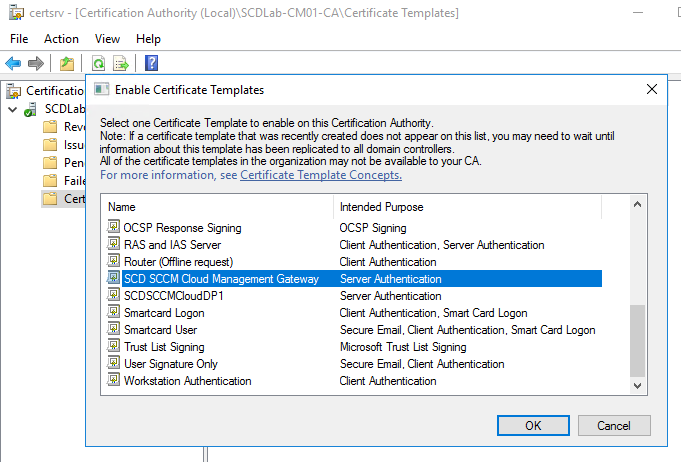
- In the Enable Certificate Templates dialog box, select the new template that you just created, SCD SCCM Cloud Management Gateway, click OK
Request the custom web server certificate on the Primary Site Server
This procedure requests and then installs the newly created custom web server certificate on the Primary Site prior to the SCCM cloud management gateway installation
- On the SCCM Server, run MMC
- On the File Menu, choose Add/Remove Snap-in… select Certificates, and click Add
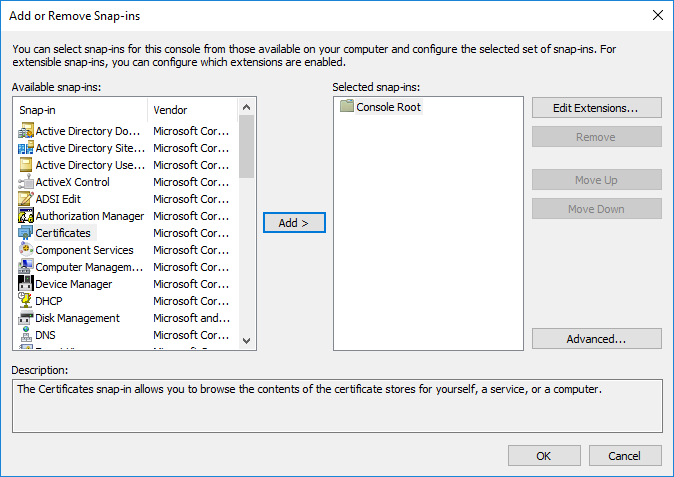
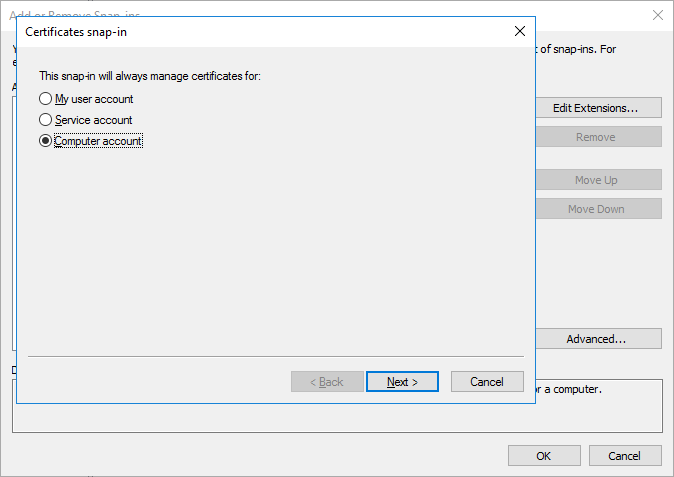
- When prompted for what you want to manage certificates for, select Computer Account, click Next
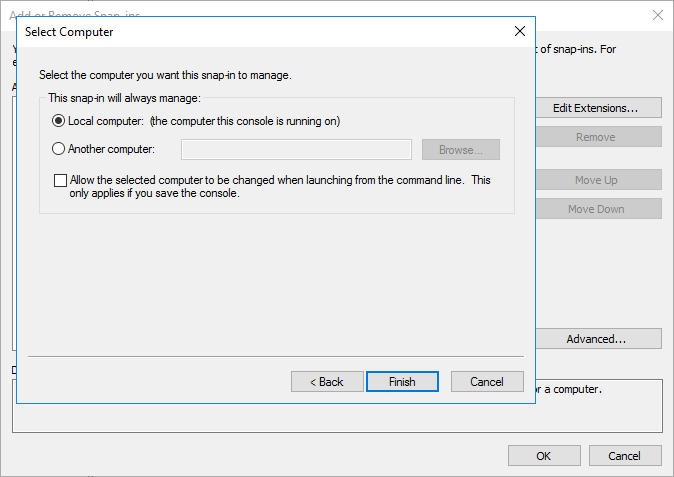
- Select Local Computer and then click Finish
- Click OK to close the Add/Remove Snap-ins
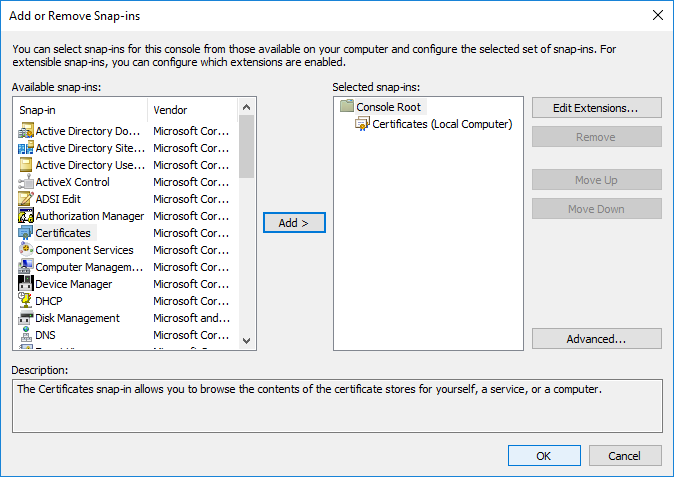
- In the Add or Remove Snap-ins dialog box, choose OK.
- In the console, expand Certificates (Local Computer) / Personal / Certificates
- Right-click Certificates, select All Tasks / Request New Certificate
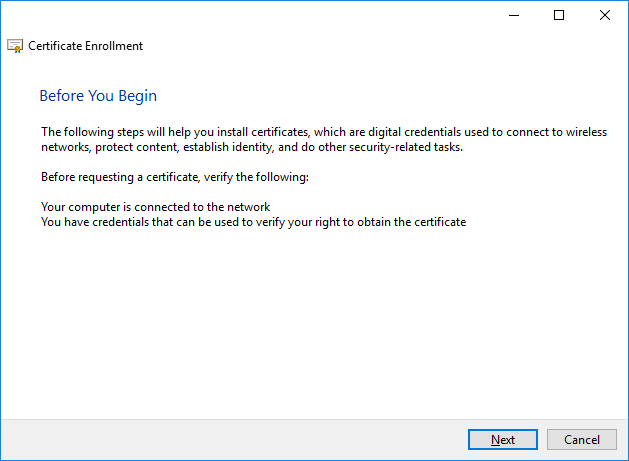
- On the Before You Begin page, click Next
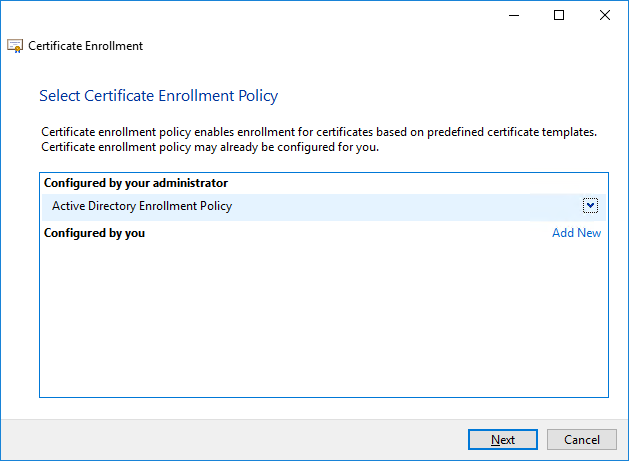
- If you see the Select Certificate Enrollment Policy page, choose Next
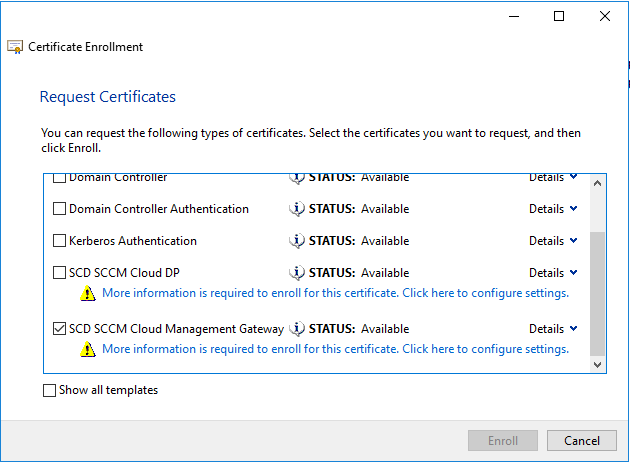
- On the Request Certificates page, identify the SCD SCCM Cloud Management Gateway from the list of available certificates, and then select More information is required to enroll for this certificate. choose here to configure settings
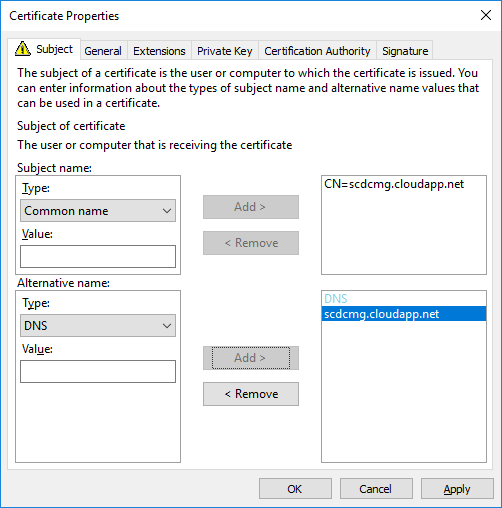
- In the Certificate Properties dialog box, in the Subject tab
- Subject name: in Type choose Common name
- Value: Specify your service name and your domain name by using an FQDN format. (For example: scdcmg.cloudapp.net) and select Add
- Alternative name: in Type choose DNS
- Value: Specify your service name and your domain name by using an FQDN format. (For example: scdcmg.cloudapp.net) and select Add
- Click OK to close the Certificate Properties dialog box
- On the Request Certificates page, select SCD SCCM Cloud Management Gateway from the list of available certificates, click Enroll
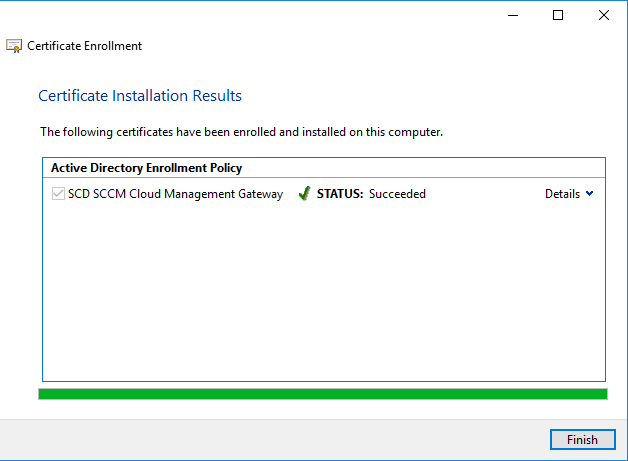
- On the Certificates Installation Results page, wait until the certificate is installed, click Finish
Export Web Server Certificate
This procedure exports the custom web server certificate to file. We will export it as a .CER file for the Azure Management Certificate and in a .PFX format for the cloud management gateway creation.
.CER EXPORT
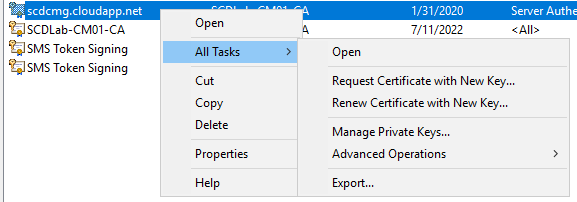
- In the Certificates (Local Computer) console, right-click the SCD Cloud Management Gateway certificate that you just created, select All Tasks / Export
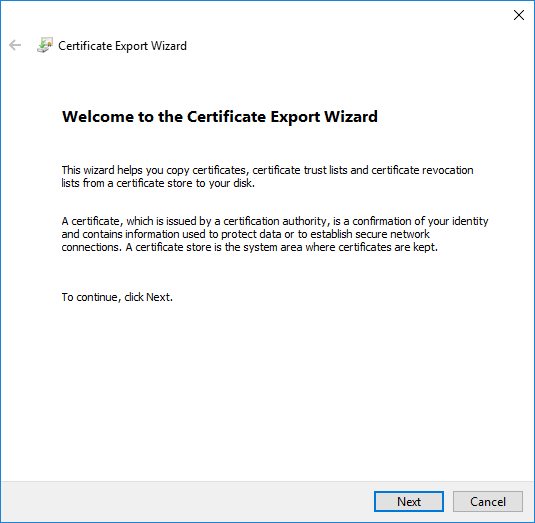
- In the Certificates Export Wizard, choose Next
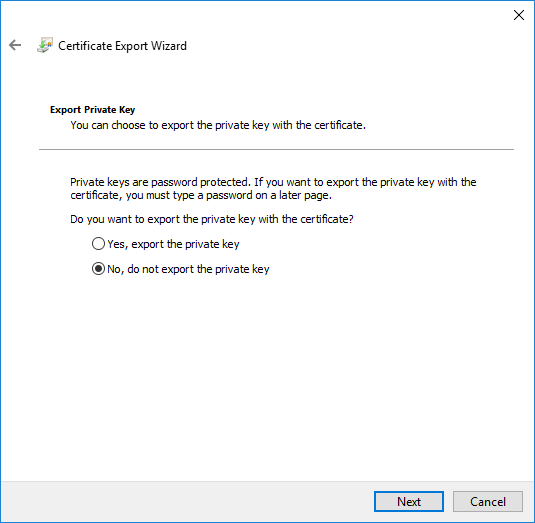
- On the Export Private Key page, select No do not export the private key and click Next
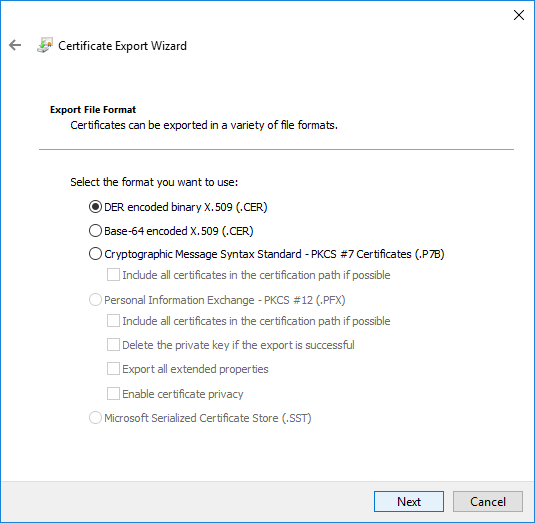
- On the Export file format, select CER and click Next
- Save your certificate in a folder and close the wizard
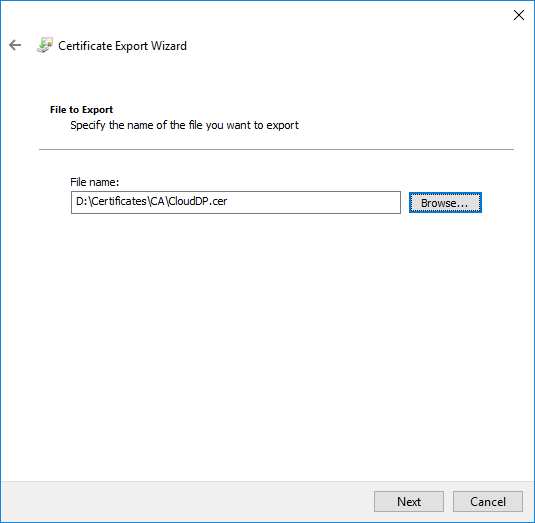
- To close the wizard, click Finish in the Certificate Export Wizard page
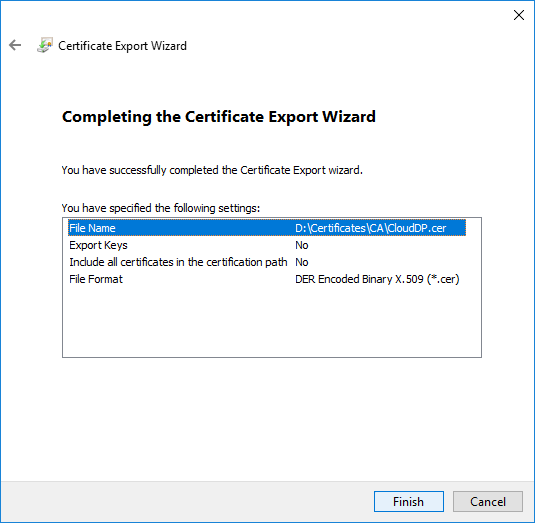
.PFX EXPORT
- Redo the export task a second time
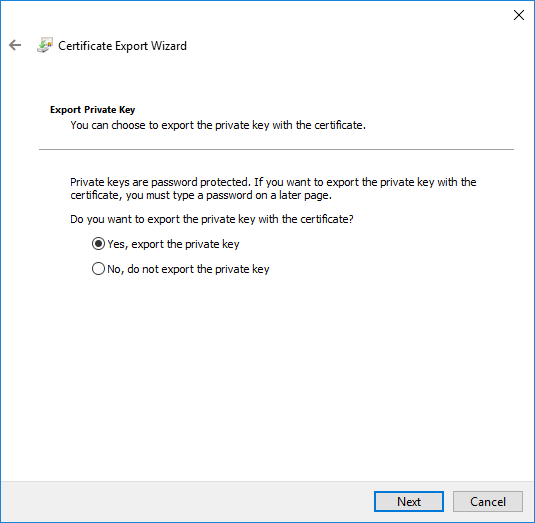
- On the Export Private Key page, choose Yes, export the private key, click Next
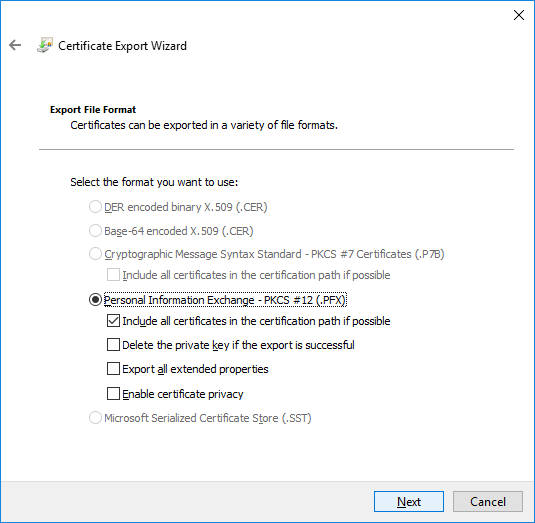
- On the Export File Format page, ensure that the Personal Information Exchange – PKCS #12 (.PFX) option is selected
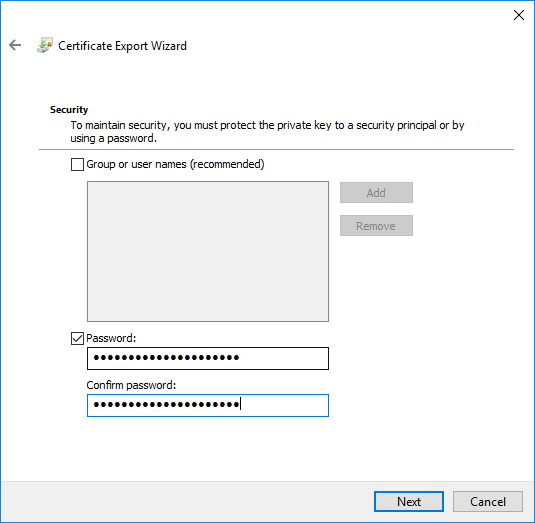
- On the Password page, specify a strong password to protect the exported certificate with its private key, and then click Next
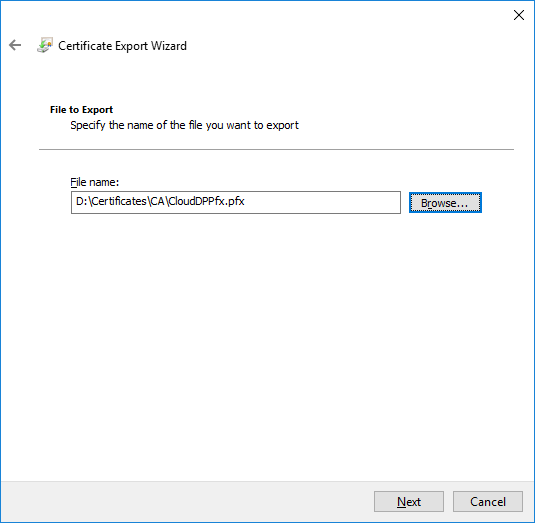
- On the File to Export page, specify the name of the file that you want to export
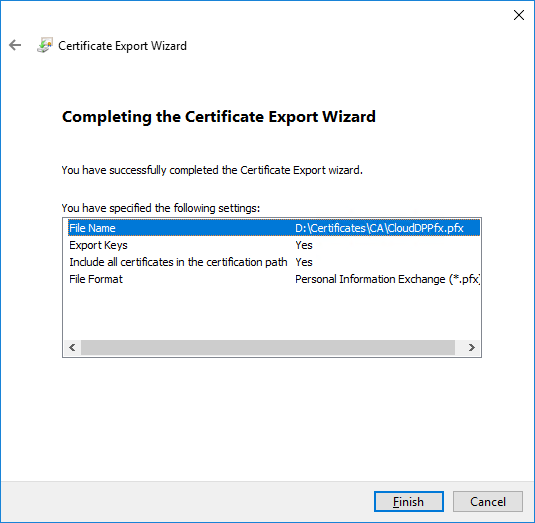
- To close the wizard, click Finish in the Certificate Export Wizard page
- Close Certificates (Local Computer).
The certificate is now ready to be imported to create an SCCM Cloud Management Point Gateway
Create the Client Certificate
A client certificate is required on any computer which will be managed via the Cloud Management Gateway. It is also required on the server that will host the Cloud Management Gateway connection point. The fastest way to deploy the client certificate to all your machines is through an autoenrollment GPO. If you do not already have a client certificate template, follow these steps:
- RDP to an Intermediate Certification Authority
- Open Certification Authority console, right-click Certificate Templates and click Manage
- Right-click Workstation Authentication and click Duplicate Template
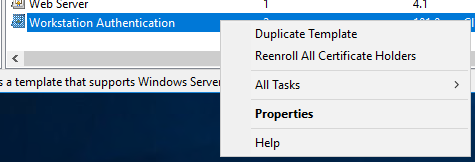
- Make sure to use Server 2003, not 2008
- In the General, name this SCCM Client Certificate
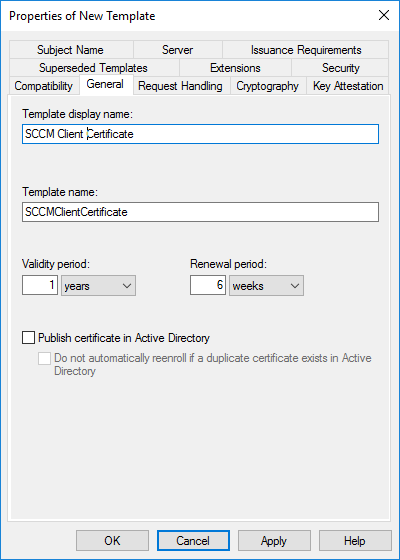
- Set the Validity Period to 5 years
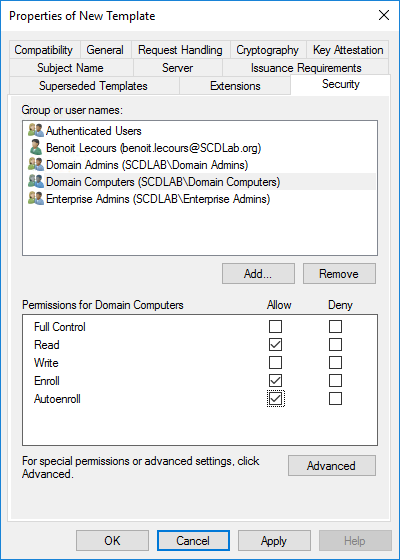
- Click on the Security tab, select the Domain Computers group and add the permissions of Read and Autoenroll, do not clear Enroll. Then click OK
- When you refresh your console, you will see that the new template is there
Create an Auto-Enroll Group Policy
A client certificate is required on any computer which will be managed via the Cloud Management Gateway. It is also required on the server that will host the Cloud Management Gateway connection point.
The fastest way to deploy the client certificate to all your machines is through an autoenrollment GPO :
- Launch Group Policy Management on your Domain (Start / Administrative Tools / Group Policy Management)
- Right-click the desired OU and select Create a GPO in this domain, and Link it here… as we are going to create a new GPO
- Name your GPO AutoEnroll ConfigMgr Client Cert, then click OK
- Right-click and Edit your newly created GPO
- Navigate to: Computer Configuration / Policies / Windows Settings / Security Settings / Public Key Policies
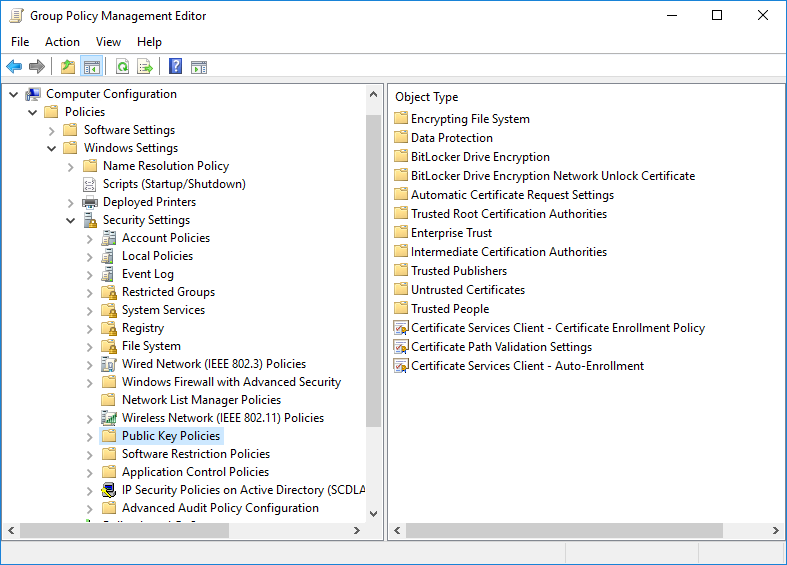
- Right-click on Certificate Services Client – Auto-Enrollment and then click Properties
- Change the Configuration Model: to Enabled
- Check the Update certificates that use certificate templates and Renew expired certificates, update pending certificates, and remove revoked certificates
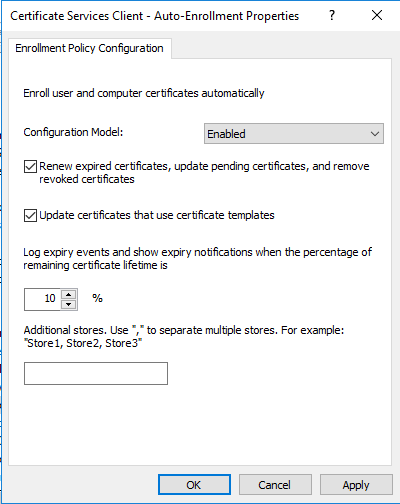
- Click Apply and OK
- Reboot a workstation and when you run a gpupdate /force or in 15 minutes when GP is re-applied, any machine on the domain communicating with the DC will request and receive a client certificate automatically that will be placed in theLocal Computer Personal Certificate Store
Export the client certificate’s root
The easiest way to export the root of the client certificates used on the network is to get it on one of the domain-joined machines that receive it through your auto-enrollment GPO
Client certificates are required on any computer you want to manage with cloud management gateway and on the site system server hosting the cloud management gateway connector point
- Run MMC
- From the File menu, choose Add/Remove Snap-in…
- In the Add or Remove Snap-ins dialog box, choose Certificates / Add / Computer account / Local computer
- Go to Certificates / Personal / Certificates
- Double-click the certificate for client authentication on the computer, choose the Certification Path tab, and double-click the root authority (at the top of the path).
- On the Details tab, choose Copy to File…
- Complete the Certificate Export Wizard using the default certificate format.You’ll need it to configure cloud management gateway later
Upload the certificate to your Azure Subscription
If your company is already using Windows Azure, there is a very good chance that a management certificate is already created and uploaded. In that case, you will only need to get the .pfx file and its password. If not, follow these instructions to upload the management certificate (.Cer file) into the Azure portal.
- Open Azure Portal
- Go to Subscription / [Your Subscription] / Management Certificate / Upload
- Select the .cer file that you exported earlier
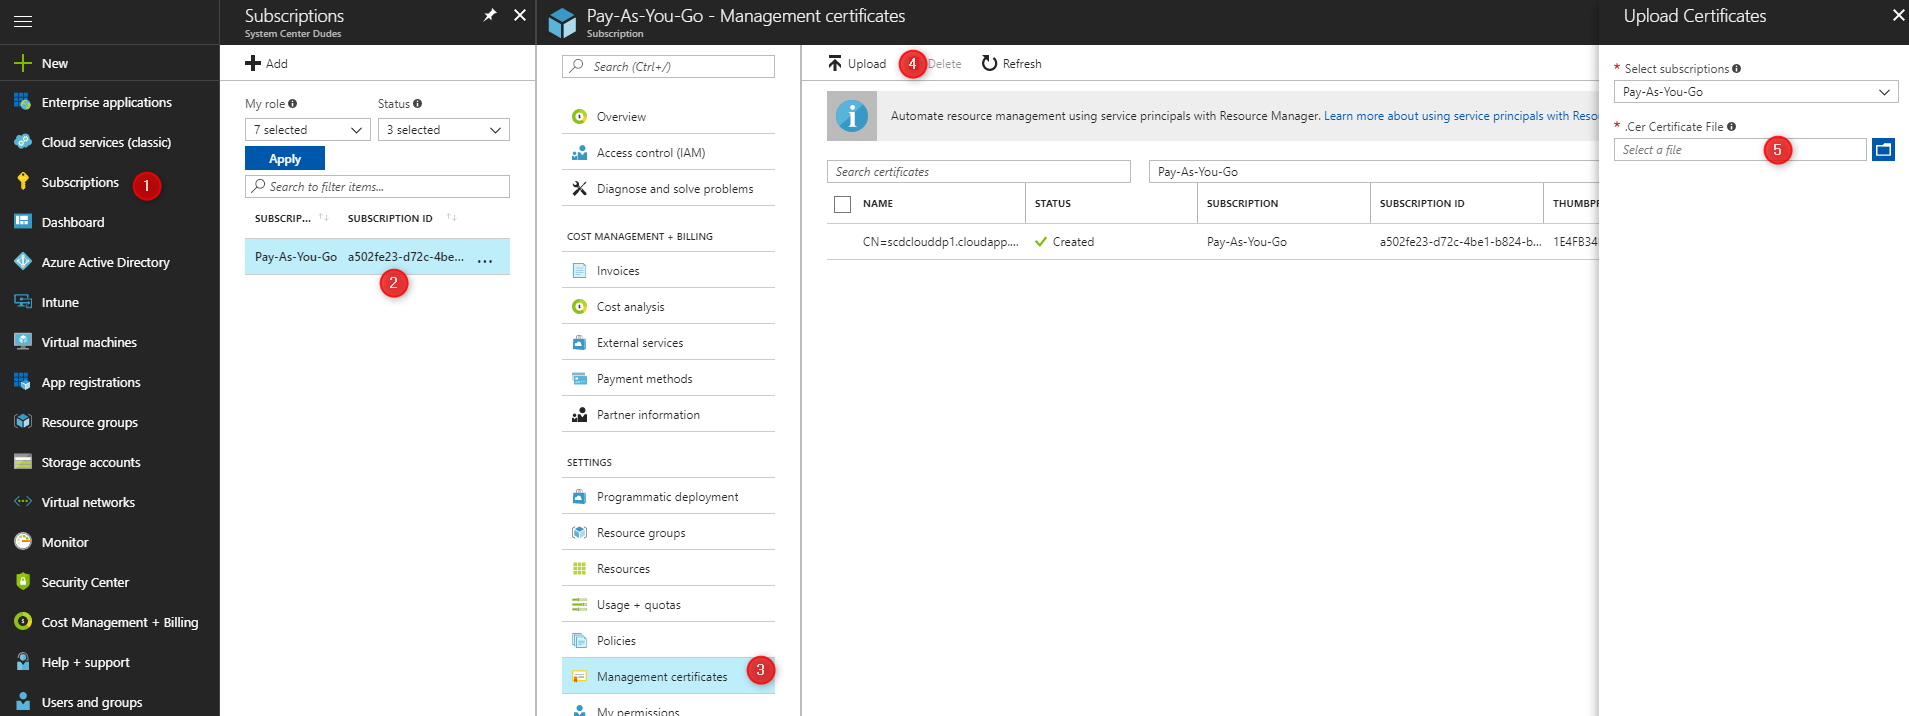
- The management certificate is now created and ready to use
- Copy the value of Subscription ID for your certificate. It will be needed to create the SCCM cloud management gateway.

Create the SCCM Cloud Management Gateway
We will now create the Cloud Management Gateway in the SCCM console.
In SCCM 1710, the Cloud Management Gateway is still a pre-release feature. Be sure to turn it on before going further.
- Open the SCCM Console
- Click Administration \ Cloud Services \ Cloud Management Gateway
- Right-Click Cloud Management Gateway and click on Create Cloud Management Gateway

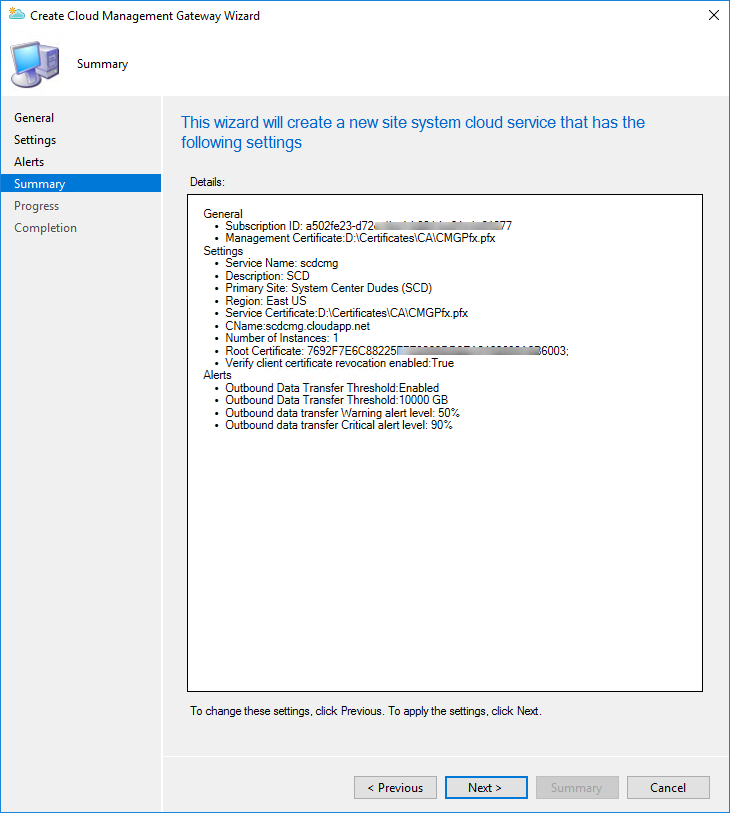
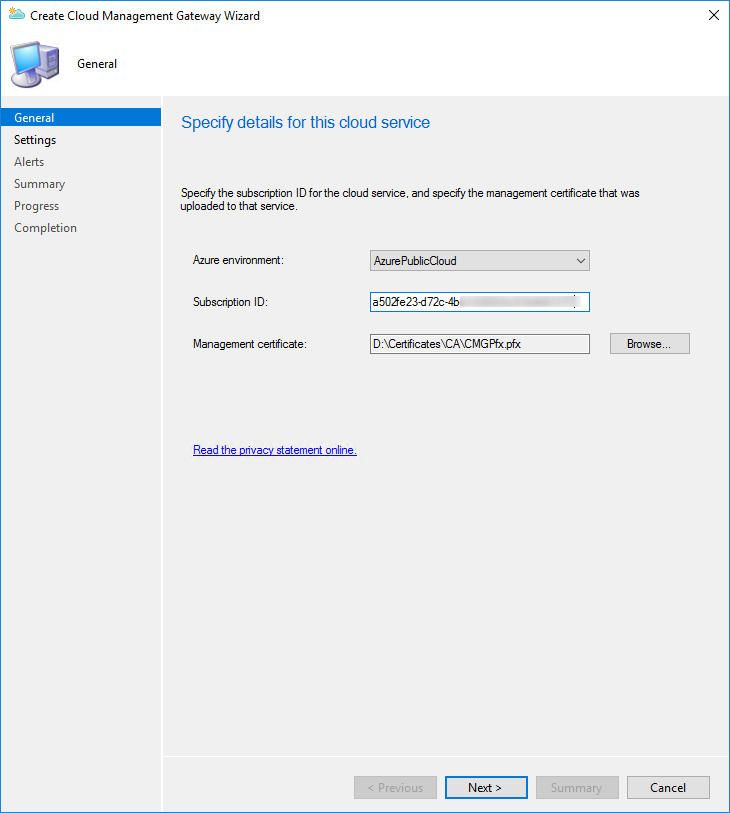
- In the General pane, paste your Subscription ID and select your Management certificate (.PFX)
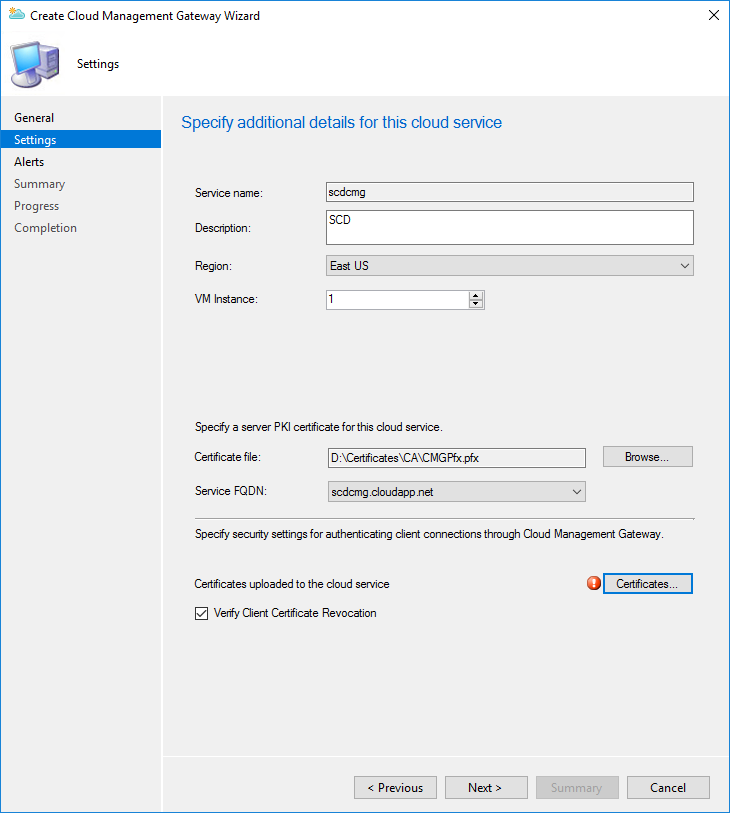
- On the Settings page
- Service name: Enter the cloud service name which was verified in the first step of the post (Ex: Scdcmg)
- Description: Enter a description for the Cloud Management Gateway
- Region: Enter your Geographical region based on your organization
- Instance number: Specify the number of VM instance
- Certificate file: Select the PFX certificate created for the Cloud Management Gateway
- Service FQDN: Will be populated by your FQDN
- At the bottom, click the certificate button and select your certificate
- Uncheck the box to Verify Client Certificate Revocation
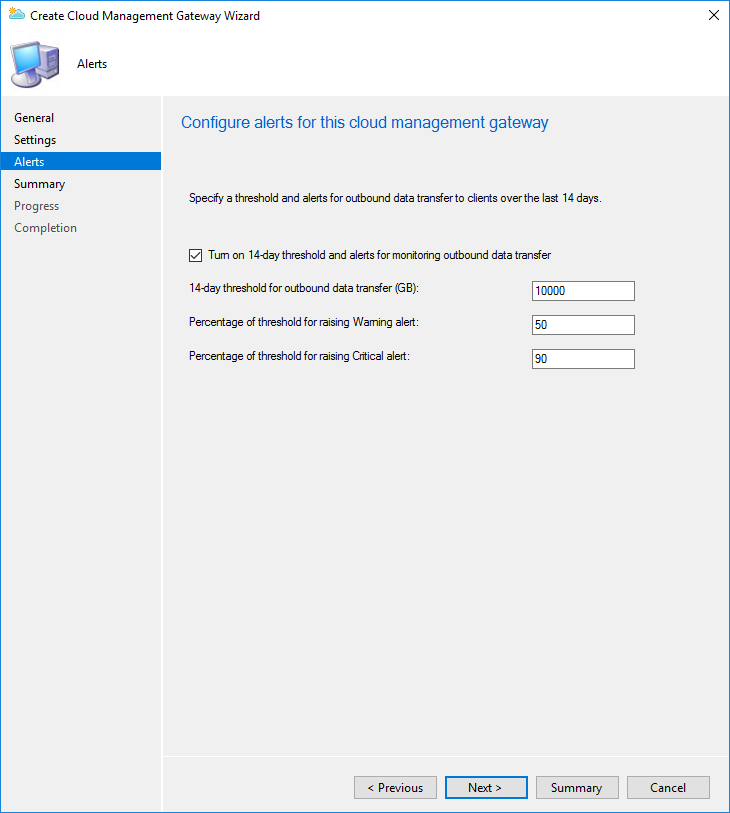
- In the Alerts pane, configure the desired settings
- Review your setting and complete the wizard

Once the wizard completed, it will take between 5 to 15 minutes to provision the service in Azure. Check the Status column for the new cloud management gateway to determine when the service is ready. You can also follow the progress in the CloudMgr.log
In progress :

When completed :

Add the Cloud Management Gateway Connector Point
The cloud management gateway connector point is a new site system role for communicating with cloud management gateway. Let’s add this role to our management point machine.
- In the SCCM console, go to Administration / Site Configuration / Servers and Site System Roles
- Select your server which will serve as your cloud management gateway connection point and select Add Site System Role
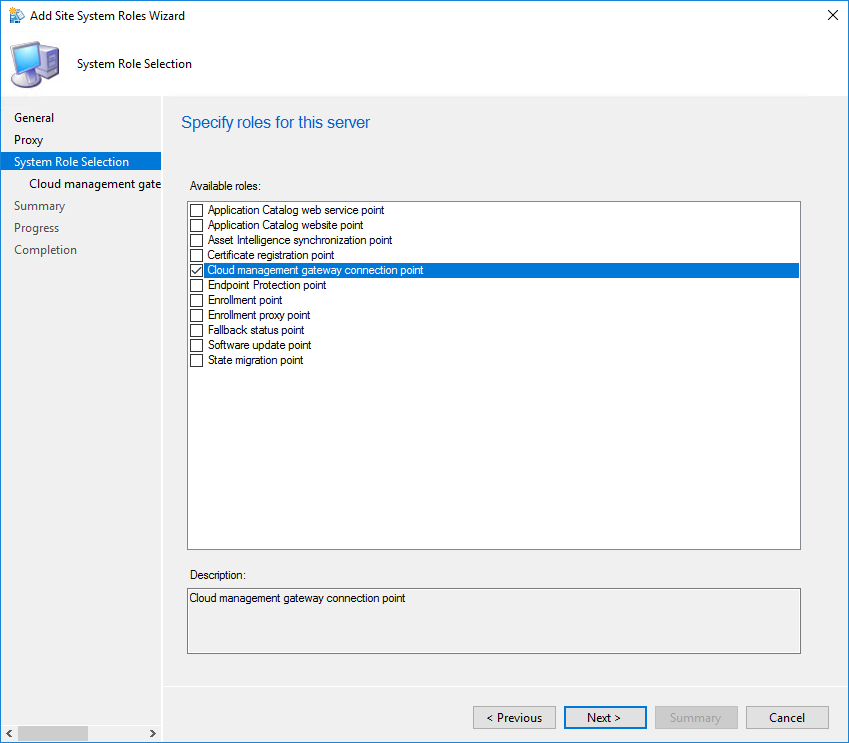
- On the System Role Selection pane, select Cloud management gateway connection point
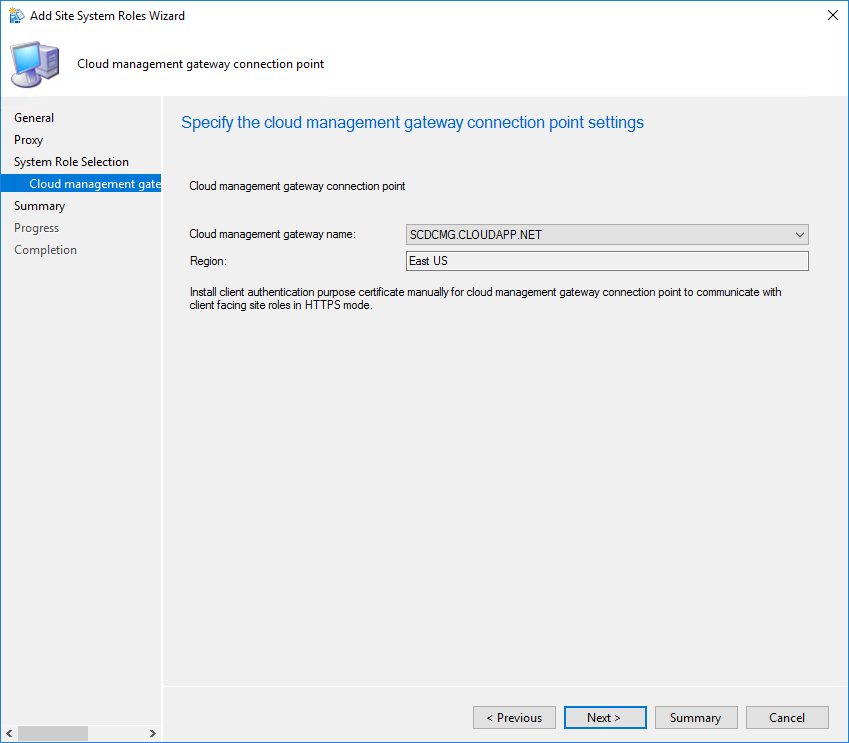
- Your Cloud Management Gateway name and region will be auto-populated
- Review your settings and complete the wizard
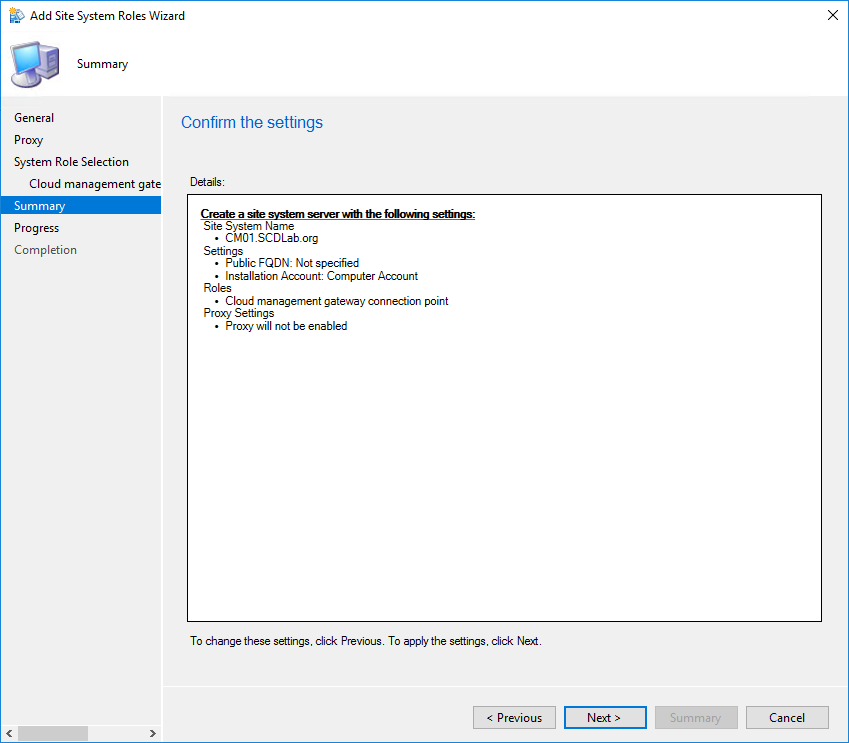
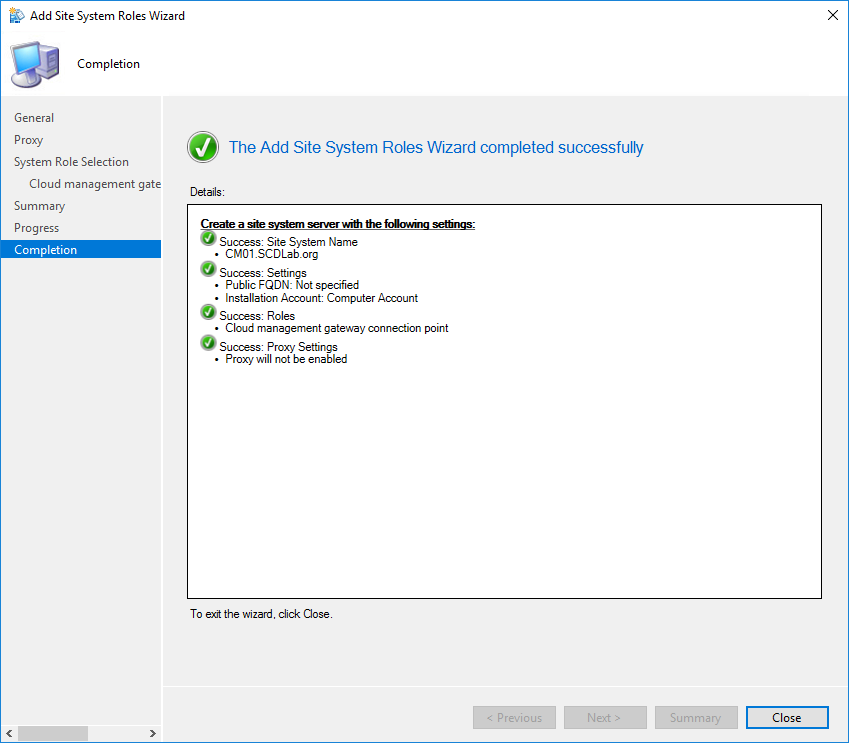
You can follow the installation progress in SMS_Cloud_ProxyConnector.log
Configure the Primary Site for client certification authentication
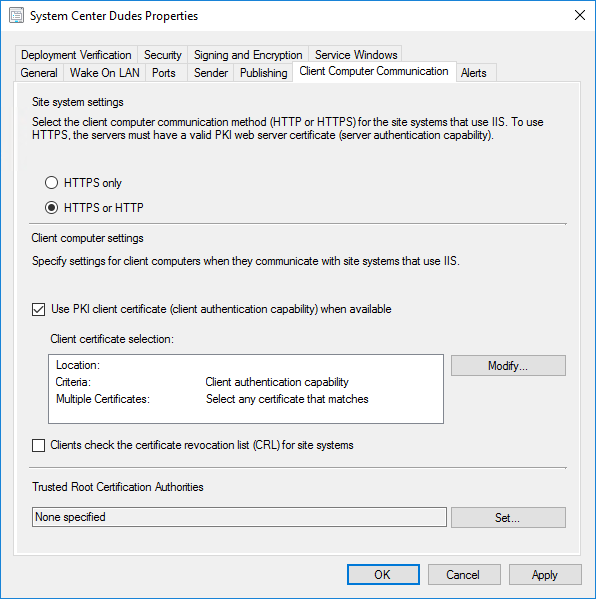
We will now specify settings for clients computers when they communicate with our Management Point
- In the SCCM console, go to Administration / Site Configuration / Sites
- Select your primary site for the clients you want to manage through cloud management gateway, select Properties
- On the Client Computer Communications tab, check Use PKI client certificate (client authentication) when available
- Clear Clients check the certificate revocation list (CRL) for site systems
- Click OK
Configure roles for cloud management gateway traffic
The final step in setting up cloud management gateway is to configure the site system roles to accept cloud management gateway traffic. Only the management point and software update point roles are supported by cloud management gateway. We recommend having a separate machine acting as the management point for your internet clients as it gives you the option to put this management point in HTTPS mode while having an HTTP MP for all your internal clients.
- In the SCCM console, go to Administration / Site Configuration / Servers and Site System Roles.
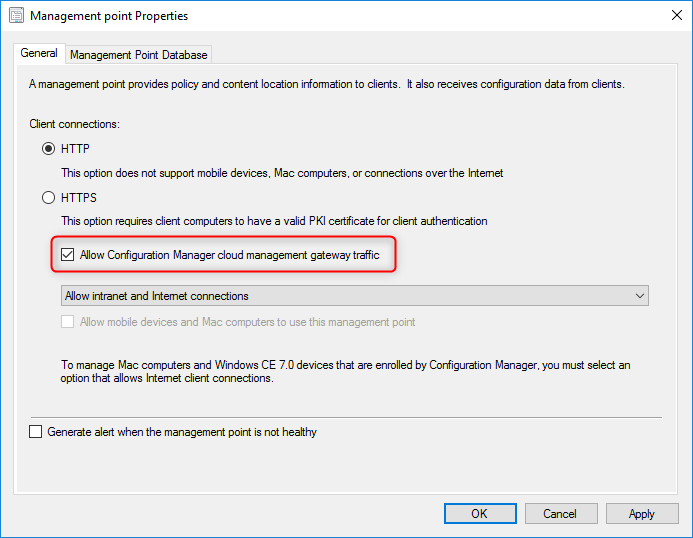
- Right-click the site system server for the role you want to configure for cloud management gateway traffic. In our case, we will configure a management point
- Select the Management Point role and select Properties
- In the General tab, check the box next to Allow Configuration Manager cloud management gateway traffic, and then click OK.
- If you require HTTPS communication, select HTTPS here and follow the next steps
Management Point HTTPS only
If you require having your management point in HTTPS communication, you must ensure that the server has requested the Server Authentification Certificate (SCD SCCM Cloud Management Gateway) and that IIS is configured with this certificate. If you are going with HTTP communication, you can skip this step.
- Once again, option the Certificate MMC console
- Choose Computer Account, click Next, Choose Local Computer, click Finish
- Click OK, and then expand the Certificates tree to the Personal / Certificates folder
- Click All Tasks / Request New Certificate
- At the Request Certificates part of the wizard, check your certificate (ex: SCD SCCM Cloud Management Gateway)
- You will notice that under the Web cert, a prompt that says, More information is required to enroll for this certificate. Click here to configure settings

- Click the link and set up your Certificate Properties
- Under Alternative Name / DNS, enter the FQDN of the management point server
- In General tab, name your certificate as it will be easier to find in IIS later
- Then the warning field will disappear from the Request Certificates screen of the Certificate Enrollment wizard
- Click Enroll and then finish once the enrollment is successful

Assign the Web (IIS) Certificate to IIS
This shall be done only on an HTTPS Management point that will handle cmg client requests.
- LaunchIIS Manager
- Navigate to the Default Website
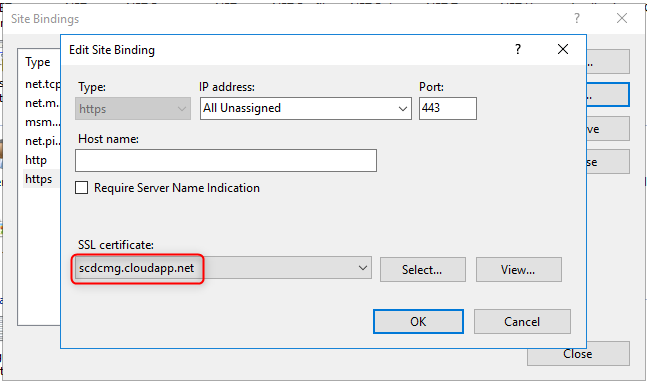
- Right-click it and select Edit Bindings
- Add https binding and click Edit
- Select the certificate with your server name, and then click OK
Configure clients for cloud management gateway
We will now verify if clients are able to succesfuly communicate with our server via the SCCM Cloud Management Gateway.
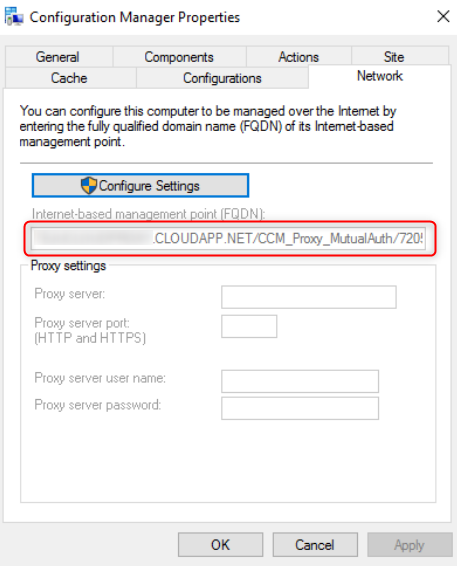
- On a client that is connected to the internet, run a Machine Policy Retrieval & Evaluation cycle from the Configuration Manager app
- Under the Networking tab, you should see the name of the Cloud Management Gateway service listed as the Internet-based management point (FQDN)
Check the ClientLocation.log file. It will indicate that the machine is using the internet management point
Rotating internet management point, new management point [1] is: SCDCMG.CLOUDAPP.NET/CCM_Proxy_MutualAuth/XXXXXXX (0) with capabilities: <Capabilities SchemaVersion =”1.0″><PropertyName=”SSL” Version=”1″ /></Capabilities> ClientLocation 02/02/2018 7:21:15 PM 4168 (0x1048)
If your clients are not already installed, you must use one of the proposed installation methods on Technet or use Intune if you are configured to use the Co-Management features.




[email protected]
08.19.2021 AT 06:55 AMMelba
09.22.2018 AT 02:02 AMNirmal
07.04.2018 AT 10:59 AMBrett
05.31.2018 AT 03:22 PMJason
01.04.2019 AT 12:12 PMI.Garcia
05.06.2018 AT 02:13 PMPrabakaran
04.18.2018 AT 01:02 AMStan
03.15.2018 AT 01:53 PMDavid
03.27.2018 AT 07:26 PMDennis
02.20.2018 AT 03:26 PMOla Holtberget
02.08.2018 AT 04:52 PM