
Step-by-Step Robopack Application guide : Package, deploy and update your first App
Founder of System Center Dudes. Based in Montreal, Canada, Senior Microsoft SCCM Consultant, 8 times Enterprise Mobility MVP. Working in the industry since 1999. His specialization is designing, deploying and configuring SCCM, mass deployment of Windows operating systems, Office 365 and Intune deployments.

Benoit Lecours
PresidentTable of Content
- Decide how you want to package the application
- Robopack Application guide : Create a first application using Robopack Instant Apps
- Robopack Application guide – Enable Automatic Updates – Patch Flows and Patch Groups
- Monitoring and Managing Versions
- Request a Robopack or Tenant Manager Demo/Quote/Trial


Share


Get the latest insights and exclusive content delivered to your inbox
This Robopack Application guide is aimed at Intune admins and application packagers who want a practical starting point. By the end of this post, you should be able to confidently package your first application in Robopack and understand how updates will be handled in the future.
Application packaging is often where Intune administrators lose the most time. Even for a simple app, you usually have to deal with installer switches, detection rules, versioning, testing, supersedence, assignment groups, and update strategy. When the vendor releases a new version, the whole process starts again.
Robopack changes this workflow by focusing on standardization, automation, and patch lifecycle management. Instead of packaging apps one by one and manually maintaining updates, Robopack lets you:
- Build applications in a repeatable way
- Upload and publish directly to Microsoft Intune
- Control updates using structured Patch Flows
- Roll out new versions safely using deployment waves
- Automatically target outdated installations
If you are new to Robopack, the interface and terminology (Instant Apps, Custom Packages, Patch Flows, Radar, Robopatch) can feel overwhelming at first. The goal of this post is to remove that friction.
In this Robopack Application guide, we will walk through the full first app creation:
- Connecting Robopack to your Intune tenant
- Creating your first application (Instant App or Custom Package)
- Publishing the app to Intune
- Creating a Patch Flow to manage updates
- Understanding how Robopack handles versions, supersedence, and rollout
This Robopack Application guide also assumes that your Robopack instance is up and running and connected to your Intune tenant. If not, refer to our post on this topic.
If you’re inter
Decide how you want to package the application
The first step is to create our app. Robopack supports two main options. Choosing the right one is important.
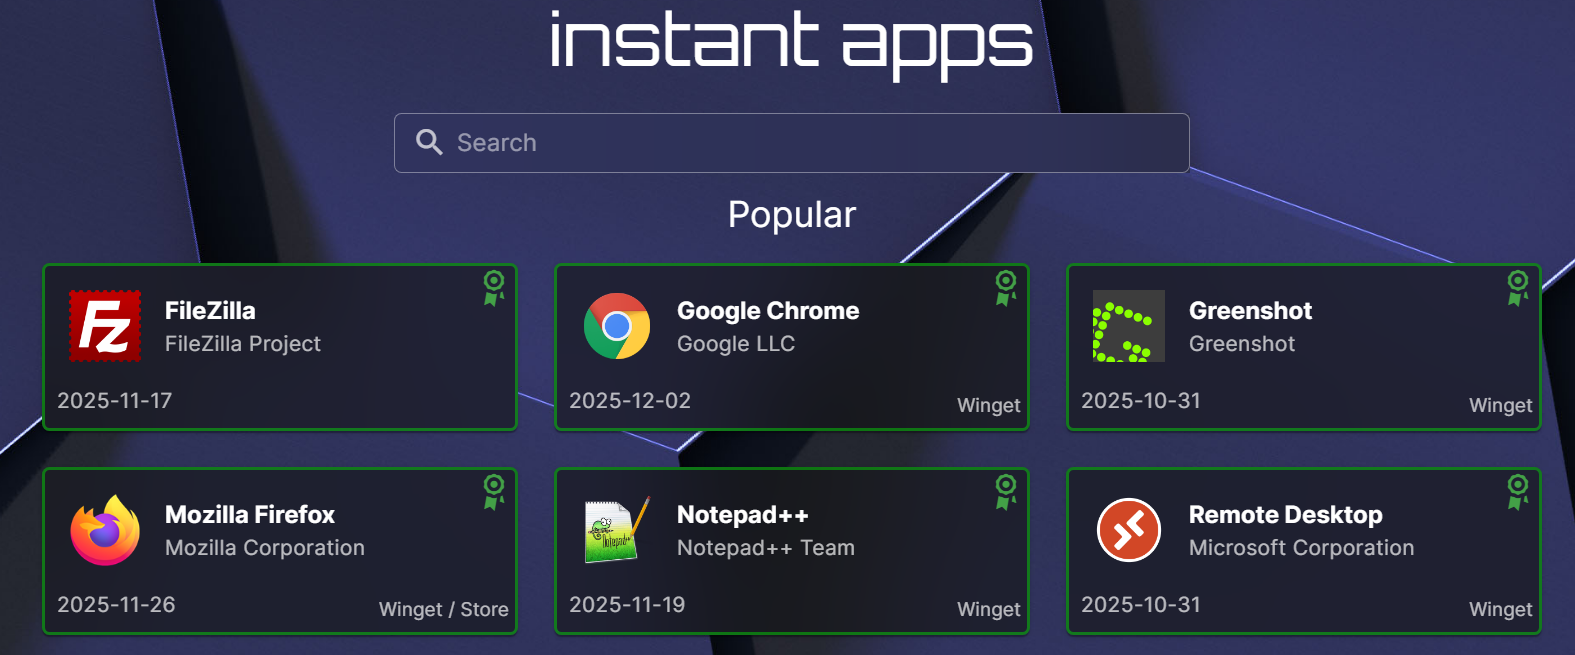
Option A – Instant App (recommended for first app)
Instant Apps are pre-packaged applications maintained by Robopack and are really easy to create. At the time of this writing, there are more than 41000 supported apps.
The complete list as of December 2025 is available here: Robopack list of 41000 available applications. If you find an unavailable app, you can request it from the Robopack dev team.
Use Instant Apps when:
- The app exists in the Robopack catalogue
- You want to create the app quickly
- You want built-in patching support
Examples:
- 7-Zip
- Google Chrome
- Adobe Reader
- Notepad++
Option B – Custom Package
Custom Packages are used when:
- The app is not in the catalogue
- You have a custom MSI or EXE
- You need scripts, transforms, or extra files
For a first test, Instant App is strongly recommended.
Robopack Application guide : Create a first application using Robopack Instant Apps
For our test, we will create Notepad++ using the built-in Robopack Instant Apps.
- On the left bar, click on Instant App
- Use the search bar or select the application you want to deploy.
- We will select Notepad++
- In the Notepad++ wizard
- Click Build Package.
Robopack Automated App Packaging create the correct format for Intune. Once ready, you can deploy the application directly from the dashboard.
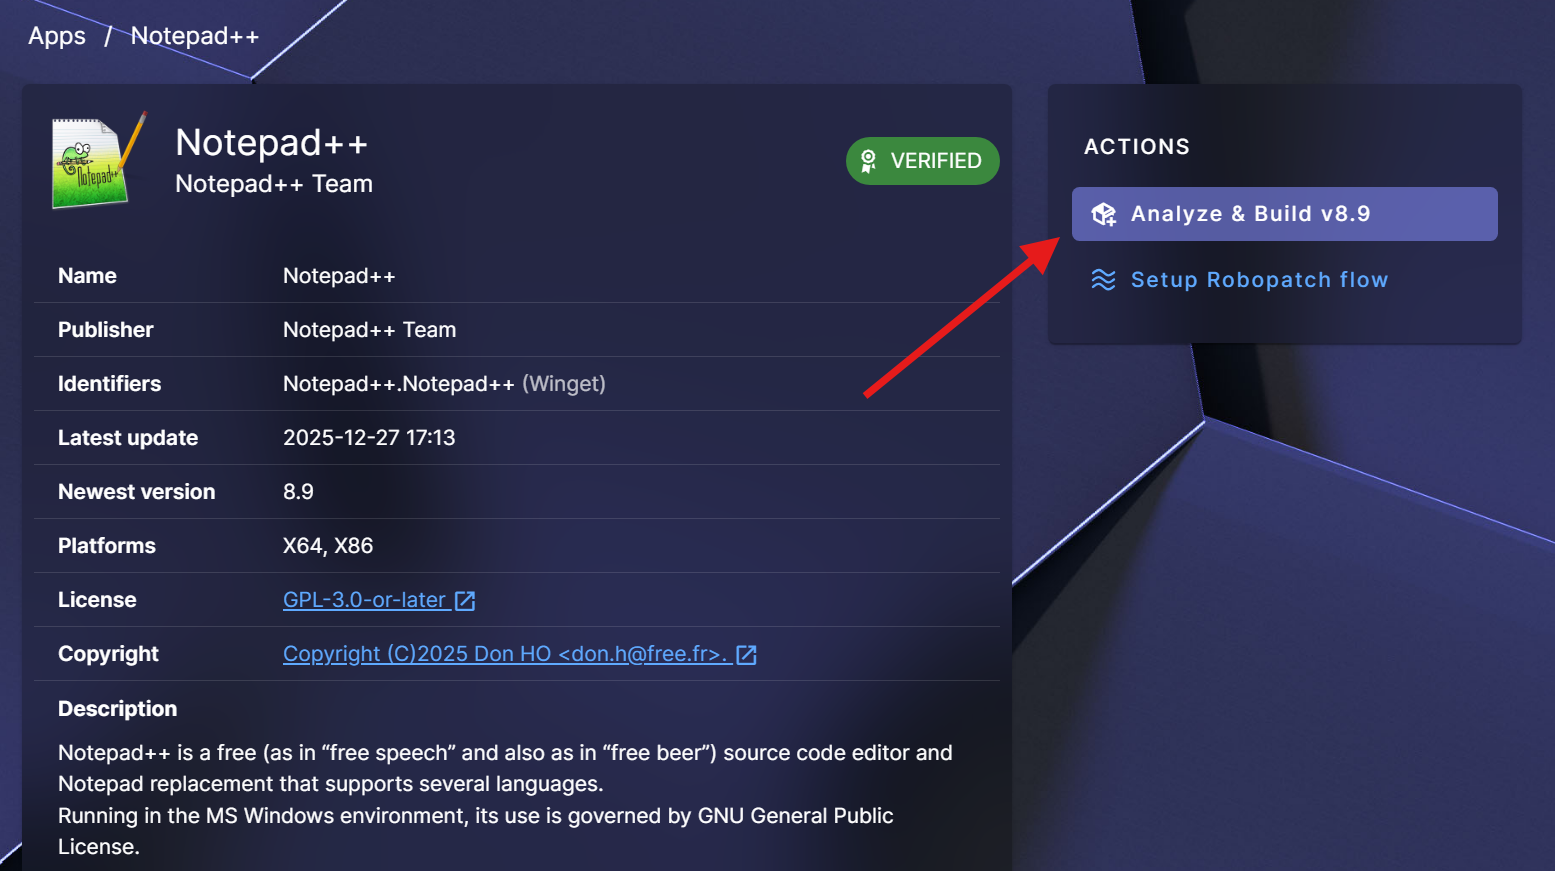
Robopack will automatically propose the latest available version of Notepad++. If you want to use an older version, use the lower part of the wizard and select your version instead of the default Analyze & Build v8.9
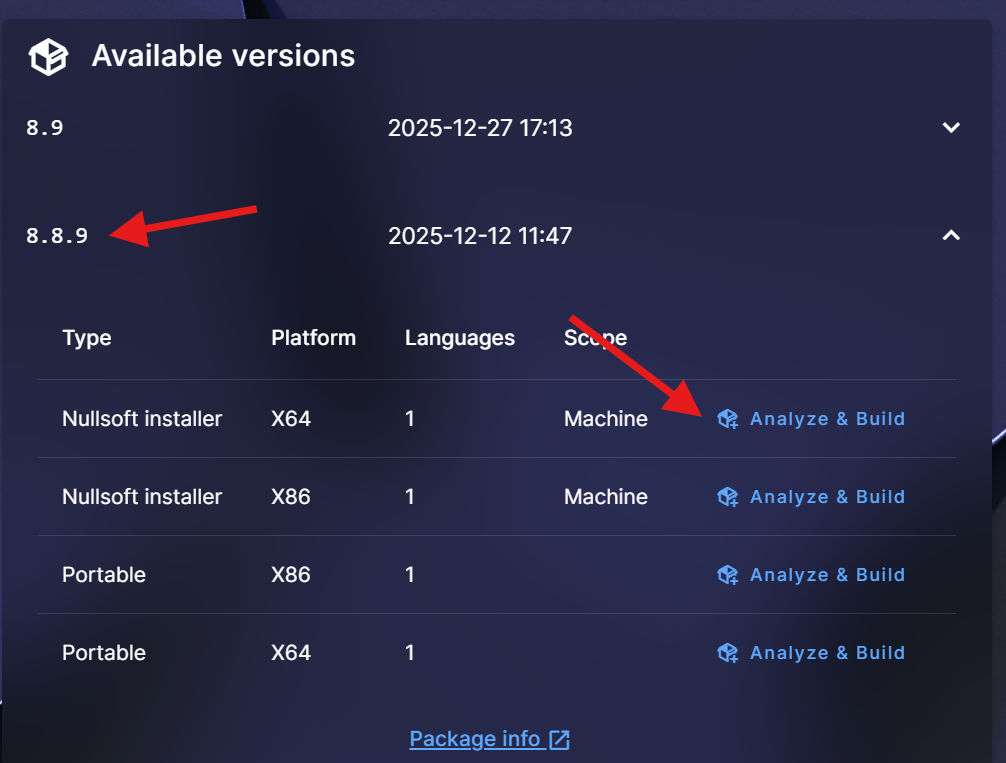
In the Analyze and build Instant App wizard :
- Select the desired platform (x86, x64)
- Define a name, publisher and version
- We will select to wrap the package with an installation script
- In the Advanced Options tab, you have a description and a developer field that you can customize. You can also select to Mark the app as featured in the Company portal.
- Click Continue

After clicking Continue, another wizard will be presented.
- We will select the Quick Import to Intune option. This will import the package to Intune immediately. If you manage multiple tenants, you can select your Tenant.
- I’m also checking the Create Deployment Assignment to create a group for deployment. You can skip this if you want to manually create those.
- When ready, click Import App

- Wait for the wizard to finish, check the progress at the bottom

- When completed, you’ll see Uploaded to Intune

Now, let’s look at the Intune side. What have Robopack created in our Tenant?
- In the Intune Tenant
- Navigate to Apps / Windows
- Our application is created and assigned to the automatically created groups

- Developper : Robopack… yes this is our app. The install command is set to the Robopack-created script.
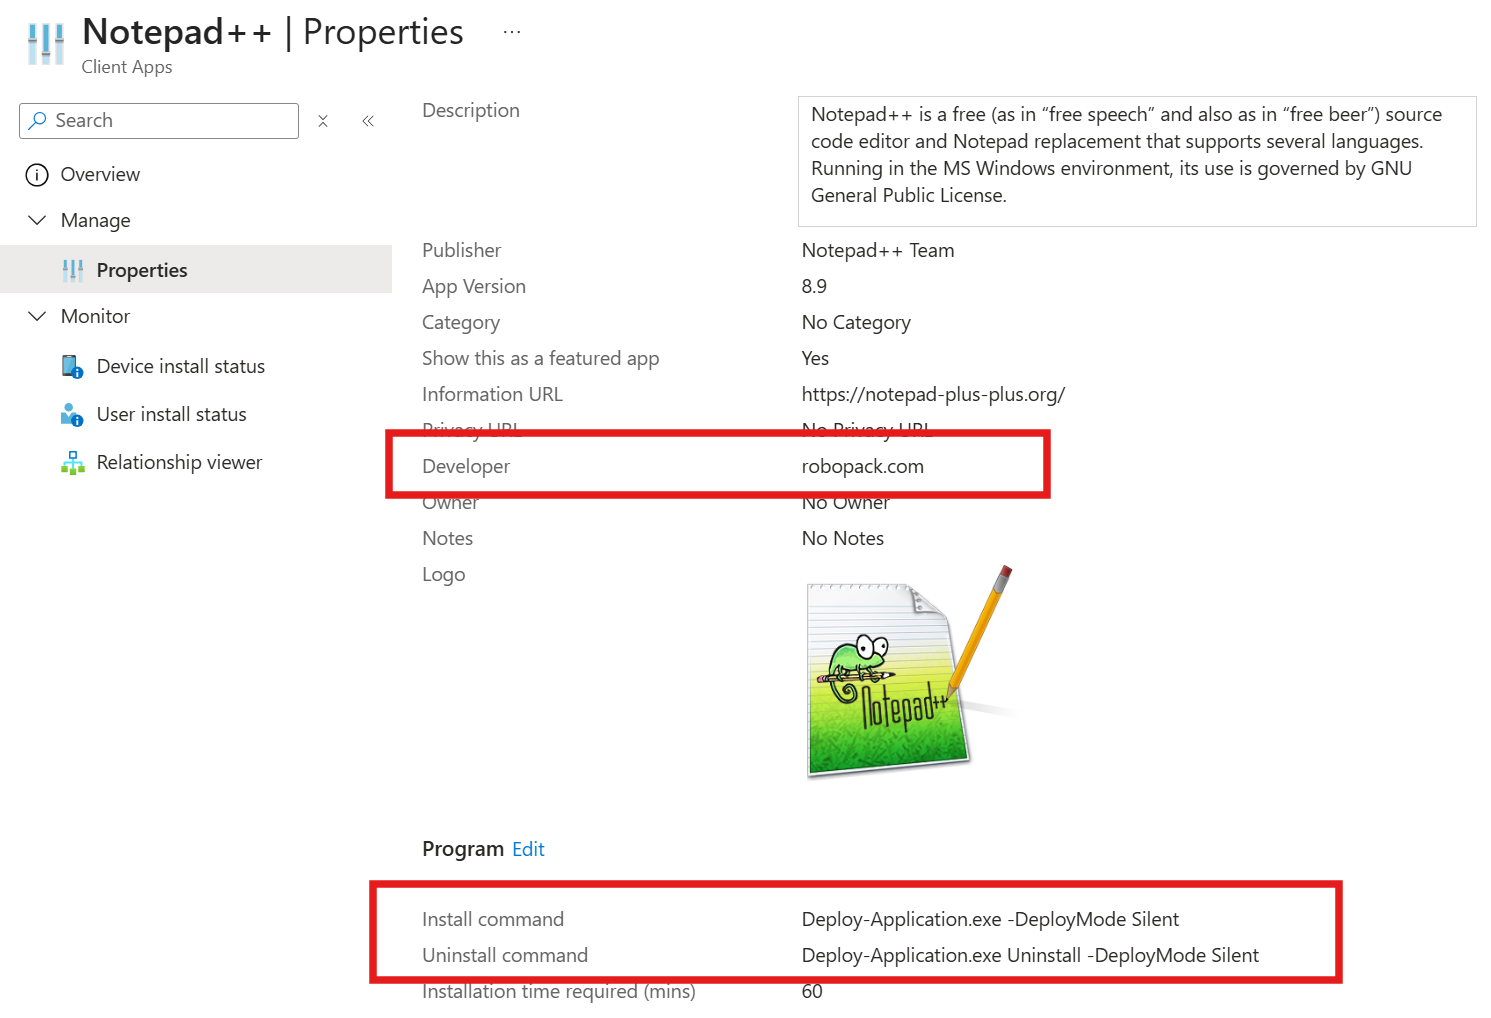
- The app is assigned to the created groups. You can add a member to one of these groups to deploy to the desired machines.
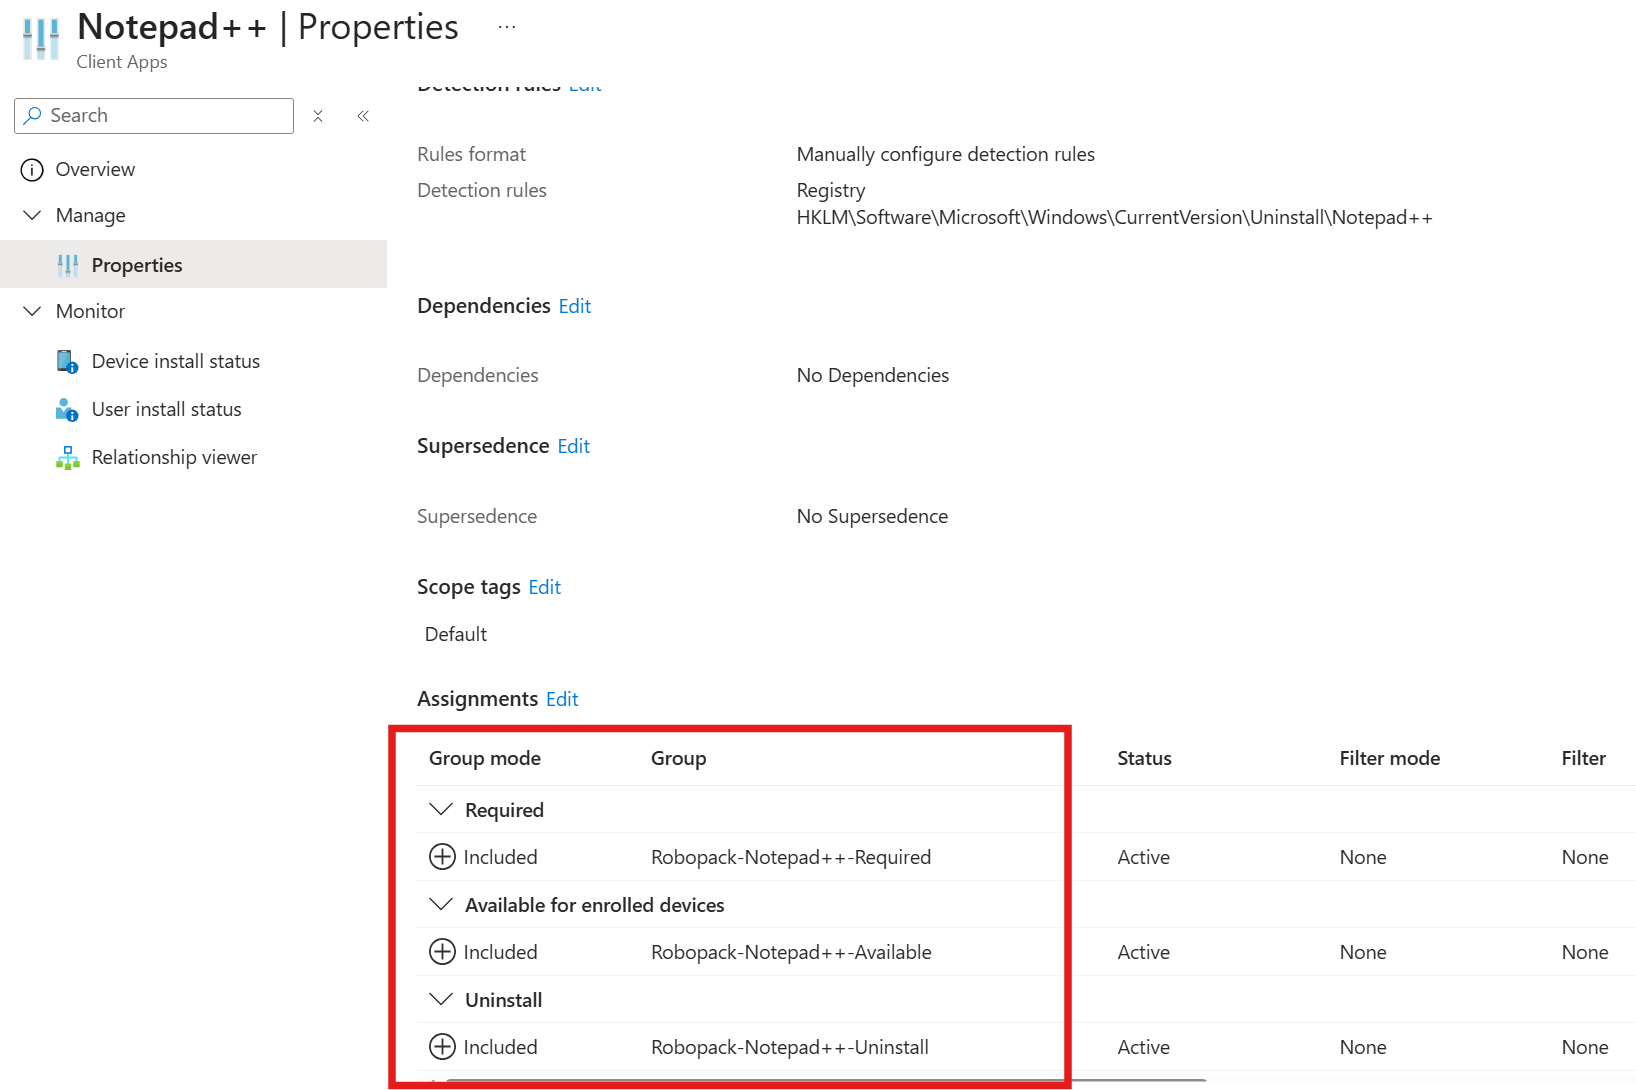
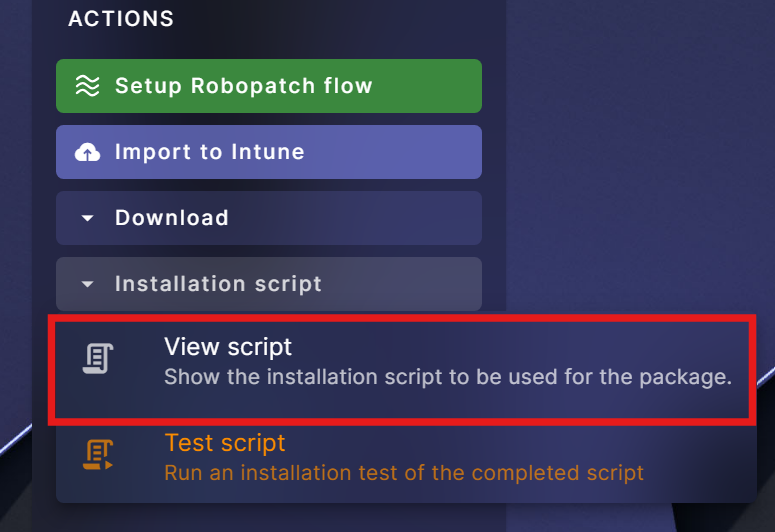
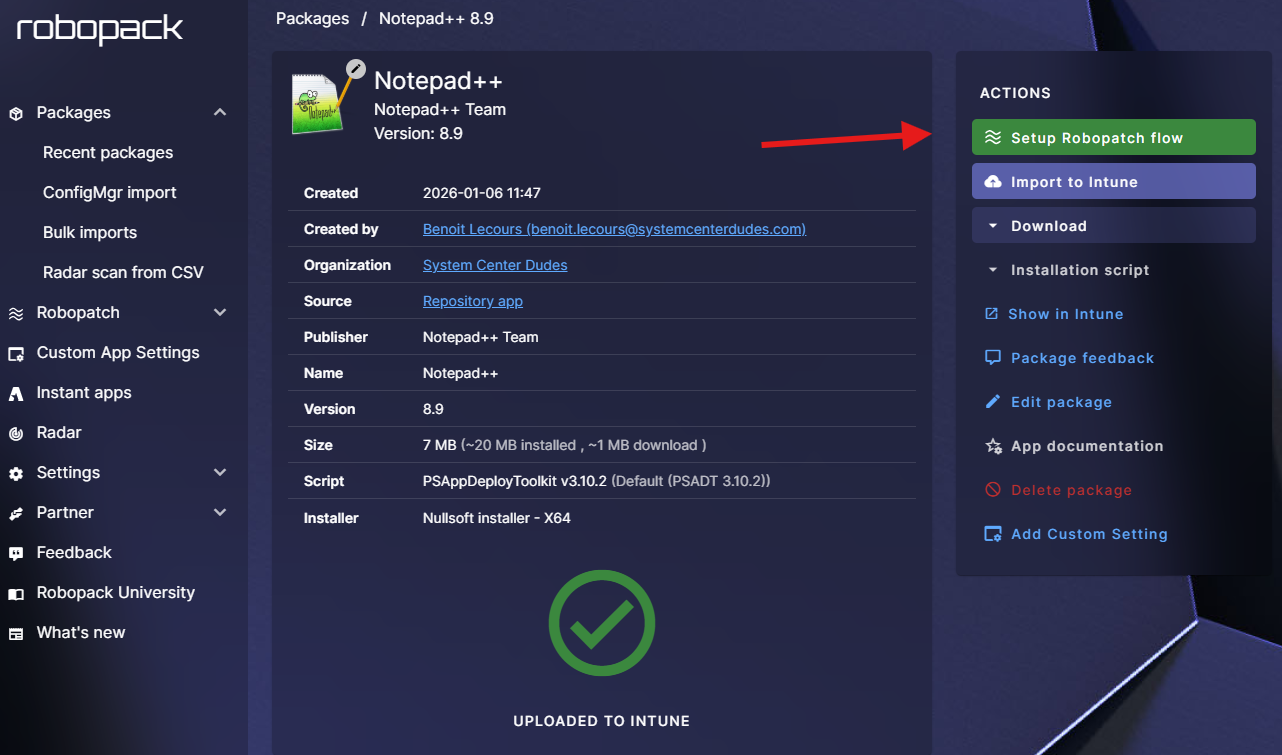
On the Robopack side, once deployed, we have new options to inspect.
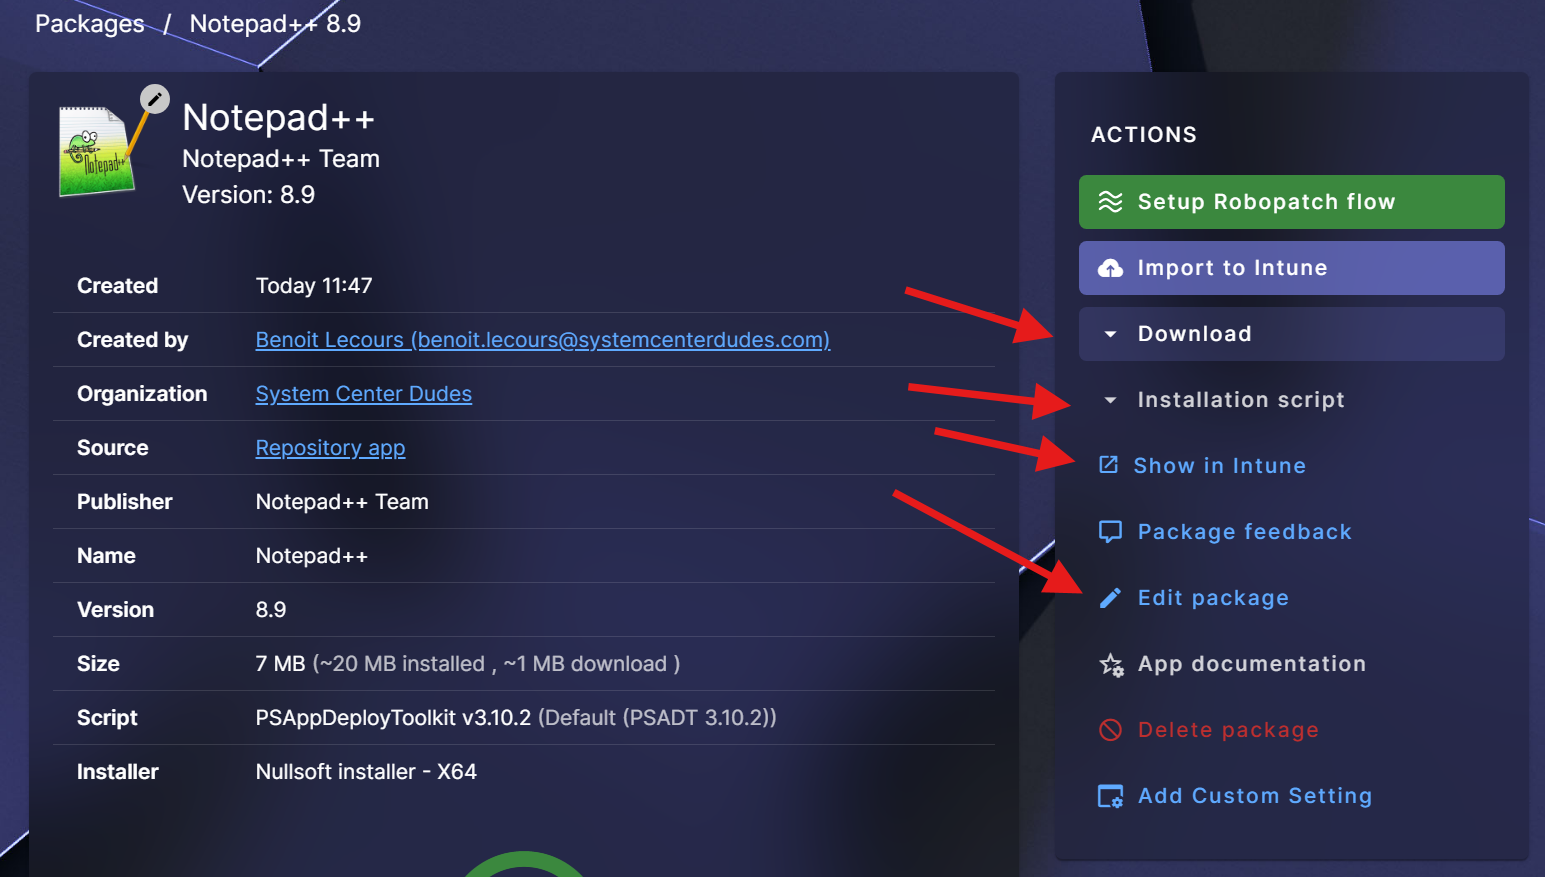
- If desired, you can look at the installation script
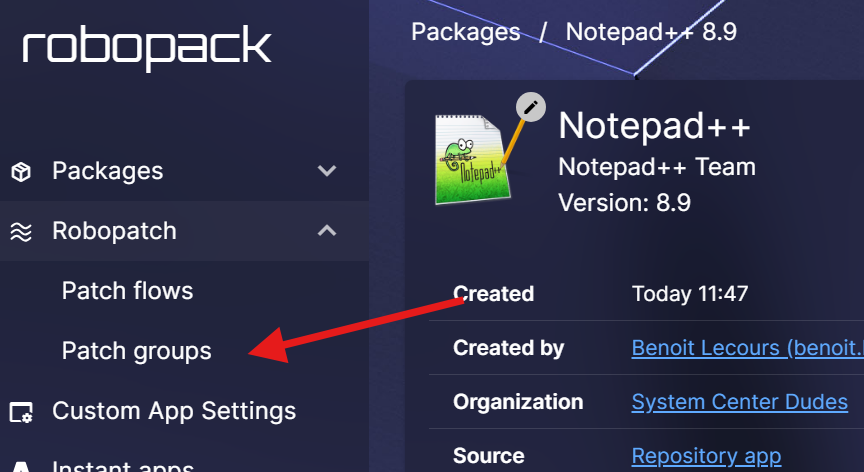
Robopack Application guide – Enable Automatic Updates – Patch Flows and Patch Groups
Now that our app is created, we need to maintain it and make sure that it’s updated.
We’ll create a new Robopatch flow for our Notepadd++ package. This will permit the creation of deployment waves, publish the app to multiple tenants, and have Robopack take care of deploying new versions. This is one of the biggest time-savers for IT teams.
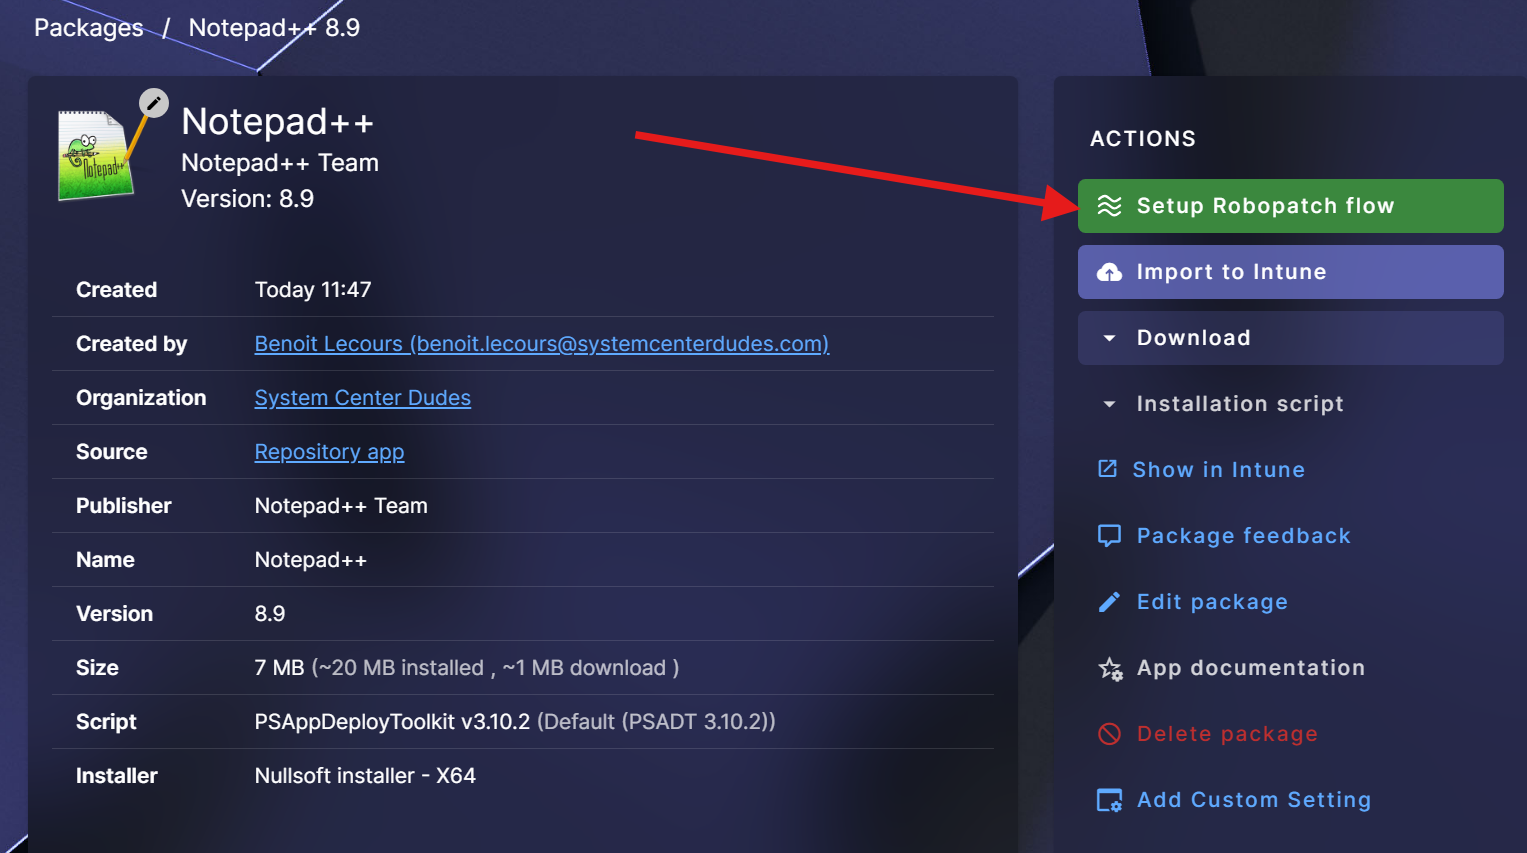
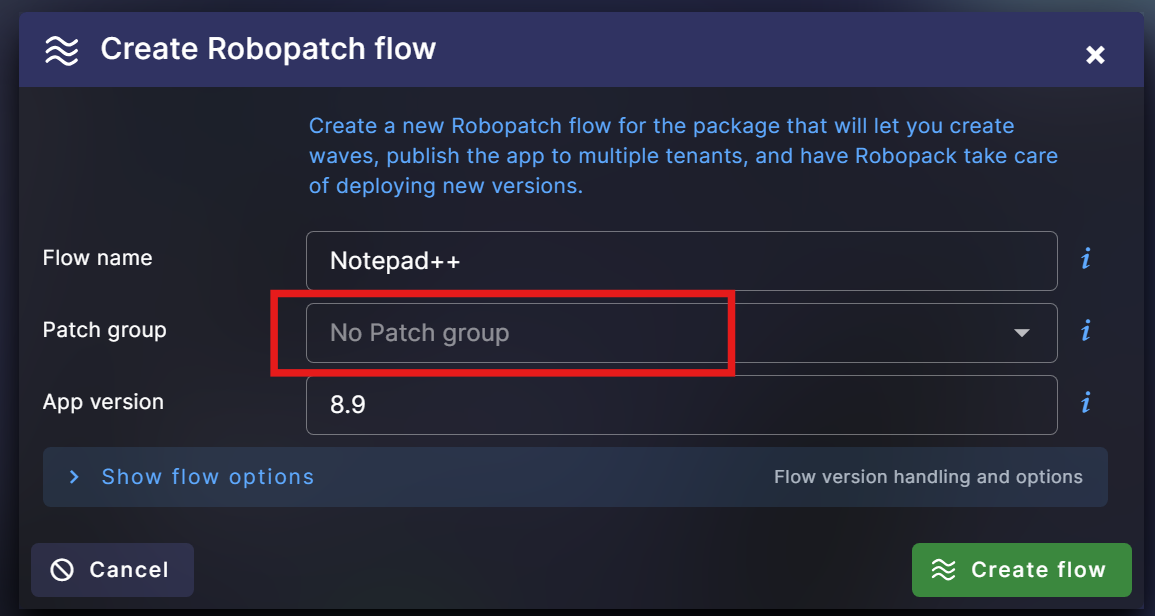
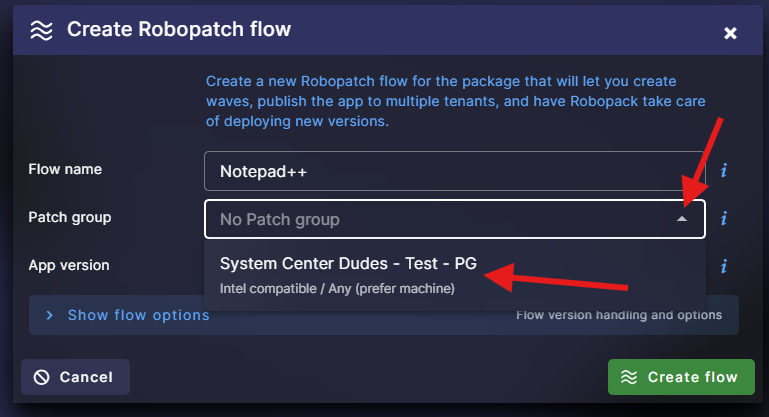
But before clicking that, we need to create a Patch Group. The Robopatch flow wizard doesn’t permit creating it there, so it must be created before.
Patch groups are used to group together a set of apps to be updated using Robopatch using a common list of waves containing targets, such as deploying the app to particular device groups or making it available to all users.
Patch Group is not mandatory; you can leave it blank if you don’t want to use it and skip the Patch Group creation part of this blog post. However, creating a Patch Group is very useful to reuse the same option without starting from scratch at each application you want to update.
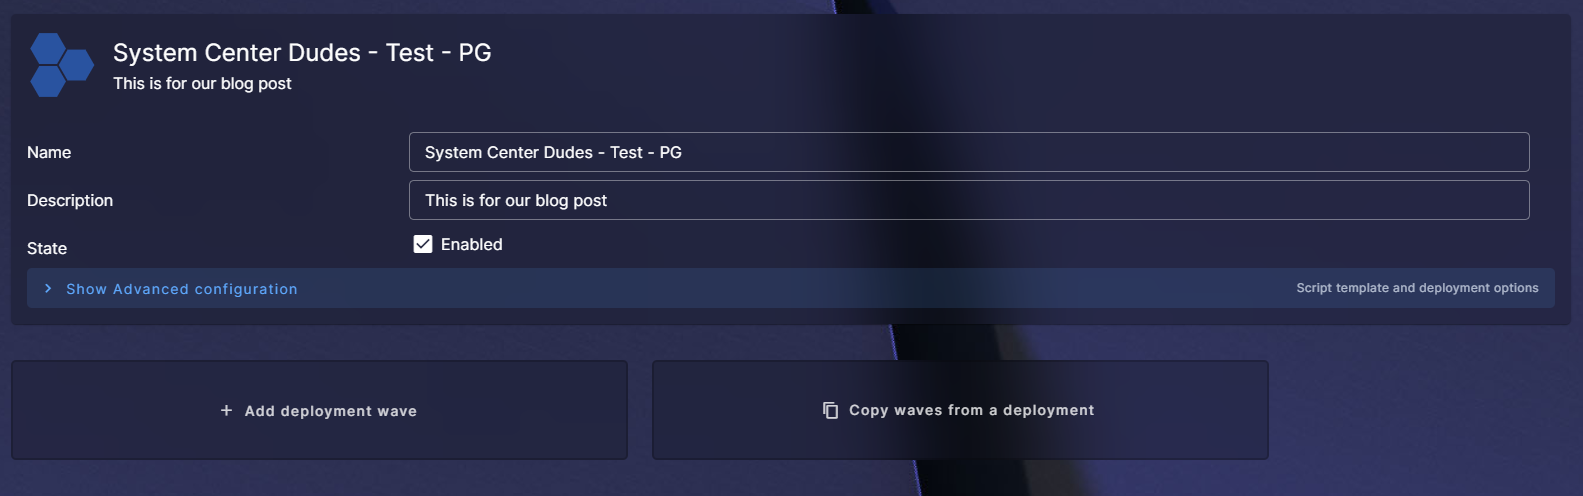
- Close the wizard and go to Robopatch / Patch Groups
- Create a new Patch Group by clicking on Add Patch Group

- We’ll name and put a description on the Patch Group
In the Show Advanced Configuration, there are lots of options to configure :
- When Start Automatically is selected, Robopack auto‑imports future versions of the application and begins the build process as soon as they’re released.
- If you have waves defined, these new versions will begin rolling out according to your wave schedules (Beta, Pilot, Production, etc.).
- Adjust other options to your preference (e.g., uninstall previous version when upgrading). If you’re not sure of an option, use the “I” at the right of each option for an explanation.
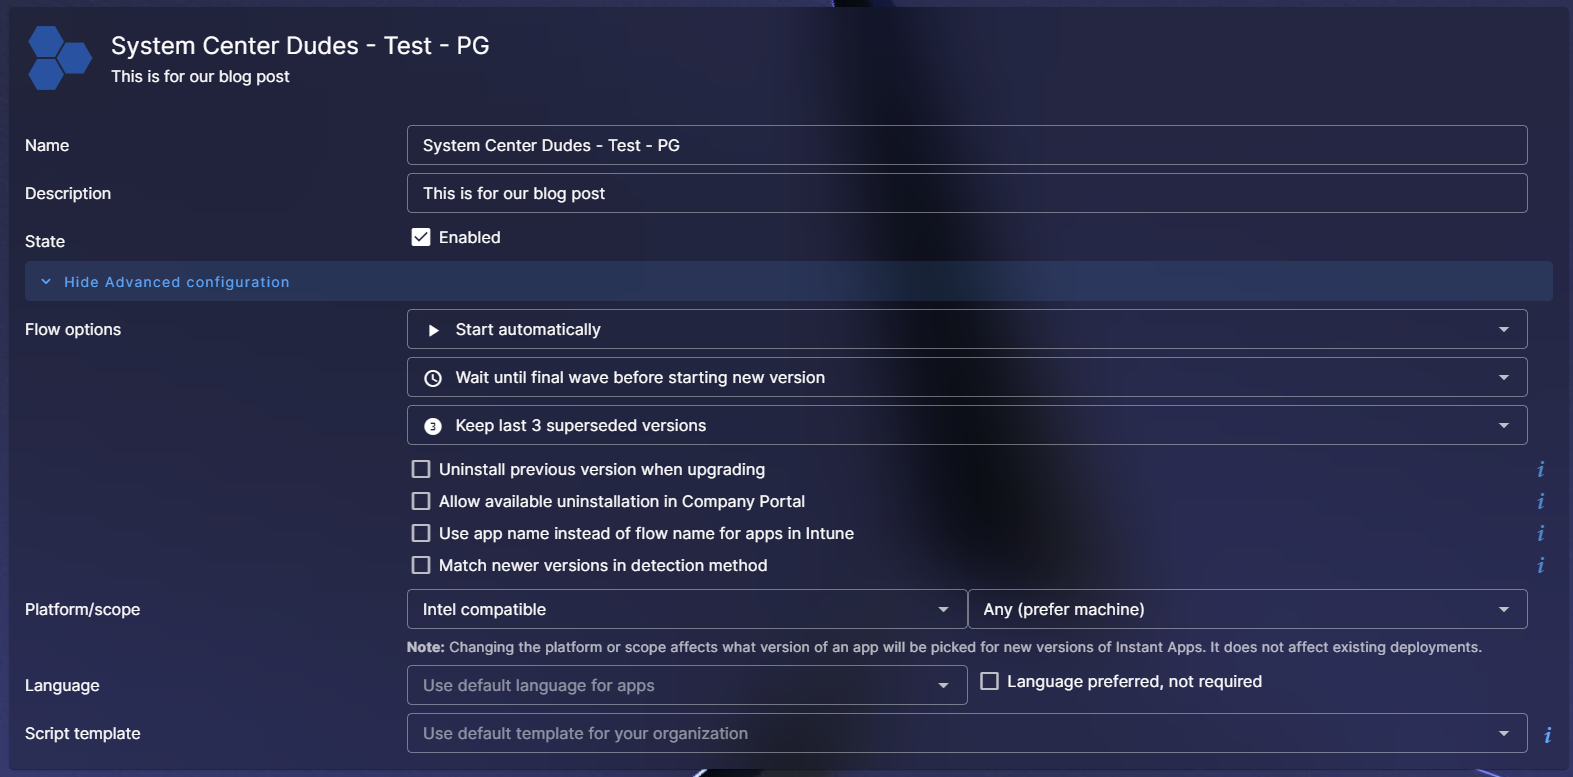
- At the bottom part, we will set up our deployment waves by clicking Add deployment wave

In each deployment wave, you can select the desired options before the next wave occurs. This is useful to deploy to a small set of devices first, a pilot group after and a full deployment to the rest of your devices at the end.
For our example, we’ll create 3 waves (Test, Pilot and Production). We’ll leave the default options, but everything is customizable
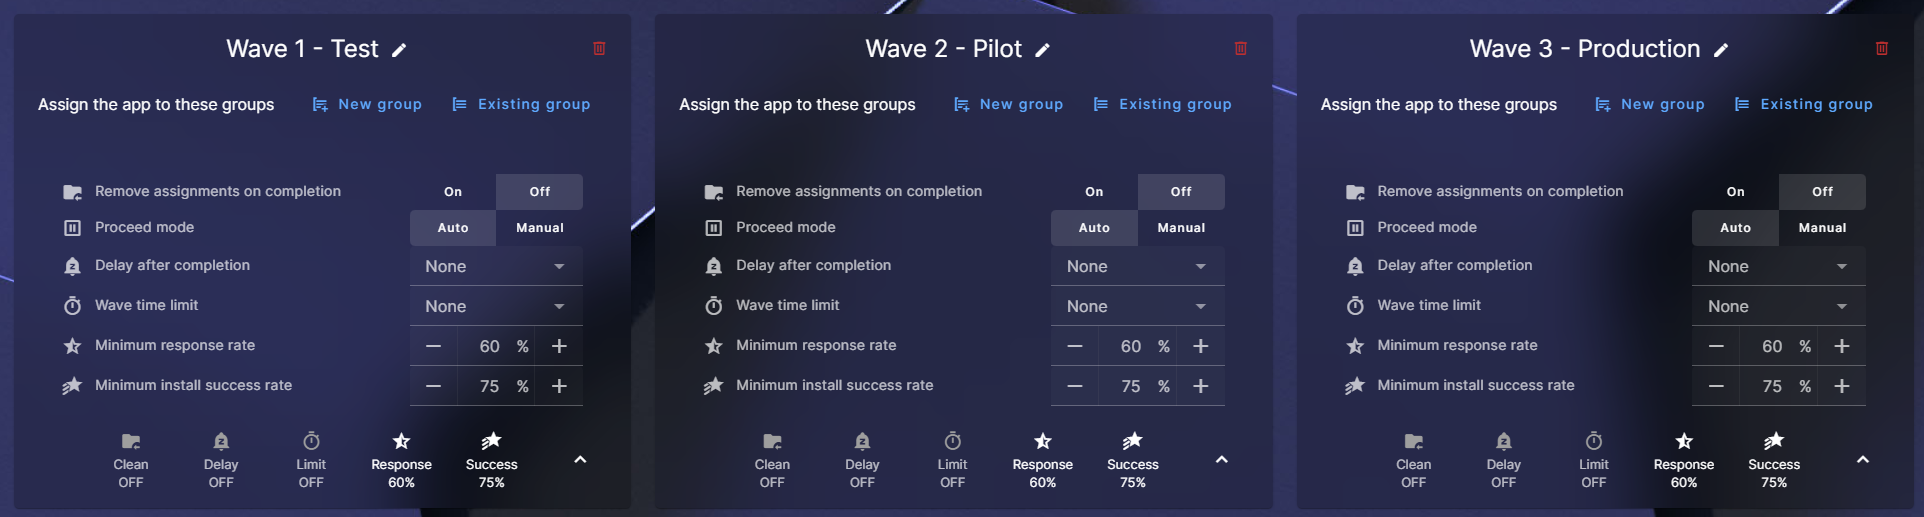
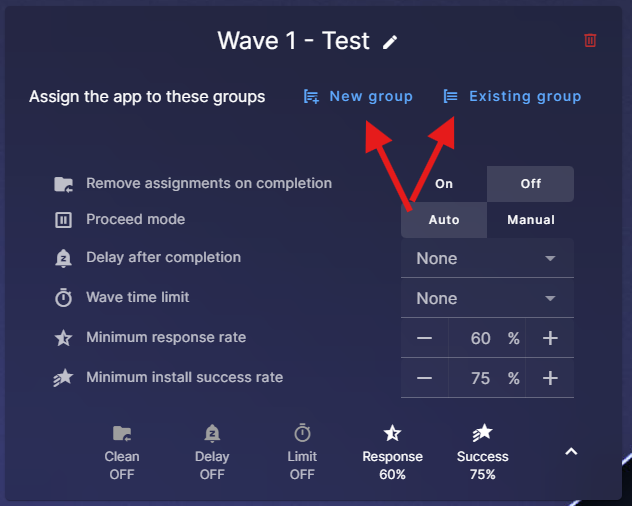
Once your option is set. You need to assign each wave to a group. You can create a new group or use an existing group :
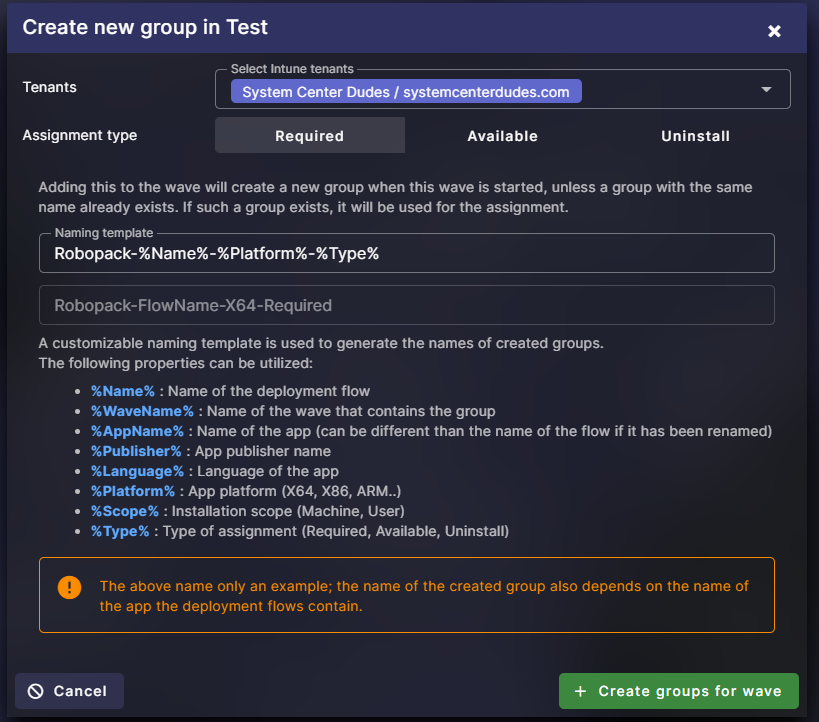
- Let’s create a new group. What’s interesting here is the use of a variable. If you’re fine with that, just use the proposed name and click Create Group for Waves when you’re ready.
Repeat the operation for all your waves. You should end up with this :

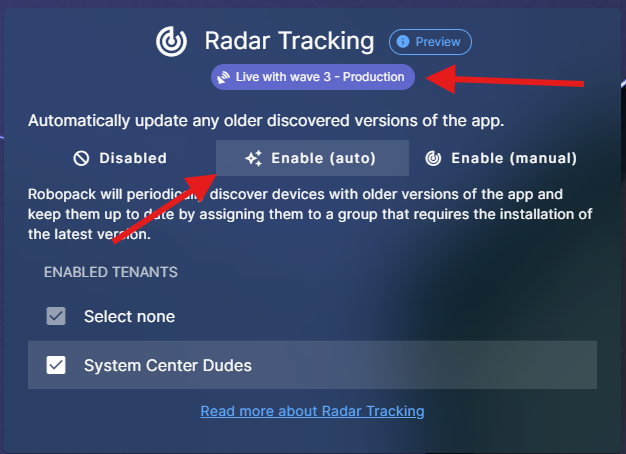
- The last option that we’ll set up is Radar Tracking.
Radar Tracking is a new automated discovery and update mechanism that extends Robopack Radar’s functionality by regularly detecting and patching manually installed software across your Intune-managed environment. With Radar Tracking enabled, you no longer need to launch manual scans or maintain static deployment groups—everything happens behind the scenes every 24 hours.
- We’ll enable the Radar tracking option
Back at the top, click Save Group
- Now, let’s go back to our Notepad++ application and assign it to the patch group that we just created :
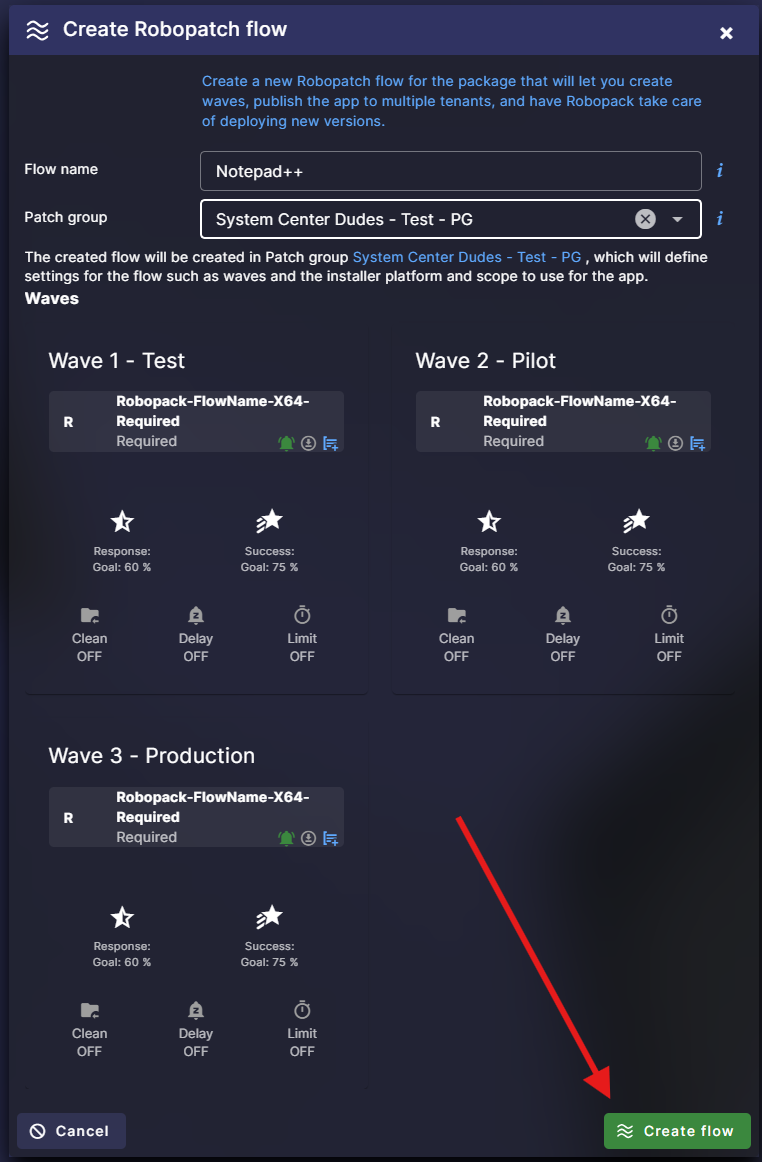
- We select our group :
- All the options are set automatically, reflecting our Patch Group. Click Create Flow at the bottom.
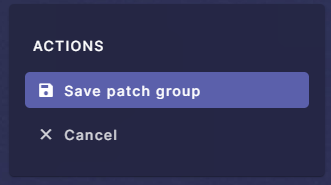
- The last set is to save our deployment
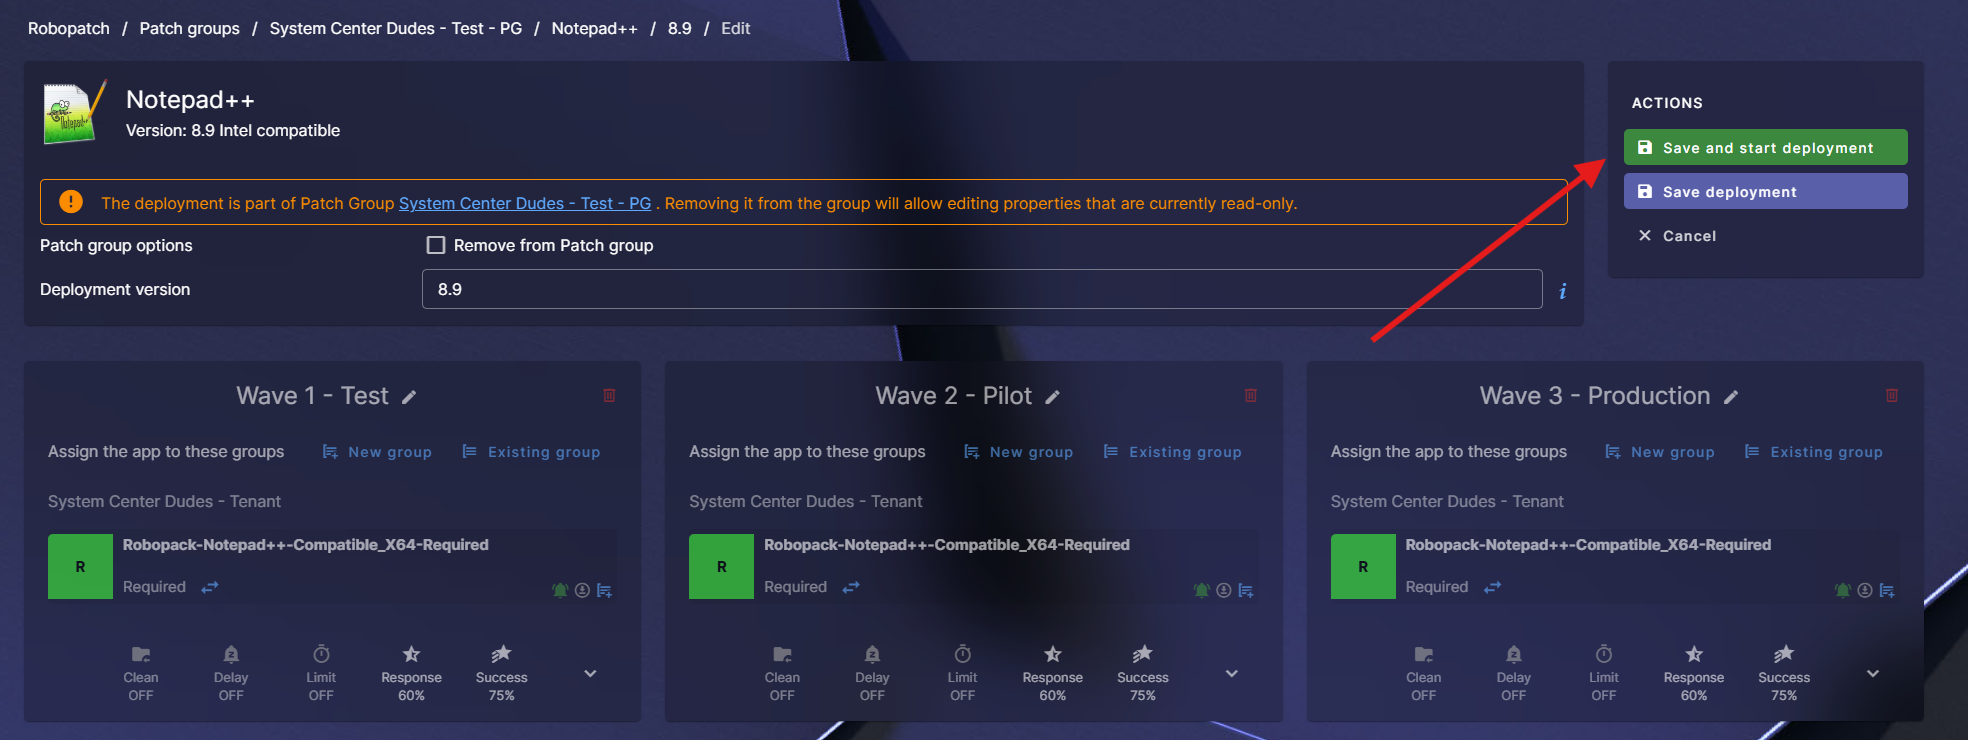
- Let’s wait for the app to be created on the Intune side
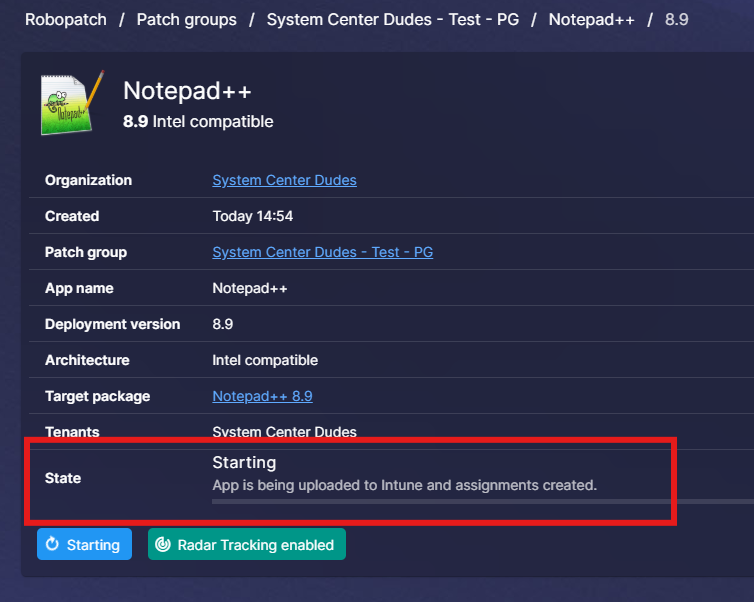
And voila ! Your first application is created and patched using Robopack !

- You can now import more apps and use the same Patch group. Just click on the Add Instant App
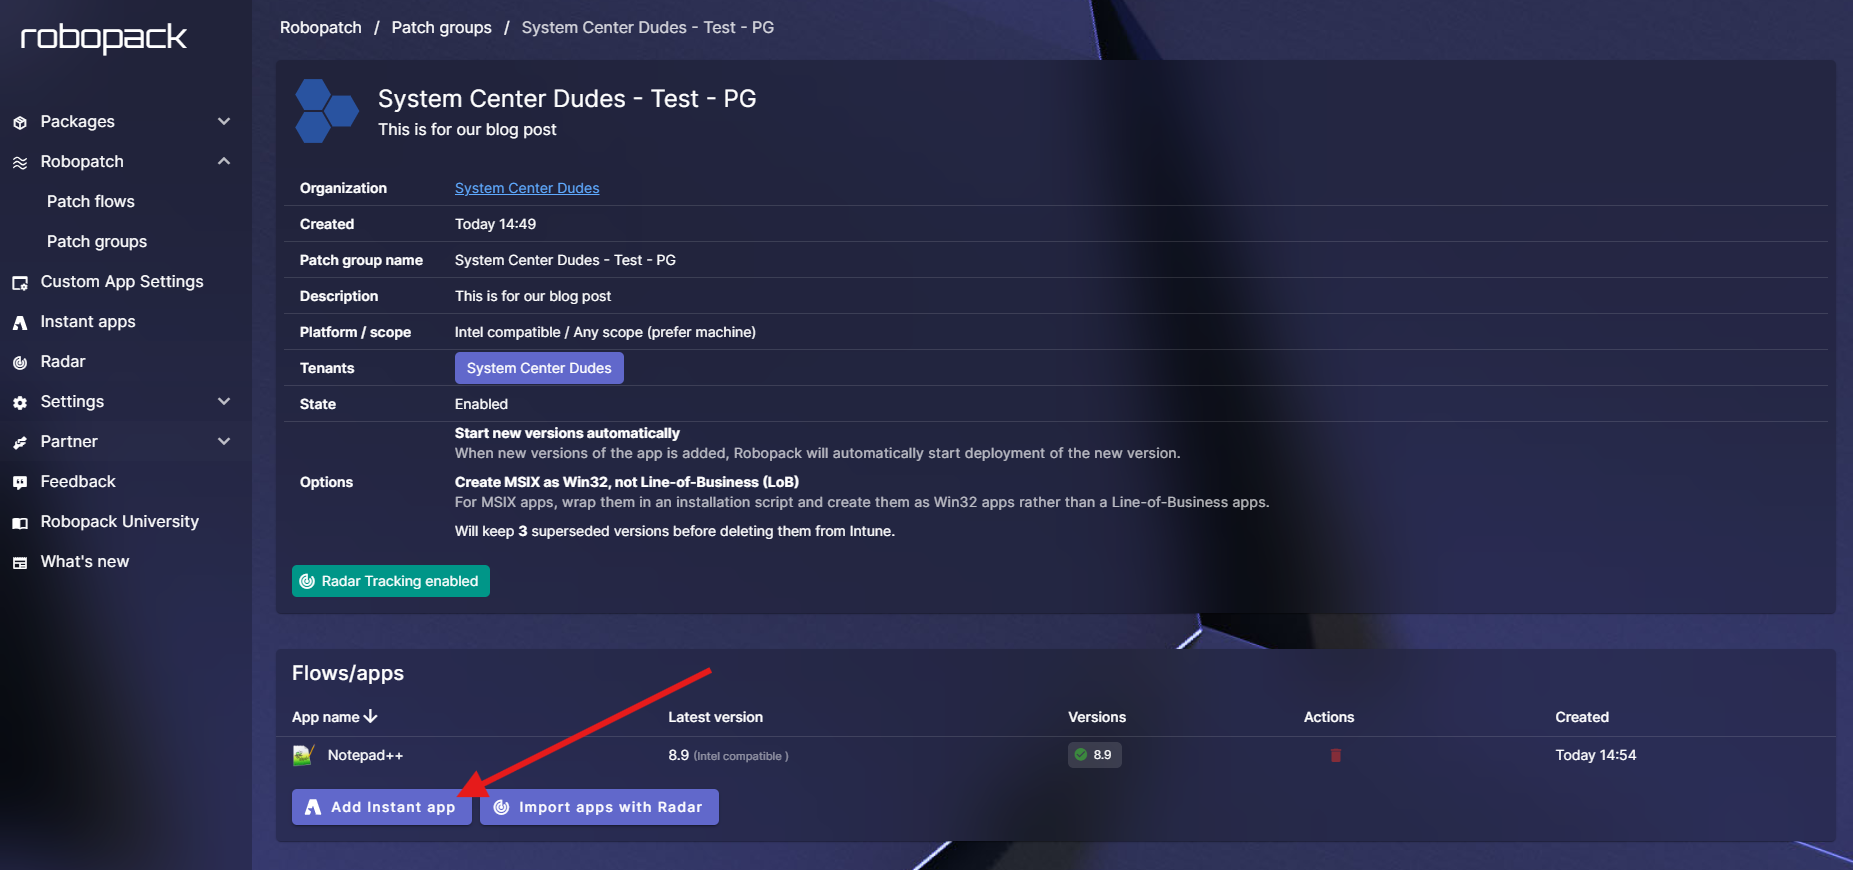
- 2 clicks later, your new application will appear (I added Filezilla)

Monitoring and Managing Versions
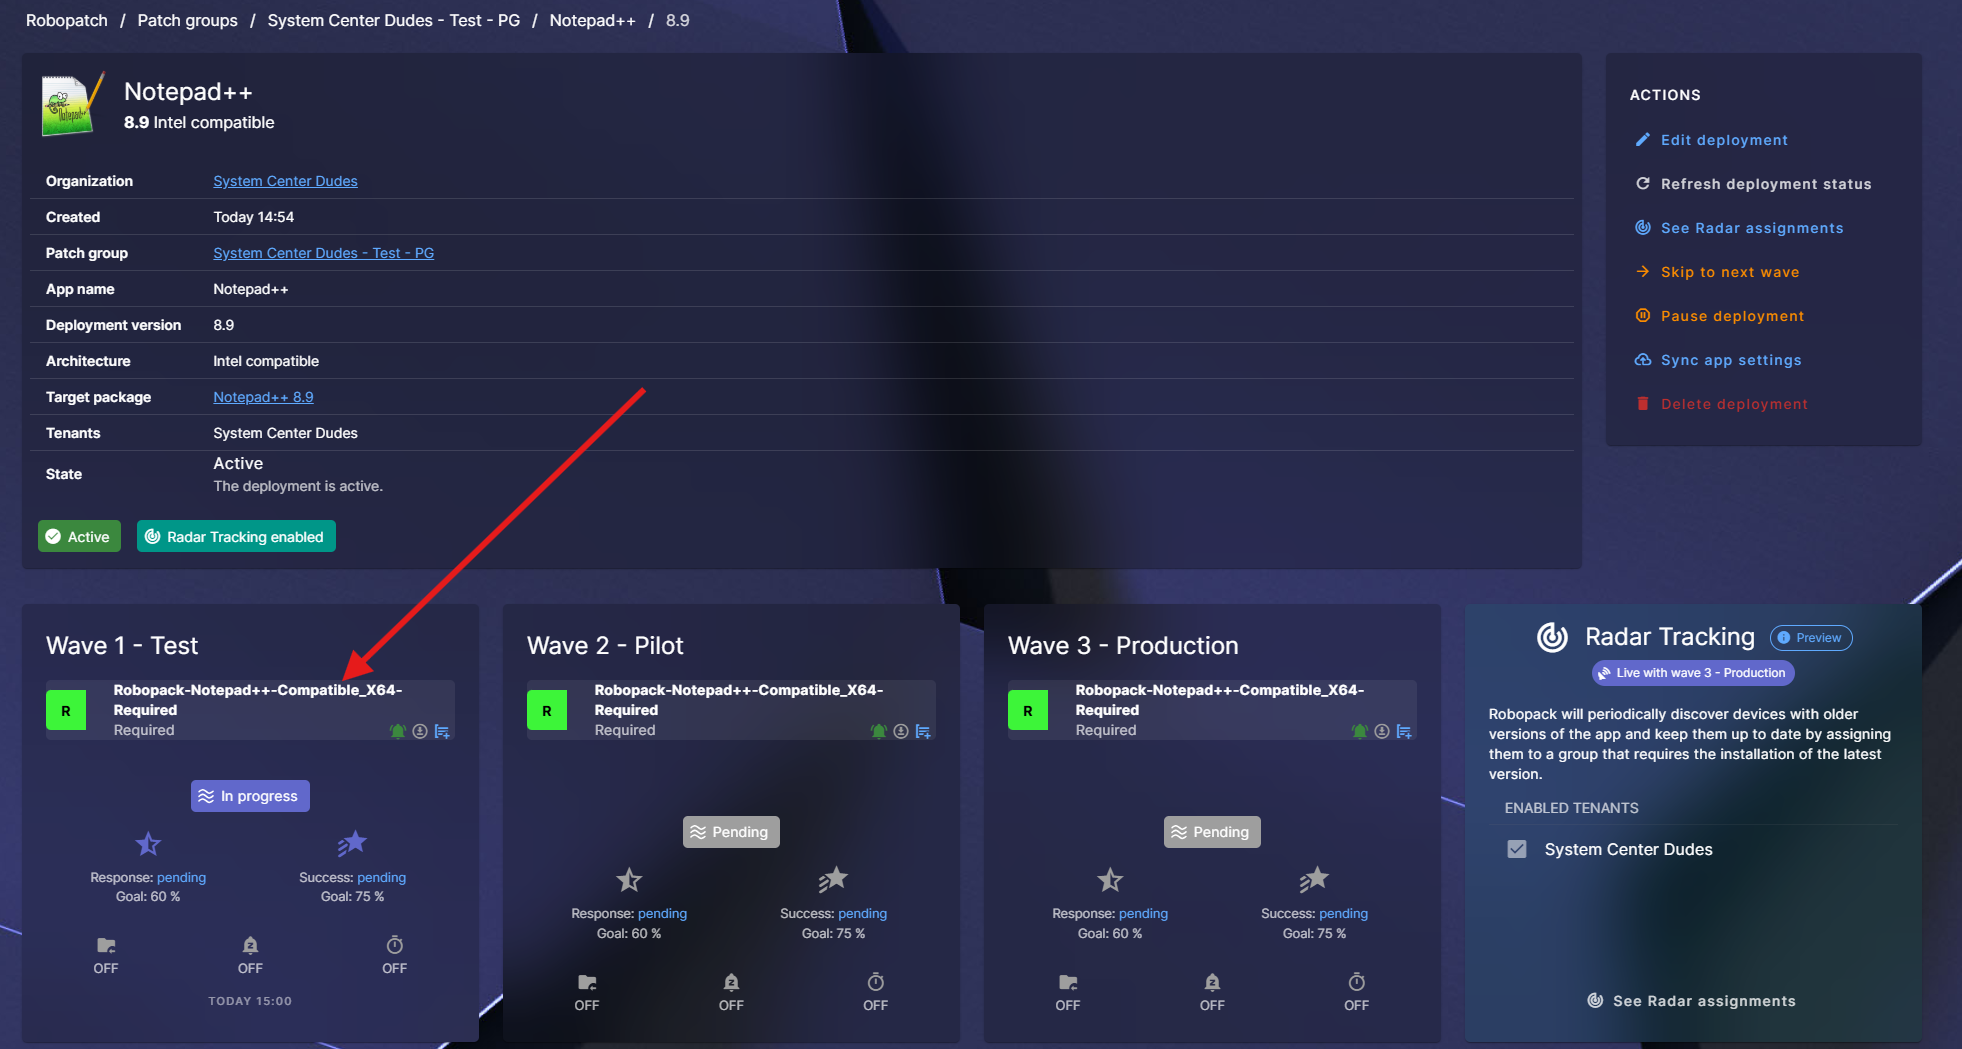
Once your Robopatch flow is created, you can monitor and manage your flow from the Robopatch / Patch Flow menu

You can drill down by clicking on an application and then on a version

Once in your app version, you can see the deployment details of each wave by clicking on the desired wave

We hope that our Robopack Application guide covers the main concepts and that you realize that Robopack is a game-changer when it comes to managing your third-party applications. With Instant Apps, Radar and Patch Flow, your application management has just become easier.
If you’re interested in going forward, we are an official reseller and can make you save up to 40% on the retail price. Just fill the form below to receive a quote or visit our Robopack reseller page.
Request a Robopack or Tenant Manager Demo/Quote/Trial
Typical Robopack licensing starts at 1000$ per year depending on environment size.
Share
Get the latest insights and exclusive content delivered to your inbox


Only authorized users can leave comments
Log In