This blog post will describe how to Deploy Office 2016 using SCCM 2012. This procedure is for the Office 2016 Click-to-Run version (Microsoft Office 365 ProPlus) not for the complete Office 2016 Professional Plus version. It will guide you in every steps required to deploy Office 2016 to your users.

The mains steps are :

  • Preparing the installation
  • Create the SCCM application
  • Create the deployment type
  • Deploy the application

Step 1 | Preparing Office 2016 installation

The first step is to create a Download.xml file that we’ll use to download the latest version of Office 365 Pro Plus (2016). Read the Reference for Click-to-Run xml file to know more about the available options.

sccm 2012 Office 2016 deployment

  • Extract the files to a drive on your computer

sccm 2012 Office 2016 deployment

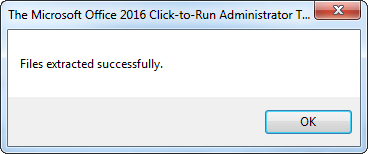
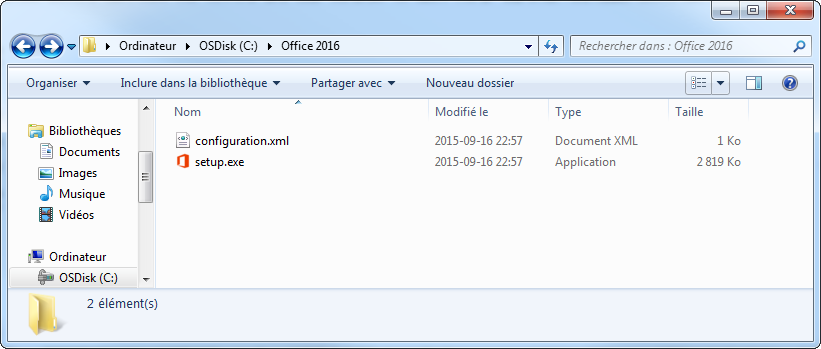
  • You’ll end up with 2 files (Setup.exe and Configuration.xml)

sccm 2012 Office 2016 deployment

Create a Download.xml file and copy this content :

<Configuration>
<Add SourcePath=”C:\Office 2016″ OfficeClientEdition=”32″ >
<Product ID=”O365ProPlusRetail”>
<Language ID=”en-us” />
<Language ID=”fr-fr” />
</Product>
</Add>
</Configuration>

  • In our example, we are downloading the 32 bit version in the C:\Office 2016 directory and add the English and French language
  • Change the SourcePath and OfficeClientEdition if desired
  • You can also add a additional language if needed by modifying/adding more language in <Language ID=”xx-xx” />
  • Save the Download.xml file in the same directory as Setup.exe

Modify the Configuration.xml file that are used when deploying Office 2016

  • Open the Configuration.xml file and modify it to reflect this :

<Configuration>
<Add OfficeClientEdition=”32″ >
<Product ID=”O365ProPlusRetail”>
<Language ID=”en-us” />
<Language ID=”fr-fr” />
</Product>
</Add>
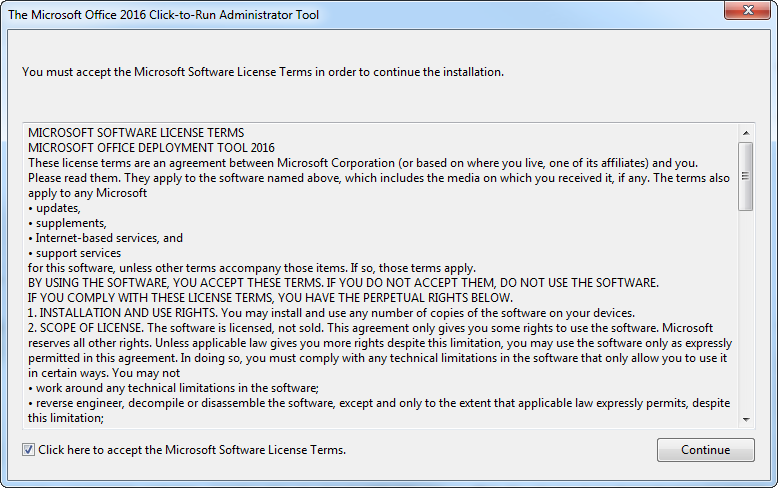
<Display Level=”None” AcceptEULA=”TRUE” />
</Configuration>

It’s important that you don’t include the SourcePath attribute in the Add section of your Configuration.xml file. That’s because SCCM copies the installation files for an application into a folder under the SCCM client cache folder, and the name of that subfolder is different for each computer. The DisplayLevel and AcceptEULA parameters ensure that our installation is silent.

Once the 2 files are created, we can launch the download using our Download.xml file :

  • Open a command prompt and naviguate to your folder
  • Execute : Setup.exe /download Download.xml

sccm 2012 Office 2016 deployment

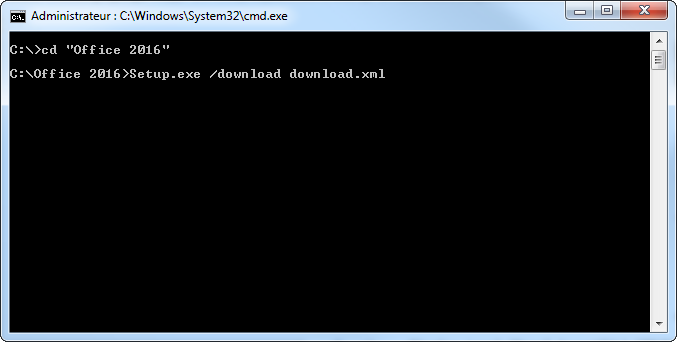
The download starts silently, you’ll see an Office folder appear in your Office 2016 directory. The folder is 1.25GB so it will take some time to complete depending of your download speed. You won’t have a notification when it completes.

If the directory was created outside your SCCM source directory, move it to it’s definitive location before creating the application

Step 2 | Create the Office 2016 Application

  • Open the SCCM console
  • Go to Software Library / Application Management / Applications
  • Right-click Applications and choose Create Application
  • On the General tab of the Create Application Wizard, select Manually specify the application information, choose Next
  • On the General information tab, enter a name for the application, enter any optional information, choose Next

sccm 2012 Office 2016 deployment

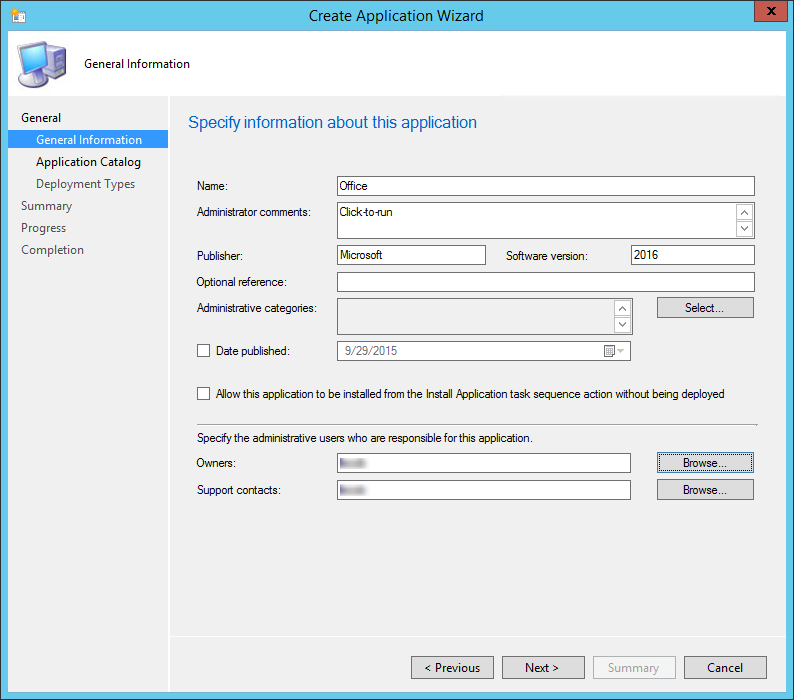
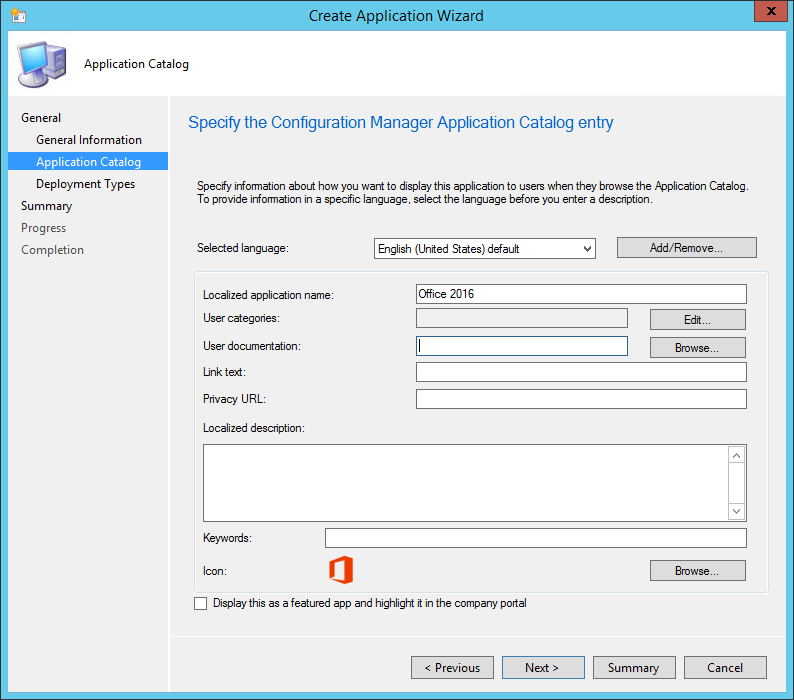
  • On the Application Catalog tab, provide the information that’s appropriate for your environment, choose Next

sccm 2012 Office 2016 deployment

  • On the Deployment Types tab, choose Next. We’ll add a deployment type later
  • On the Summary tab, review the settings you’ve chosen, choose Next
  • Complete the wizard by selecting Close

Step 3 | Create Office 2016 deployment type

  • Open the SCCM console
  • Go to Software Library / Application Management / Applications
  • Right-click the Office 2016 application and choose Create Deployment Type
  • On the General tab of the Create Deployment Type Wizard, in the Type list, select Script Installer, choose Next
  • On the General Information tab , enter a name for the deployment type, enter any optional information, and then choose Next
  • On the Content tab , do the following :
    • In the Content location box, enter the network share where you put the Office Deployment Tool, your Configuration.xml file, and the Office 365 ProPlus installation files that you downloaded from the Internet
    • In the Installation program box, enter the following text: Setup.exe /configure Configuration.xml

sccm 2012 Office 2016 deployment

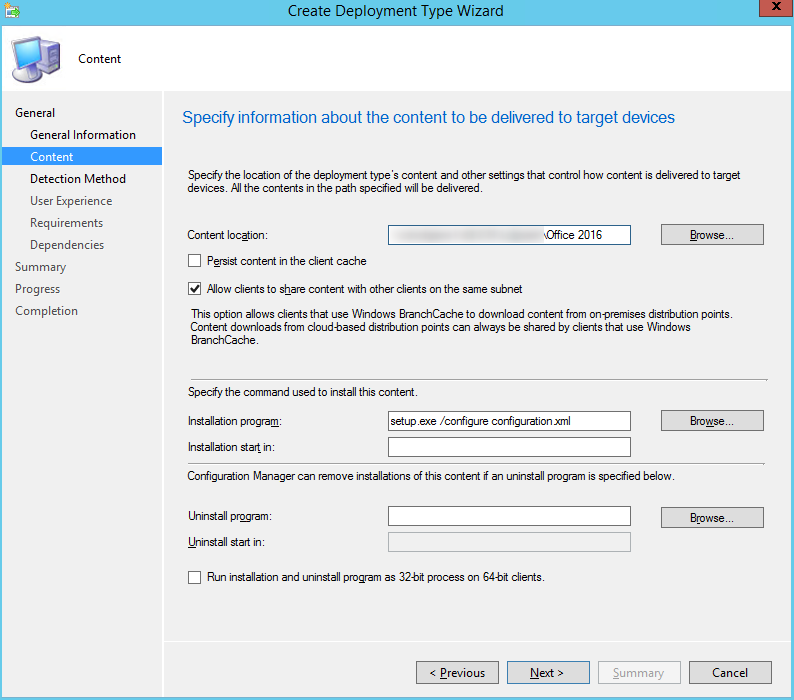
  • After you enter this information, choose Next
  • On the Detection Method tab , choose Add Clause
    • In the Detection Rule dialog box, do the following :
      • In the Setting Type list, select Windows Installer
      • In the Product Code box, enter {90160000-008F-0000-1000-0000000FF1CE}

7474 (14)

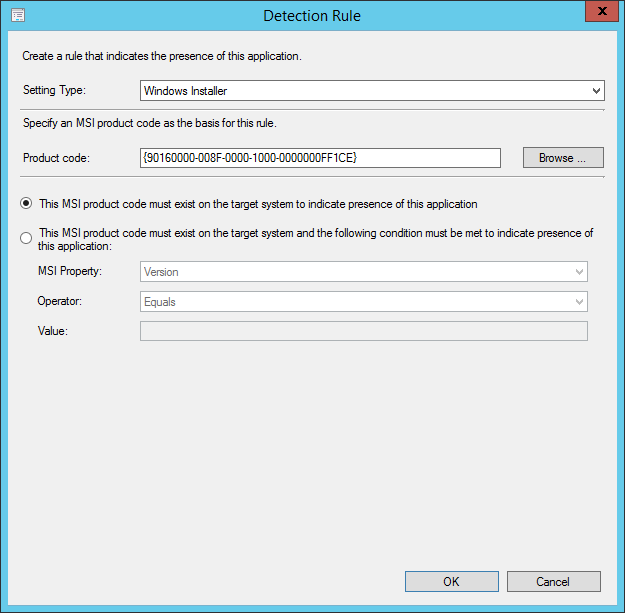
  • After you enter this information, choose OK, and then choose Next
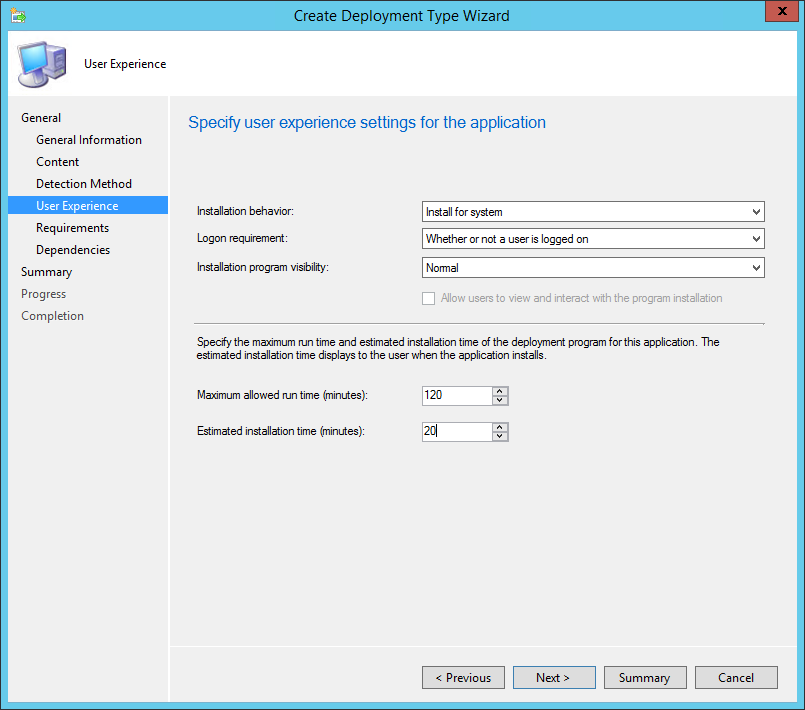
  • On the User Experience page, in the Installation behavior list, select Install for system, and then choose Next

sccm 2012 Office 2016 deployment

  • If you want to specify any requirements or dependencies for the deployment type, choose Next to go through those pages in the wizard. Otherwise, choose Summary
  • Complete the wizard by selecting Close

The only step left is to distribute the content to your distribution points and create the deployment.

Bonus information

There is a new set of Administrative Template files (ADMX/ADML) for Group Policy settings. You can download the Administrative Template files using this Microsoft Download Center link.

All Group Policy settings for Office 2016 are  located in HKEY_LOCAL_MACHINE\SOFTWARE\Policies\Microsoft\Office\16.0 and HKEY_CURRENT_USER\SOFTWARE\Policies\Microsoft\Office\16.0


Comments (62)

Santrhosh

09.14.2016 AT 11:34 PM
When ever i run Setup.exe /download Download.xml I get error to check internet connection and the disk free space. Please help

Andrew

01.05.2017 AT 11:57 PM
This happens to me too. Plenty of space and nothing wrong with network - I just downloaded the setup exe ffs

Andrew

01.06.2017 AT 12:02 AM
Alright I figured this out. If you just copy/pasted the download.xml code from this page into notepad++, you need to delete all the quotation marks and type them back in - for some reason the quotation mark characters on this page are different and it makes the setup exe bomb.

Jonathan Lefebvre

09.15.2016 AT 08:25 AM
Hi Santrhosh, I presume that you validated both and both are ok, right? copy/Past the information from your Download.xml. Might be a mistake there. Jonathan

Jack

09.07.2016 AT 09:09 AM
Hey guys- I'm stuck at the last part where I create a deployment. I would like to have this pushed out like a task sequence as I did with Win10 upgrades. Can someone help me with this please or the proper way to get this out to my users? Thanks

Jonathan Lefebvre

09.15.2016 AT 08:51 AM
Hi Jack, Installing Office is a one step installation. Not sure why you would want to use a Task sequence to install it. Jonathan

Henri

07.01.2016 AT 07:44 AM
Sorry can't edit my reply

Henri

07.01.2016 AT 07:33 AM

Henri

07.01.2016 AT 07:29 AM
Guys There is a small error in configuration file and download file it should look like this to work Download.xml ---------------------- Configuration ---------------------

Herb Munich

06.09.2016 AT 02:22 PM
I can't get the O365 app to install via Task Sequence but it will install if I deploy it via Software Center. Any ideas?

GQ

07.05.2016 AT 02:06 PM
I had the same issue. You are most likely adding it as a package to the task sequence. My fix was to add it as an application to the task sequence. Good luck.

Albert

06.07.2016 AT 02:37 PM
Thank you for this tutorial. I'm able to deploy the Office via the Software Center however, when I deploy the app though a task sequence it fails. Do you have any ideas why?

Daniel Damian

05.10.2016 AT 10:30 AM
Hello, anyone familiar with this error?: Unmatched exit code (2147549183) is considered an execution failure. This is Office 2016 c2r deployment, as POC i ran it manually and it works, But SCCM 2012 keeps failing, Once i run it manually and Office 2016 installed, i run "retry" from Software Center and it mark it as "Installed"

Andy

09.27.2016 AT 08:24 AM
Check your detection method

Wayne

12.26.2015 AT 06:01 PM
Nice Tutorial, very helpful !! Is it possible to incorporate the scrub vbs scripts into the application deployment to remove older versions office 2007 office 2013 before running the installation ? Thanks

Brian Hampson

12.26.2015 AT 06:11 PM
We created an application that ran the different offscubs and made it a prereq for the O365 Office 2016 deployment.

Wayne

12.28.2015 AT 09:37 PM
Thanks Brian, can you give me more details.. trying my hand at applications vs making a package for o365 you created an application for each offscrub ? where in the application for o365 can you make this a prereq ? Again Thanks !!

Brian Hampson

12.29.2015 AT 11:25 AM
Whoops - I lied that was for my 2013 MSI install... For the O365 install, I just put the scripts in the same folder as my O365 setup and xml and then call it as follows: cscript %~dp0OffScrub_O15msi.vbs CLIENTSUITES /removelync cscript %~dp0OffScrub10.vbs CLIENTSUITES /removelync cscript %~dp0OffScrub07.vbs CLIENTSUITES /removelync cscript %~dp0OffScrub03.vbs CLIENTSUITES %~dp0setup.exe /configure configuration.xml timeout 20

cheapest car insurance Dearborn Heights MI

08.17.2017 AT 10:30 AM
Hey There. I discovered your weblog using msn. That is a really neatly written article. I’ll make sure to bookmark it and return to learn more of your useful info. Thank you for the post. I will certainly comeback.

Wayne

12.30.2015 AT 01:25 PM
Great Thanks !!

Brian Hampson

12.29.2015 AT 11:22 AM
I create an application called Clean up Old Office. My source content folder holds all the offscrub scripts and one batch file which is this: cscript %~dp0OffScrub10.vbs CLIENTSUITES /removelync cscript %~dp0OffScrub07.vbs CLIENTSUITES /removelync cscript %~dp0OffScrub03.vbs CLIENTSUITES echo > C:\OfficeScrubMarker.txt In the application detection, I look for the existence of the file to see if it has been run. It my O365 deployment type, there is a dependency tab. I put the "Clean up old Office" application in as a dependency.... I hope that makes more sense.

Jeff R

10.27.2015 AT 07:53 AM
You may want to point your detection rules at the individual executables. If you deploy Word and Outlook today and tomorrow you want to add Powerpoint the product code detection method is too general. Another method for deployment is to create a folder in a system accessible network location to contain the Office source files. In SCCM distribute only the folder containg setup.exe and the XML files you have created for config. Make sure you XML contains and the update line . Now you only need to download the setup.exe and the XML file to the client cache. As you update the source files the size will quickly grow to several GB. This also forces system to use local update sources so you have control over when updates are done and new installs are using same version as all updated clients. Example XMLs below. I use comments to comment out ExcludeApp lines to install that app. Install.xml: <!-- --> UpdateSource.xml: RemoveAll.xml:

Faizan

10.16.2015 AT 02:31 PM
Good tutorial. I have a confusion is it going to install Office 2016 Pro Plus or Office 365 (2016)Pro Plus??

Jóhann Már Sigurbjörnsson

10.08.2015 AT 01:18 PM
Hi, This is working almost perfectly for me. The click to run installs on the target machine using SCCM 2012 R2, but I´m having problem with the detection method of Office 2016. The system is unable to verify installation using the msi code : {90160000-008F-0000-1000-0000000FF1CE}. Do you have the correct one, I´m unable to find it in the registry ?

Benoit Lecours

10.09.2015 AT 06:29 AM
It's also possible to use a registry key to check your installation if the MSI doesn't work for you: HKLM\Software\Microsoft\Windows\CurrentVersion\Uninstall\O365ProPlusRetail - en-us https://www.systemcenterdudes.com/wp-content/uploads/2015/09/7474-9.png *You can use a wildcard in the version or simply not use the exact version (ex:16*). If your Offcie gets updated, it's possible that the version will change.

Brian Hampson

10.08.2015 AT 01:22 PM
I use that code in my deployment as well as in a collection that is created based on that Product Code - it's right.

Jóhann Már Sigurbjörnsson

10.09.2015 AT 06:33 AM
This one worked for me : {90160000-008F-0000-1000-0000000FF1CE}

Brian Hampson

10.02.2015 AT 01:01 PM
1) Do we not have to persist the content, or every month it's going to redownload 1 GB of files?

Pete Nowacki

10.01.2015 AT 10:38 AM
I got the install to work but I had to kill Click-to-Run in the task manager. Once I did that, it took off like a champ.

STGdb

09.30.2015 AT 03:13 PM
Thanks for the great article. However, we get the same error. We can download the 2013 (v15) of Office 365 Pro Plus but when we use the same download XML file with the 2016 (v16) of Office Deployment Tool, we get the same error. We used your version of the download.xml file, same error. Also tried on domain workstations, non-domain workstations, systems with Office already installed, fresh Windows 7 x64 systems with no apps installed, using Run As Administrator, etc. We haven't been able to get past this error or figure out how to get it to work. We don't see any errors otherwise on the systems we use to test. When the process starts it creates the Office directory where we tell it to download the files, but then it fails at that point. When we go to the Office 365 portal, we can't manually download the product. Is Office 365 2016 available yet? Thanks

STGdb

10.05.2015 AT 06:34 AM
My error was because the Office 365 2016 version requires a source path to download the files (it can be blank for the install, but the SourcePath cannot be blank like it can in 2013 when you try to download the 2016 product). REF: http://blogs.technet.com/b/odsupport/archive/2015/09/22/office-365-proplus-2016-couldn-39-t-install-error-30015-1007-when-trying-to-download-using-the-office-deployment-tool-odt.aspx

Howard

09.30.2015 AT 02:45 PM
Thank you for this guide! I have been fighting with the click-to-run issue with Office 2016 deployment, since the behavior is different than Office 365 (2013) version. The problem was because we specified the UNC path for the source location, and after we leave it blank like your example, then it works! We kept getting this error prior to your guide: Couldn't Install We're sorry, we can't continue because we weren't able to download a required file. Please make sure you're connected to the internet or connect to a different network, then try again. Error Code: 30182-1011 (5)

Benoit Lecours

09.30.2015 AT 02:51 PM
Thanks !