With the release of SCCM Current branch 1610, one of the interesting new feature is the ability to do a BIOS to UEFI conversion in a task sequence. This would also allow to use Secure Boot with Windows 10 for strengthen security.
In this blog, we’ll explain how to convert BIOS to UEFI with a task sequence on HP computers. This solution can also be applied for Dell and Lenovo computers.
SCCM BIOS UEFI Conversion Prerequisites
Before starting, you need 3 things :
- SCCM Current Branch 1610 or higher
- The computer manufacturer must provide a tool for BIOS configuration
- Package for Bios Configuration Utility and configuration file must be created (procedure included in this post)
Create BIOS and UEFI Configuration File
First, we need to create a configuration file that will be used in our task sequence. A configuration file, is basically a text file that will be used to change an option in the BIOS of the targeted computer. We’ll use an HP computer for our example.
You don’t have to create multiple files for each models, the same BIOS configuration file should apply to all HP models. The only settings included in the BIOS configuration file will be those required to change to UEFI. If needed, additional or model specific BIOS configuration could be apply at a later time in the task sequence.
Here’s an example of a configuration file that will :
- Disable legacy boot option (BIOS)
- Enable UEFI boot options
- Enable Secure Boot
Fast Boot
Disable
*Enable
Legacy Boot Options
*Disable
Enable
Legacy Boot Order
<no legacy boot options available>
UEFI Boot Options
Disable
*Enable
UEFI Boot Order
HDD:SATA:1
HDD:USB:1
NETWORK IPV6:EMBEDDED:1
NETWORK IPV4:EMBEDDED:1
Configure Legacy Support and Secure Boot
Legacy Support Enable and Secure Boot Disable
*Legacy Support Disable and Secure Boot Enable
Legacy Support Disable and Secure Boot Disable
Clear Secure Boot keys
*Disable
Enable
Reset Secure Boot keys to factory defaults
*Disable
Enable
Enable MS UEFI CA key
No
*Yes[/su_box]
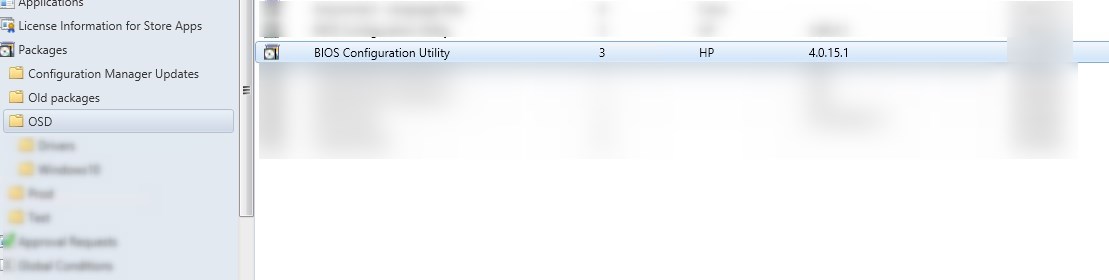
Package Creation of BIOS Configuration Utility and Configuration
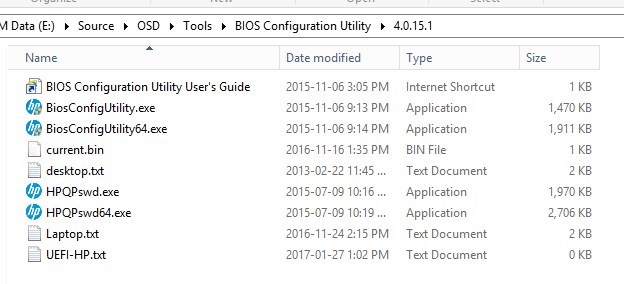
We will now create a standard program that contain all the source file. The content directory must contain the BIOS configuration utility, the configuration file and the password file.
- No program is needed, as we will use Run Command Line in the task sequence
SCCM BIOS to UEFI Conversion in Task Sequence
We will now create or edit an exiting task sequence to include the step to convert the BIOS to UEFI.
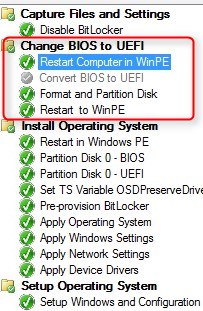
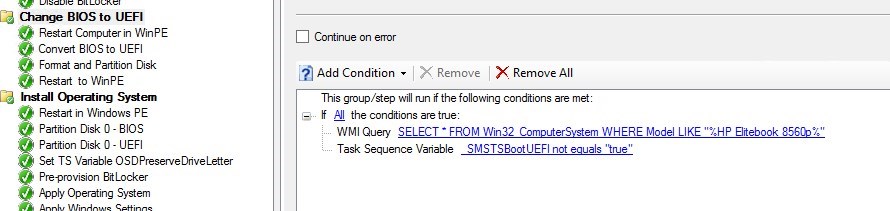
- Add a new group before the Install Operating System section
- In the Option tab, set the condition for task sequence variable _SMSTSBootUEFI not equals true. This variable is needed to check if UEFI is already enabled on the group
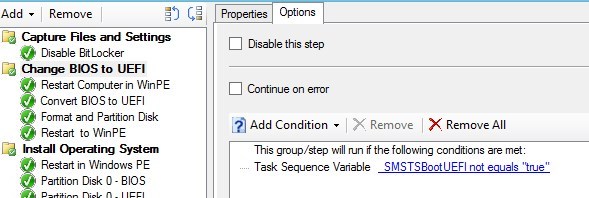
- You could also add another condition for computer manufacturer or model if you have older PC that don’t support UEFI
- Add a Restart Computer task, in the Option tab, set the validation for task sequence variable _SMSTSInWinPE equals False
If the drive, before starting the task sequence, as BitLocker enabled, adding a standard Partition Disk for BIOS is required.
The Partition Disk 0 – BIOS can be copied before the Convert BIOS to UEFI.
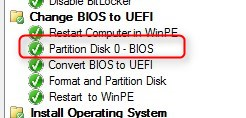
This is needed because when BitLocker is enabled, the disk cannot be accessed in WinPE. Therefore the Convert BIOS to UEFI task will fail execute the script from _SMSTaskSequence local path.
[/su_box]- 
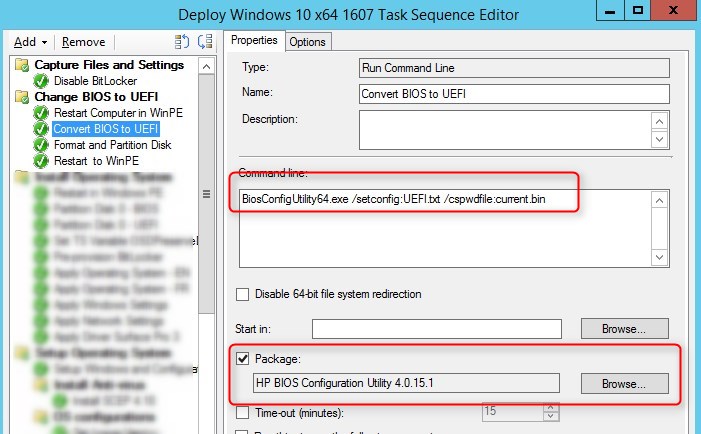
Add a Run Command Line to run the HP BIOS config Utility
- Command Line : BiosConfigUtility64.exe /setconfig:UEFI.txt /cspwdfile:current.bin
- Package : Bios configuration utility with configuration files (Created in previous step)
- This must be a Run Command Line and not a program. Program are not allowed to run under WinPE
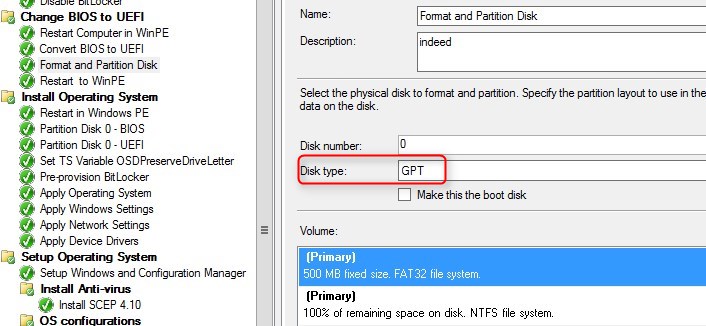
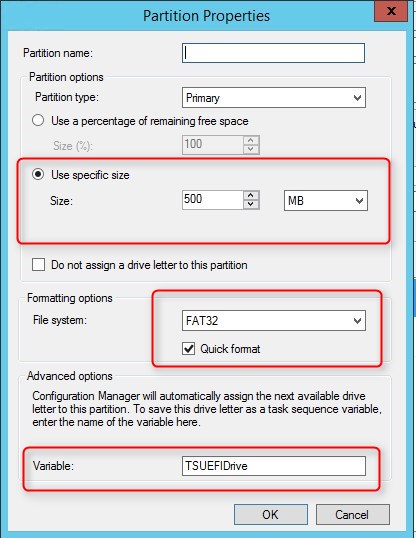
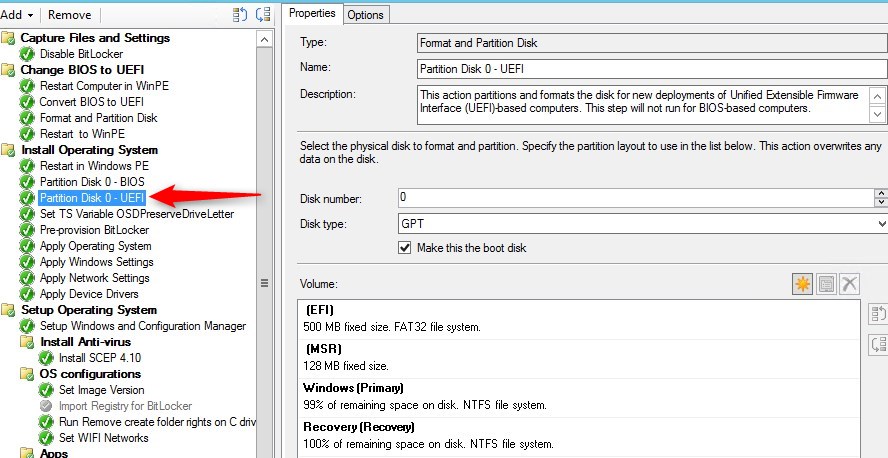
- Add a Format and Partition Disk task and configure as following :
- Disk type : GPT
-
- First partition :
- 500MB
- Fat32 and Quick format
- Variable : TSUEFIDrive
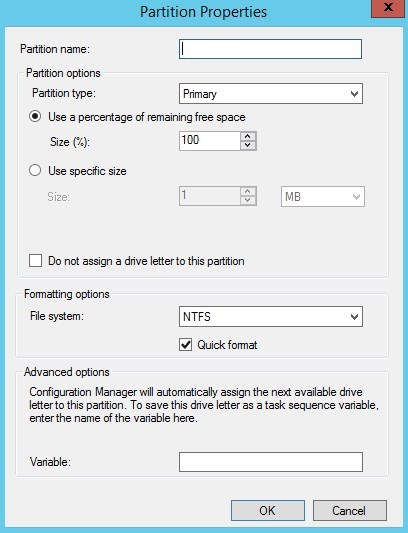
- First partition :
-
- Second Partition default 100% of remaining space
- Add a Restart computer task. Make sure to select The boot image assigned to this task sequence
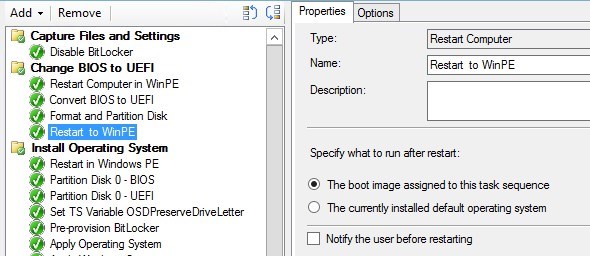
- After the restart, the BIOS will be configured with UEFI and Secure boot Only. It will partition and format the disk.
That’s it, you can now do the same tasks for your other manufacturer. Leave your comments and experience in the comment section bellow.
48 Comments on “BIOS UEFI Conversion using SCCM Task Sequence”
So, I am attempting to do this and I found out a couple of things that made me fail and I found out the hard way through trial and error how to fix it.
1. The BIOS configuration file you mention does NOT work with all HP models. I have an HP ProDesk 400 G1 and I had to create a unique one just for that. I wasted three computers during testing because the settings kept failing.
2. The 500MB partition is not large enough for the latest Microsoft ADK boot image. You get an “Out of Disk space” error when attempting to copy the boot image to the partition after the BIOS -> UEFI conversion. I set mine to 800MB for good measure.
FYI you can have a same config file with different setting name for the UEFI and secureboot, if the setting name doesn’t exist it simply won’t be applied
Hello,
Great Post.
Maybe someone can help me.
I configured the TS as described and the conversion BIOS -> UEFI works.
After the conversion the TS will upgrade the TPM 1.2 –> 2.0 and here is where the problem is.
I get an error after reboot where the BIOS tell me it can find the UEFI upgrade file… from the logs the files are successfully copied to the HP_TOOLS partition (which I had to MAP with a letter, without a letter I get an error that WMI cannot mount it?)
nice post
Hey Guys.
I am having similar kind of issue here. I have several Dell Latitude computers like Dell Latitude 3490 and 3590. These computers are not booting up with PXE. The first step where it tries to get an IP Address before going into WinPE stage. This is where it is not getting an IP Address. My other Dell latitude Computers 5580 they are booting up just fine with PXE.
Would the steps described above help me boot the those laptops with UEFI. because i am a newbie here with SCCM 2012. and i am trying to figure out what could be wrong which is making those laptops not boot up with legacy BIOS.
Please let me know if you need more information.
@Axsaeed, did you find a solution to the issue with the Latitude 3590?
Apparently new dell models xx90’s have changed the Legacy option used for traditional PXE booting. It’s no longer called “Legacy Boot” now its called “Legacy External Devices”. I’m trying to figure out how to PXE via UEFI and all I have found out is that the image has to be UEFI compatible and deployed through the UEFI boot. I also enabled the UEFI Network Stack option.
I have not been successful yet.
If anyone has any input please let me know.
Thanks for this amazing tutorial! I’m new to HP brand and this tool while we always used Lenovo. How can I get this password file “current.bin”? It isn’t explained in the document
Hey guys good article. Works perfectly fine with only a C drive but environment requires a D drive also. I added another partition as I normally would in the past (the same as our Legacy BIOS Task Sequence). Its applying the OS to the C (variable OSDisk) and when it restarts to continue the Task Sequence, it cannot boot or find an operating system. Any clues?
Jonathan
Very nice crisp and clear article. I am able to build my HP EliteBook 745 machine with UEFI configuration after following your Blog. Thanks a ton mate. 🙂
Thanks for the feedback Mohammad! 🙂
Jonathan
i am running this on a HP 800 g3 and it always fails failed to run data is invalid error 0000000D . Any one tried this model ?
sorry guys sorted it out, typo errors
Hi All,
Can you please share me the recomment UEFI partition. i was able to convert from BIOS to UEFI, but when applying operating system giving Error 0x80004005
Hello All
I am facing a unique issue with the PXE boot. I have updated sccm to 1706 and ADK to 1703. We are using IP helpers and as per the wireshark capture, they are configured correctly. Now if i PXE boot an unknown machine, it works fine on both Legacy or UEFI. BUT if i PXE boot a Known machine, it only works in legacy mode. If UEFI mode is selected on the Known client, it throws a BCD error. As per wireshark capture, the known machine in UEFI, does not get the DHCP option 252 and option 243 in the DHCP ACK. But both these options are available if i set that machine back to legacy. This is not model specific as it is occurring on different models and this behavior is the same on different DPs. I am thinking of using this conversion step in the TS as a workaround but if anyone could help me fix this concern, then I would really appreciate it. Thank you
Hi again,
I managed to resolve it by enabling DHCP options for legacy and UEFI.
helpful guide
https://wiki.fogproject.org/wiki/index.php/BIOS_and_UEFI_Co-Existence#Option_003_steps_here
Hi Guys,
I have options 67 configured on DHCP for efi . This doesn’t allow PXe to work without the secure boot is enabled on the laptop in first place. any idea what’s the correct step should be taken before configuring the task sequence. if i remove the DHCP options pxe doesn’t work
thanks
I followed the steps exactly as mentioned above (my environment is 1610 on CM ad Windows 1607 ) and hence leveraged Create a custom task sequence to prepare the hard drive for BIOS to UEFI conversion
i followed the exact steps and my hardware is dell and hence used dell CCTK tool to change it from BIOS to UEFI. i also formatted and partitioned the drive and TSUEFI comes as C: on the SMSTS.LOG
i get the following CreateNewUEFIBootsystem() failed. 0x80070070. when i go to diskpart and check i see two partitions
I Need to know if a reboot is required after converting to UEFI?
Hi Ranganathan, take a look at this post that just came out yesterday. Basically, allow more space for the FAT32 partition… http://deploymentresearch.com/Research/Post/631/Error-0x80070070-in-ConfigMgr-OSD-during-BIOS-to-UEFI-step
Hope this help!
Jonathan
Just a heads up if you are switching Dell computers to UEFI. I encountered a problem where enabling UEFI would have PXE turned on. This would then cause the computer to put the PXE as the first boot device. Our computers already had PXE enabled in our work environment. I would just change the boot sequence, but the Boot list wouldn’t populate in CCTK after enabling UEFI until a reboot was done. This would break the touchless task sequence because of the PXE boot order.
There are 2 commands that can solve this problem for you.
Optiplex 5040 and newer optiplex computers run this command in the task sequence: “cctk.cmd –uefinwstack=disable”
Older optiplex computers such as 7010, 790, etc. have a different command to disable PXE: “cctk.cmd bootorder –bootlisttype=uefi –embnic1=onnopxe”
Then at the end of the task sequence you can go back and enable PXE.
Hope this helps somebody that was having issues between different models with PXE automatically booting before the hard drive during this conversion. I ran both the commands and just continue on error and have not had any issues any longer.
Thanks for sharing!
Jonathan
A bit late to the game, but there’s something missing in the “Disk type : GPT” step: You have to check “Make this the boot disk”. That might’ve eliminated some of the problems others have experienced?
Hi baardH,
I did not check it when I did the post. I shouldn’t be required as the next step will set WinPE to boot, which override any partition disk that would be bootable.
that partition is temporary,
Jonathan
And why is that first, temporary partition required? Why all the formats? Why not just go straight to the “Format and Partition Disk” step that has the four volumes for EFI, MSR, Windows, and Recovery?
I think he meant the step “Partition Disk 0 – UEFI” step. I had to check the “Make this the boot disk” for it to start working. Before in the smsts.log I was getting “System partition not set” error.
This is working on Dell systems as well. Just replace the HP piece with the Dell CCTK. Nice post!
I am having a hard time getting this to work. It keeps failing at “Convert BIOS to UEFI” it doesn’t matter if I add the extra “Partition Disk 0 – BIOS” before the convert step. If I do add this step however, as you described in the “bitlocker consideration” step, I get the error:
Failed to run the action: Convert BIOS to UEFI.
The system cannot read from the specified device. (Error: 0000001E; Source: Windows)
I used a CMD by pressing F8 to verify if the BIOS Config package is copied properly and it is.
I am trying to get this to work on a HP Elitebook 850 G3, so I am using the HP BIOS config utility. Do you have idea where to go from here? Do I maybe need to reconfigure the partitions in the “Partition Disk 0 – BIOS”, instead of just copying it as you described?
Hi Erik,
If you are able to validate that the content is available with the CMD in WinPE, I would to try execute the Bios to UEFI manually from there.
You might see the error from the HP tool directly.
If you can, copy/paste the command line here.
Thanks
Jonathan
Hi Jonathan,
I finally figured it out, sort of… it has to do with the paths in the commandline
This does NOT work:
BiosConfigUtility64.exe /setconfig:”EnableUEFI.txt” /nspwdfile:”securebios.bin”
This does work:
BiosConfigUtility64.exe /setconfig:”C:\_SMSTaskSequence\Packages\ZDM00029\EnableUEFI.txt” /nspwdfile:”C:\_SMSTaskSequence\Packages\ZDM00029\securebios.bin”
As you can see I need to supply the entire path where the config and password file are located. Do you know if this is by design or that I mis-configured something?
Hi Erik,
Good news, not sure why it requires you to enter the full path.
I did it without the full path.
Jonathan
Hi, Thanks for the article. We have followed the same however we are getting error “TS failed with error code 0x80070490error code” on the step Format and Partition Disk. Kindly suggest
Hi Mohit,
Are you trying with Dell computers?
Take a look at the comments below for different ideas about BIOS To UEFI for Dell computers.
Jonathan
Testing on HP 1040 G3
I have problems at the “Restart to WinPE” step and errors out… “The Operating system reported error 2147942512: There is not enough space on the disk. It never restarts…
I replaced “Restart to WinPe” with Command Line “wpeutil.exe reboot” . This does restart the task sequence, but you have to select the Task Sequence again and then everythign works. So… PXE > Select TS > converts BIOS – UEFI > Restarts > PXE > Select TS (AGAIN) > Then installs Windows 10…
Any others have to go through this process? Rather select TS once then > converts Bios-UEFI>restart> continues completing the first TS.
Any help on streamlining this would be great? So close and appreciate the article;)
Hi JAc3d,
Have you updated you boot images after the 1610 Upgrade?
As stated in other comments this seems to be mandatory.
I didn’t test prior the update mine, so not a 100% sure about this step.
Jonathan
Hey Jonathan thanks for replying.
I created my boot images after 1610 upgrade. Checked and “BCD-EFI-64…. are in my osdinjection.xml.
So assuming I am good. My Boot images age MDT integrated boot images…
ummm…
Did you ever solved this? I have the same issue with a HP 840 G1 and G2. (Other HP like the 820 G3) doenst have this issue. If I check with dispart I see the the created GPT disk has 0 free space (disk is 500GB)
Kevin: for MDT TS (and from WinPE) try to add bios config after the “partition if necessary” step at the beginning of the TS.
the “Failed to save environment to (80070057)” is definitively something about the mdt scripts not being able to be copied on the drive (and check that your drive is correctly converted back to MBR and not GPT)
If you want to put the bios to uefi configs after the “new Computer only” step I think you’ll have to repeat the whole “partition if necessary” group, followed by a “use toolkit package” and “gather” (and UDI wizard after that if you’re using it (I do)
for your last remark how do you reimage the machine? from windows (software centre?) if so you’ll probably need to do the same under the refresh only step (I didn’t try that yet). But at this point uefi should already be enabled and therefore skipped right (so that’s maybe a completely different problem)
I also found (on Dell system, didn’t try on HP) that I needed 2 steps, separated by a reboot, to apply the uefi config because when you switch to uefi some settings are not instantly available, and I don’t want it to boot on the uefi network stack as it does by default when windows is not yet installed.
good luck !:)
We have a similar but related problem with supporting both new hardware and legacy hardware.
We constantly have to swap between x86 and x64 PXE boot image to get the differing hardware to build from the task sequences.
We publish our task sequences to the “unknown computers” collection to avoid building the same hardware several times and to keep AD clean.
Could we use your method above to determine the BIOS version and then pick the correct boot image without having to constantly swap the boot images on our task sequences around (more annoyingly PXE uses the last advertised tasks sequence boot image when booting into PXE)
thanks,
David
This is a good write-up – I essentially did all of this on my own when wanting to automate BIOS configuration settings in our imaging process for my colleagues but I’ve only recently run into the UEFI/Secure Boot battle. PC’s are coming out of the box with UEFI enabled now so it’s a pain to have to change it before you can network boot and and image the PC so I’ve configured DHCP and WDS to only use the UEFI PXE image now which solves that.
The issue is, we’re still using Windows 7 which does NOT support secure boot. HP will give you a nice message that your OS is not authorized if you try booting Windows 7 with secure boot on so I have to disable it now in the BIOS configuration settings that are already getting applied.
Everything is great up until this point, where when setting the secure boot changes with the BIOS utility, the next reboot prompts you for a 4-digit code before proceeding, as it does when you change these settings manually. Is there no way to bypass this??
This breaks the automation I’m trying to achieve by requiring the attending technician to go BACK to the computer they just kicked a deployment off on to be available to stand by and enter a code before the rest of the process can continue.
Thanks Taylor! I’ve faced the Windows 7 and UEFI issue on Dell computers. Client had no time to allow me to automate this, so the solution was to switch to BIOS prior OSD. 🙁
I’ll keep this in mind if I face this with newer HP computer.
Jonathan
I am following your TS, which is pretty much like Nickolaj so i thought maybe i was doing something wrong…
I am using a Dell system, so i get that it will react differently during the OEM conversion part, but the system should reboot regardless.
The challenge seems to be that the laptop never restarts. Right after the disk partition step it always fails.
Do you find that the above creates a C: on Fat32 and D: on NTFS?
It is possible that it is my OEM Conversion tasks, but they seem to work (enabling HAPI, UEFI, Secure boot, etc..)
I just cannot seem to figure out why it refuses to reboot the system… even the first Restart does not do anything (although i am already PXE using WinPE)
Hi Kevin,
Yes it does create a C: with Fat32 and another partition with NTFS. those are temporary.
As for the reboot not rebooting, the 1st reboot is set to NOT reboot if already in WinPE.
Take a look at the 2nd reboot(after the Disk partition) if you have any condition on it. It should not have any.
Jonathan
Another thing to keep in mind, the “Restart Computer” step, which is set to reboot back into the currently assigned boot image, will “stage” the boot image first by expanding the boot.wim file to a temporary location on your hard disk that SCCM OSD has chosen to use as the location to store temporary cache files from your packages (and boot images). This location should be defined in the _SMSTSDataPath task sequence variable.
My guess is that your drive letter is changing after you format the disk to a letter different than is initially defined in _SMSTSDataPath so the task sequence step fails when copying the boot iamge to your local drive since that location is no logner vaild. To verify this (if you have F8 command window support and PowerShell enabled in your WinPE image), you can press F8 for a command window, drop to PowerShell, and use the Microsoft.SMS.TSEnvironment COM object to query the variable value and see where its location is pointing to.
From PowerShell (in the boot image when you encounter the error), do the following (one line at a time):
$TSEnv = New-Object -COMObject Microsoft.SMS.TSEnvironment
$TSEnv.Value(“_SMSTSDataPath”)
This will tell you the path that SCCM initially defined as the location it stores its temp data on. If the drive letter in that variable is not the drive letter your partitioned drive has, then there’s your issue.
If not, use notepad to open X:\Windows\Temp\SMSTSLog\smsts.log and look toward the end of the file for more info and details on the error you encounter when trying to stage the boot image and “Restart Computer”
Let us know what you find!
Hi Taylor/Jonathan
I do have Powershell in WinPE. When i ran the commands you suggested it did not present me with anything, it just wanted me to enter more information (did a line return)
In the logs it appears that errors show up during the entire TS.
Failed to save environment to (80070057)
Failed to save execution state and environment to local disk.
All of my BIOS/UEFI settings worked and the format partition is fine.
I have no conditions on the last restart TS.
So i don’t think the error is specifically related to the reboot.
My disk is wiped using diskpart (so there are no previous partitions or OS)
My CCTK stuff are coming from the WinPE disk (x:) (not a program)
The pop up message i get on the screen is 0x80070490
I even tried putting the format and partition task at the beginning so that it creates a proper partition.
Because it does do everything, if i force restart the machine and it boots back up, it finishes off the task sequence..
Kevin, if you’re testing on the same system you may want to reset the bios setup (manually choosing legacy or to the defaults depending) and then convert your disk to mbr before re trying the task sequence and bios to uefi conversion.
Do you use MDT in your TS?
Hi Seb,
After it fails, i revert the BIOS to legacy, put all my settings back to normal and start again.
My TS does have MDT integrated, but i am even testing this on a plain SCCM TS without MDT and it still fails at the same part.
I only wipe the drive using diskpart… if i add a format for mbr then do all of my Dell tasks, and convert it still fails.
I do also have a TS that is just a BIOS to UEFI from Mike Terrill that works, but only works on it’s own. I am trying to combine things, and now that i moved to 1610 to leverage that, it does not work as intended.
I also tried different models, but it seems even if i finally get Windows 10 installed, if i need to reimage the machine, i run into all kinds of errors as well.
Hello Kevin,
i had the same here, am I right that your second stripped down TS is using another WinPE image ?
That you haven’t redistributed / updated the first one ?
As said, I had the same issue, when i thought that after upgrading to 1610 I didn’t update the boot image. When I did, it worked – so there are some additional / changes SCCM binaries which are needed in boot image.
Kevin: for MDT TS (and from WinPE) try to add bios config after the “partition if necessary” step at the beginning of the TS.
the “Failed to save environment to (80070057)” is definitively something about the mdt scripts not being able to be copied on the drive (and check that your drive is correctly converted back to MBR and not GPT)
If you want to put the bios to uefi configs after the “new Computer only” step I think you’ll have to repeat the whole “partition if necessary” group, followed by a “use toolkit package” and “gather” (and UDI wizard after that if you’re using it (I do)
for your last remark how do you reimage the machine? from windows (software centre?) if so you’ll probably need to do the same under the refresh only step (I didn’t try that yet). But at this point uefi should already be enabled and therefore skipped right (so that’s maybe a completely different problem)
I also found (on Dell system, didn’t try on HP) that I needed 2 steps, separated by a reboot, to apply the uefi config because when you switch to uefi some settings are not instantly available, and I don’t want it to boot on the uefi network stack as it does by default when windows is not yet installed.
hope that helps, good luck !:)