
How to Update the Intune Connector for Active Directory from System Account to MSA Account

Eswar Koneti
Table of Content


Share


Get the latest insights and exclusive content delivered to your inbox
The Intune Connector for Active Directory, also known as Offline Domain Join (ODJ), is a critical component for integrating Microsoft Intune with on-premises Active Directory (AD).
It facilitates communication between an organization’s on-premises AD and Intune, enabling the Hybrid Azure AD Join process. This ensures devices are joined to both the on-premises domain and Azure AD, especially during the Windows Autopilot process.
 |
|---|
Key Uses of the Intune Connector for Active Directory
1. Hybrid Azure AD Join:
- The Intune Connector allows devices joined to an on-premises Active Directory (AD) to be automatically registered with Azure Active Directory (Azure AD). This process is called Hybrid Azure AD Join.
- Hybrid Azure AD Join is especially useful for organizations an on-premises AD and want to extend their environment to Azure AD for cloud-based management through Microsoft Intune.
2. Offline Domain Join (ODJ):
- The connector supports Offline Domain Join (ODJ), allowing devices to join the corporate network even when not directly connected to the on-premises domain at the time of provisioning.
- This feature is ideal for remote workers, as it allows devices to be pre-configured and joined to the domain without needing to be on the corporate network initially.
Important Change: Moving from System Account to Managed Service Account (MSA)
Microsoft has recently announced a significant update to the Intune Connector for Active Directory. Previously, the connector used a system account for integration, but now it will transition to using a Managed Service Account (MSA). This change enhances security and management capabilities, providing more granular control over service account permissions.
In this blog post, we’ll walk you through updating your Intune Connector for Active Directory from using a system account to a Managed Service Account (MSA).
Steps for Updating the Intune Connector for Active Directory – Intune Connector MSA Account
Before you start, ensure you have completed the prerequisites and backed up your environment if necessary.
High-Level Steps:
- Validate your existing Intune Connector is active.
- Prerequisites
- Uninstall the old Intune Connector.
- Install the new connector.
- Configure the Intune Connector and validate the MSA account.
- Update the XML configuration file.
- Final validation
1. Validate Your Existing Intune Connector is Active
Before starting the update process, confirm that the current Intune Connector is active and functioning properly.
- Log into the Intune Admin Console and check the status of the Intune Connector for Active Directory.
- Go to Devices → Windows → Windows enrollment → Intune Connector for Active Directory.

- Confirm that the connector version is up-to-date and working properly (e.g., Version 6.2304.38.4).
2. Prerequisites
To successfully configure the Intune Connector with an MSA, you need the following permissions:
- Required:
- Create msDs-ManagedServiceAccount objects in the Managed Service Accounts container in Active Directory.
- The account used for configuring the Intune connector must be assigned the Intune Administrator role in Entra ID.
- Local administrator rights on the server where the Intune connector is installed.
- Optional (depending on your environment):
- Modify permissions in Organizational Units (OUs) within Active Directory. If the account used to install the Intune Connector lacks this permission, additional configuration by an AD administrator will be required.
If the Intune Connector is installed on a Domain Member Server, ensure that the account used for installation has permission to create computer objects in the appropriate OUs.
The whole process makes alot easier if you use domain admin account to install and configure the setup otherwise you will need to work with AD/directory services team to grant necessary permissions. (This is one-time setup).
I have listed the steps to grant permissions if not using domain admin account to install/configure the Intune connector.
- In Active Directory, use the tool ADSIEDIT.msc to assign the msDs-ManagedServiceAccount permissions to the account.
- Launch ADSIEDIT.msc, navigate to CN=Managed Service Accounts, and right-click on the container.

- Select Properties, go to the Security tab, and click on Advanced.

- Add the account and enable permissions for Create msDs-ManagedServiceAccount.


- Choose type “Allow”, applies to “This object only” and Enable “Create msDs-ManagedServiceAccount” while leaving the default read permissions (if you require, you can uncheck the read permissions that exist and select only “Create msDs-ManagedServiceAccount”.


3. Uninstall the Old Intune Connector
To begin the update process, you must first uninstall the existing Intune Connector:
- Download the Legacy Intune Connector uninstaller from Microsoft Download Center.
- Run the setup to remove the old connector from the system. The process is straightforward. Launch the connector and click Install.
- This step will validate if the Intune connector for AD installed, it proceed to uninstall.

- After the uninstallation is complete, confirm that the old connector is no longer present by checking Programs and Features or the Start Menu.
4. Install the New Intune Connector with MSA account
After removing the old connector, download and install the new Intune Connector for Active Directory that supports MSA.
- Download the latest ODJConnectorBootstrapper.exe from Microsoft’s official site or go to intune portal, windows, enrollment, intune connector for Active Directory, Click on Add and download

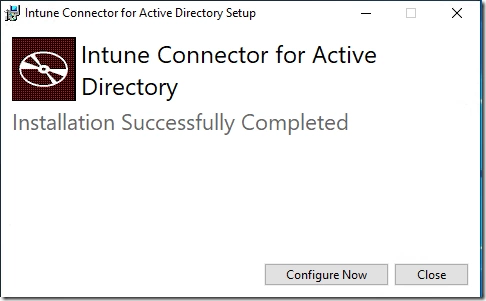
- Run the installer and follow the prompts to complete the installation.


- Once the installation is complete, click Configure Now.

- Sign in with an account that has Intune Admin role.


Verify Intune Connector for Active Directory is active in Intune console:
Go to Intune console and verify the newly installed Intune connector for AD status
- Old Connector Version: 6.2304.38.4
- New Connector Version: 6.2501.2000.5


5. Configure the Intune Connector and Validate the MSA Account
Inactive Intune Connectors for Active Directory still appear in the Intune Connector for Active Directory page and will automatically be cleaned up after 30 days.
Now that the new Intune Connector is installed, ready to configure it to use MSA account:
- Open the Intune Connector for Active Directory and click on Configure Managed Service Account.

- If the account has the necessary permissions, it will create an MSA and assign it to the connector service.

- Go to Services.msc and verify that the Intune Connector service is now running under the new MSA (not the system account).

- Use ADSIEDIT.msc to check that the MSA account has been successfully created under the Managed Service Accounts container in Active Directory.

6. Update the XML Configuration File
Finally, update the XML configuration file to ensure the MSA account can create computer objects in the specified Organizational Units (OUs).
- Open the ODJConnectorEnrollmentWizard.exe.config file located at
C:\Program Files\Microsoft Intune\ODJConnector\ODJConnectorEnrollmentWizard. - In the file, locate the section with the key
OrganizationalUnitsUsedForOfflineDomainJoinand add the Distinguished Names (DNs) for the OUs you want the MSA to have access to. - In my case, i have the following 2 OU’s that i would like to add
- OU=Asia,OU=Physical,OU=MDM Managed computers,OU=Workstations,OU=Computers,OU=SG,DC=intranet,DC=eskonr
OU=Europe,OU=Physical,OU=MDM Managed computers,OU=Workstations,OU=Computers,OU=SG,DC=intranet,DC=eskonr
- Since my OU contains the spaces, i will need to focus on DISTINGUISHED NAME IS ESCAPED PROPERLY.
![image_thumb[29]](https://www.systemcenterdudes.com/wp-content/webp-express/webp-images/doc-root/wp-content/uploads/2025/03/image_thumb29_thumb.png.webp "image_thumb[29]")
- To properly escape the Distinguished Names (DN) in your XML, you need to replace the spaces in the Organizational Unit (OU) names with the escape sequence
\20. The\20represents a space character in the Distinguished Name format.MDM Managed computersbecomesMDM\20Managed\20computerswhere each space is replaced by\20.Here’s how the updated XML would look with spaces correctly escaped: <add key=”OrganizationalUnitsUsedForOfflineDomainJoin” value=”OU=Asia,OU=Physical,OU=MDM\20Managed\20computers,OU=Workstations,OU=Computers,OU=SG,DC=intranet,DC=eskonr;OU=Europe,OU=Physical,OU=MDM\20Managed\20computers,OU=Workstations,OU=Computers,OU=SG,DC=intranet,DC=eskonr” />
- Save the configuration file.
![image_thumb[29]](https://www.systemcenterdudes.com/wp-content/uploads/2025/03/image_thumb29.png "image_thumb[29]")
7. Final validation
- After configuring the XML file, launch the Intune Connector again and click Configure Managed Service Account.

- This will update the permissions for the MSA account in Active Directory.

- Go back to Active Directory Users and Computers and verify that the MSA account now has the required permissions to create computer objects in the specified OUs.

Conclusion
By following these steps, we have successfully updated the Intune Connector for Active Directory to use a Managed Service Account (MSA) instead of a system account. This change not only enhances security but also allows for more granular control over service account permissions. This process ensures smoother integration between Microsoft Intune and on-premises Active Directory for hybrid environments.
References
Share
Get the latest insights and exclusive content delivered to your inbox


arovbukay
06.09.2025 AT 09:54 AM