

BlackLotus Remediation: Beyond the CA Certificate expiration
SCD Consultant, Contributor. Specialized in Microsoft Endpoint Manager (SCCM, InTune), Windows Autopilot, Windows10 (11) and Office365 Deployment and maintenance.

Marc-Andre Chartrand
Table of Content
- Table of Contents – BlackLotus Remediation
- Why This Is a Security Problem
- The Four BlackLotus Mitigations, In Order
- BlackLotus Remediation Prerequisites
- Applying the BlackLotus Mitigations Automatically
- Applying the BlackLotus Mitigations Manually
- Verifying Each BlackLotus Remediation
- Deploying the Report in Your Environment
- How to Read the Power BI Report – BlackLotus Remediation
- BlackLotus Remediation – Turning the Report Into a Roadmap


Share


Get the latest insights and exclusive content delivered to your inbox
If you manage a Windows fleet, you have probably already seen the date circled on every IT pro’s calendar: the Microsoft Corporation UEFI CA 2011 and Microsoft Corporation KEK CA 2011 certificates begin to expire in June 2026, followed by the Microsoft Windows Production PCA 2011 in October 2026. By now most admins have heard the headline: “install the 2023 certificates before the 2011 ones expire, or your devices stop getting Secure Boot updates.”
That message is correct. It is also incomplete. Getting a device from “2011 certificates” to “fully mitigated” is not one step. It is four, each one depends on the one before it, each one requiring reboots, and each one capable of stalling on firmware that is not ready.
This post explains what is really happening under CVE-2023-24932 (the BlackLotus vulnerability), walks through the four BlackLotus mitigations and how to apply them manually with PowerShell, and shows you how to read every value in our Secure Boot Remediation Power BI report so the numbers actually mean something when you build your roadmap.
If you haven’t already, download the free Power BI dashboard and .cab file, which will be required later in the post. The report is available in our Free Subscription package.
 |
|---|
Table of Contents – BlackLotus Remediation
- Why this is a security problem, not a housekeeping task
- The four BlackLotus mitigations, in order
- Before you touch anything: prerequisites
- Applying the BlackLotus mitigations manually (registry + scheduled task + PowerShell)
- Verifying each BlackLotus mitigation
- How to read the Power BI report
- Turning the report into a roadmap
Why This Is a Security Problem
CVE-2023-24932 is a Secure Boot bypass made famous by the BlackLotus UEFI bootkit. The flaw lets an attacker who already has administrator rights (or physical access) swap the trusted Windows Boot Manager for an older, still-trusted but vulnerable version, then run malicious code before Windows even starts. Because it lives below the operating system, a bootkit installed this way is invisible to traditional antivirus and EDR.
The fix is not a single patch. Microsoft shipped the code in the monthly updates, but the protections are not enabled by default, because enabling them changes what your firmware will trust at boot time and a mistake there can leave a device unbootable. The actual remediation is a sequence of trust changes to the firmware: install new 2023 signing certificates, replace the boot manager with one signed by the new chain, then revoke trust in the old 2011-signed boot managers so they can never run again.
So the June 2026 certificate expiration and the BlackLotus mitigations are two sides of the same project. The expiration forces you to get the 2023 certificates in place; BlackLotus is the reason you cannot stop there and must also revoke the old trust. A device that has the 2023 cert but still trusts the 2011 boot manager is “future-proof” for updates, but still vulnerable to the bootkit.
The Four BlackLotus Mitigations, In Order
Microsoft breaks the remediation into four BlackLotus mitigations. They must be applied in order. Our report mirrors this exact sequence in its Remediation Stage field (stages 1 through 7), so it is worth learning the four steps first.
Mitigation 1 : Install the 2023 CA certificate into the firmware DB
Adds the Windows UEFI CA 2023 certificate to the Secure Boot signature database (DB), and the Microsoft Corporation KEK 2K CA 2023 to the Key Exchange Key (KEK). This is what the June 2026 deadline is really about. Without it, the device cannot trust anything signed by the new chain. In the report this is Mitigation 1 (Cert Updated).
Mitigation 2 : Update the boot manager to the 2023-signed version
Replaces bootmgfw.efi on the EFI system partition with a copy signed by the Windows UEFI CA 2023. The firmware will only accept this once Mitigation 1 is confirmed, because it has to trust the new signer first. In the report this is Mitigation 2 (Bootmgr 2023).
Mitigation 3 : Revoke the 2011 boot managers (DBX)
Adds the Microsoft Windows Production PCA 2011 to the forbidden signature database (DBX), so any boot manager signed by the old 2011 chain is refused at boot. This is the step that actually closes the BlackLotus hole. In the report this is Mitigation 3 (DBX Revoked).
Mitigation 4 : Enforce the Secure Version Number (SVN)
Writes a minimum Secure Version Number to the firmware so that even a validly-signed-but-old boot manager cannot be rolled back and run. This blocks downgrade attacks. In the report this is Mitigation 4 (SVN Enforced).
The critical point for reporting: a device is only fully remediated when all four are done and confirmed.
BlackLotus Remediation Prerequisites
These steps change firmware trust. Done out of order or on unready hardware, they can prevent a device from booting. Do not skip the prep.
- Install the servicing update. Make sure the device has the July 8, 2025 Windows monthly update or later. The BlackLotus mitigations ship in these updates but stay disabled until you enable them. Every device should reach this baseline regardless of your rollout plan.
- Back up the BitLocker recovery key. Changing the boot chain can trigger a BitLocker recovery prompt. Confirm the recovery key is escrowed (Entra ID / AD / SCCM) before you start. You can read the local 48-digit key with:
manage-bde -protectors -get C:- Note that this is very unlikely to occur, but there has been reported cases where BitLocker prompted for the recovery password after applying a remediation
- Test on representative hardware first. Microsoft cannot test every firmware/hardware combination and neither can you, but you should test at least one device of each model in your fleet before broad deployment. Known-bad combinations (for example, certain TPM 2.0 systems and older server builds) can block Mitigations 2 and 3.
Applying the BlackLotus Mitigations Automatically
Microsoft gives you the option to automatically handle the BlackLotus mitigations for you. This is the easiest and recommended method to reach compliance with the least amount of effort on most devices.
The procedure to enable the automatic mitigation is the same as for the Secure Boot Certificate as described in our blog post How to update Secure boot certificate using Intune
Applying the BlackLotus Mitigations Manually
If instead you prefer to manage the rollout or need to action a device manually for any reason, you may do so by deploying registry values to batch of devices using the management platform of your choice.
Each mitigation follows the same pattern: set a single bit in the AvailableUpdates registry value, kick the built-in scheduled task that processes it, then reboot. As each mitigation completes, Windows clears the bit back toward 0 on its own, so a non-zero AvailableUpdates value is itself a signal that a reboot is still pending (this is exactly what drives the report’s “Pending Restart” states). You’ll also see it sitting at 0x4000 often, meaning it has no pending changes.
For a manual rollout, you should also ensure the registry values that enable the Microsoft-Managed rollout is set to 0, that the AvailableUpdatesPolicy is not set, and high confidence opt out is set to 1
Key: HKLM\SYSTEM\CurrentControlSet\Control\Secureboot<br>Value: MicrosoftUpdateManagedOptIn(REG_DWORD)<br>Data: 0<br><br>Value: HighConfidenceOptOut(REG_DWORD)<br>Data: 1<br><br>Value: AvailableUpdatesPolicy(REG_DWORD)<br>Data: DELETE THIS VALUE/Unassign policy setting thisThe registry value and task are:
Key:   HKLM\SYSTEM\CurrentControlSet\Control\Secureboot
Value: AvailableUpdates (REG_DWORD)
Task:  \Microsoft\Windows\PI\Secure-Boot-Update

<strong>The per-mitigation bit values:</strong>- Mitigation 1 (2023 cert to DB):
0x40 - Mitigation 2 (boot manager):
0x100 - Mitigation 3 (DBX revoke 2011):
0x80 - Mitigation 4 (SVN enforcement):
0x200
Order matters and cannot be changed. Mitigations 1 and 2 must complete before 3 and 4. The boot manager step (2) will not apply until the firmware confirms the certificate step (1). If you want to be cautious, apply them one at a time as shown below; if you are confident, you can combine 1+2 with 0x140 and 3+4 with 0x280.
Step 1 : Mitigation 1 (certificate to DB)
reg add HKLM\SYSTEM\CurrentControlSet\Control\Secureboot /v AvailableUpdates /t REG_DWORD /d 0x40 /f
Start-ScheduledTask -TaskName "\Microsoft\Windows\PI\Secure-Boot-Update"Restart the device, let it settle, then restart a second time. Verify before moving on (see Verifying each mitigation).
Step 2 : Mitigation 2 (boot manager)
reg add HKLM\SYSTEM\CurrentControlSet\Control\Secureboot /v AvailableUpdates /t REG_DWORD /d 0x100 /f
Start-ScheduledTask -TaskName "\Microsoft\Windows\PI\Secure-Boot-Update"Restart twice again. The boot manager on the EFI partition is now signed by the Windows UEFI CA 2023.
Step 3 : Mitigation 3 (revoke 2011 in DBX)
reg add HKLM\SYSTEM\CurrentControlSet\Control\Secureboot /v AvailableUpdates /t REG_DWORD /d 0x80 /f
Start-ScheduledTask -TaskName "\Microsoft\Windows\PI\Secure-Boot-Update"Restart twice. The old 2011 boot managers can no longer run on this device, this is the step that actually neutralizes BlackLotus.
Step 4 : Mitigation 4 (SVN enforcement)
reg add HKLM\SYSTEM\CurrentControlSet\Control\Secureboot /v AvailableUpdates /t REG_DWORD /d 0x200 /f
Start-ScheduledTask -TaskName "\Microsoft\Windows\PI\Secure-Boot-Update"Restart twice. The firmware now refuses any boot manager below the enforced Secure Version Number.
Verifying Each BlackLotus Remediation
You don’t have to guess whether a step worked. The certificate database (DB) and the forbidden list (DBX) can be read directly with PowerShell. Run these from an elevated prompt:
Mitigation 1 : is the 2023 CA in the DB? A result of True means the certificate is present.
[System.Text.Encoding]::ASCII.GetString((Get-SecureBootUEFI db).bytes) -match 'Windows UEFI CA 2023'Mitigation 2 : is the boot manager 2023-signed? There is no reliable way to validate the actual signer of the boot loader because it’s dual-signed. The best method is to confirm the hash of the boot loader file in the EFI partition matches the hash of the bootloader from the EFI_EX folder in your OS:
$Hash2011 = Get-FileHash 'C:\Windows\Boot\EFI\bootmgfw.efi'       -Algorithm SHA256 -EA SilentlyContinue
$Hash2023 = Get-FileHash 'C:\Windows\Boot\EFI_EX\bootmgfw_ex.efi' -Algorithm SHA256 -EA SilentlyContinue

if (-not $Hash2011 -or -not $Hash2023) {
    $data.BootmgrSigned = 'Reference Missing'
}
else {
    $drive = $null
    try {
        $used       = (Get-PSDrive -PSProvider FileSystem).Name
        $candidates = 'ZYXWVUT'.ToCharArray() | Where-Object { $_ -notin $used }
        if (-not $candidates) {
            $data.BootmgrSigned = 'NoDriveLetter'
        }
        else {
            $drive = "$($candidates[0]):"
            $null = & mountvol $drive /s 2>&1
            Start-Sleep -Milliseconds 500

            $bootMgrPath = "$drive\EFI\Microsoft\Boot\bootmgfw.efi"
            if (-not (Test-Path $bootMgrPath)) {
                $data.BootmgrSigned = "Can't Verify"
            }
            else {
                $h = Get-FileHash $bootMgrPath -Algorithm SHA256
                $data.BootmgrSigned =
                    if     ($h.Hash -eq $Hash2011.Hash) { '2011' }
                    elseif ($h.Hash -eq $Hash2023.Hash) { '2023' }
                    else                                { 'Hash Mismatch' }
            }
        }
    }
    finally {
        if ($drive) { & mountvol $drive /d 2>&1 | Out-Null }
    }
}Mitigation 3 : is the 2011 PCA revoked in the DBX? A result of True means the old chain is now forbidden.
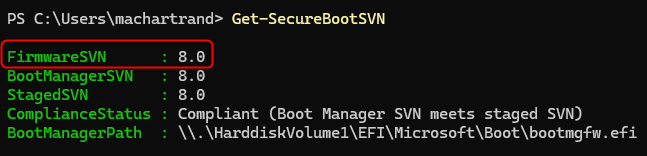
[System.Text.Encoding]::ASCII.GetString((Get-SecureBootUEFI dbx).bytes) -match 'Microsoft Windows Production PCA 2011'Mitigation 4 : SVN. You can confirm this by running the powershell command Get-SecureBootSVN. FirmwareSVN should match the Staged and BootManager SVN version
Deploying the Report in Your Environment
The report itself is just the front end. What feeds it is a small data pipeline you stand up inside ConfigMgr: a Configuration Baseline that inventories each device’s Secure Boot state into a custom WMI class, and a hardware inventory extension (MOF) that tells your clients to report that class up to the site database. Once data is flowing into the view v_GS_SCD_SecureBoot0, you point the Power BI file (or the SSRS report) at it. Here is the full sequence.
Step 1 : Import and deploy the Configuration Baseline
The baseline contains the Configuration Item Script that performs the firmware checks (the same Get-SecureBootUEFI reads shown earlier) and writes the results to the WMI in root\cimv2\SCD_SecureBoot on each device.
- In the ConfigMgr console, go to Assets and Compliance > Compliance Settings > Configuration Baselines.
- Right-click Configuration Baselines and choose Import Configuration Data.
- Browse to the provided
.cabfile and complete the wizard. The baseline and its referenced Configuration Item are imported together. - Select the imported baseline and click Deploy. Target a device collection, leave Remediate noncompliant rules unchecked as there are no remediation scripts in the baseline anyway, and set an evaluation schedule (daily is recommended).
Step 2 : Extend hardware inventory with the MOF file
The baseline puts the data on the client; the MOF tells the site to collect it. Importing the class into hardware inventory is what makes it land in the database view the report queries.
- Go to Administration > Client Settings.
- Open the Default Client Settings (This is the only place where you can import a custom class) and select Hardware Inventory.
- Click Set Classes…, then Import…, and browse to the provided
.moffile. - Confirm the SCD_SecureBoot class is listed and checked, then click OK out of both dialogs.
- Alternatively, if you don’t want it applied in the default client settings, you may uncheck it from here and go check it in your preferred custom client setting.
Because hardware inventory only reports classes that already exist on the client, deploy the baseline (Step 1) first, or simply allow a cycle or two for the class to be created before the next inventory run. If you don’t, you may see errors in SCCM component status that it failed to find a class when taking inventory.
Note: It’s recommended to have the hardware inventory cycle run daily to keep reports and queries current.
Step 3 : Let the cycles run
Nothing appears in the report until policy and inventory have run. On a pilot device you can speed this up from the Configuration Manager control panel applet (or via client actions) by running, in order: Machine Policy Retrieval & Evaluation Cycle, then the configuration baseline evaluation, then Hardware Inventory Cycle. After the inventory reaches the site, the data is queryable through v_GS_SCD_SecureBoot0 in SQL or SCD Secure Boot in Resource Explorer under Hardware Inventory.
Step 4 : Connect the report
Power BI (.pbit): open the template in Power BI Desktop. When prompted, supply your SQL Server instance (your site database server) and the site database name (usually, CM_<sitecode>). The model loads from v_GS_SCD_SecureBoot0 joined to the standard ConfigMgr views, then Save once as a .pbix. (Saving in Desktop is also what finalizes the file after a template open, so always save once before publishing.)
SSRS (.rdl): browse to your Reporting Services portal at http://<your-reporting-server>/Reports, open the target folder, choose Upload, and select the .rdl. Then edit the report’s data source so it points at your site database. If you use our SCD Advanced Reports Manager, you can import and wire up the data source with it directly instead of doing it by hand in the portal.
From here, give the fleet a few inventory cycles to report in, and the KPIs will start to populate. You should start getting relevant data within 48 hours.
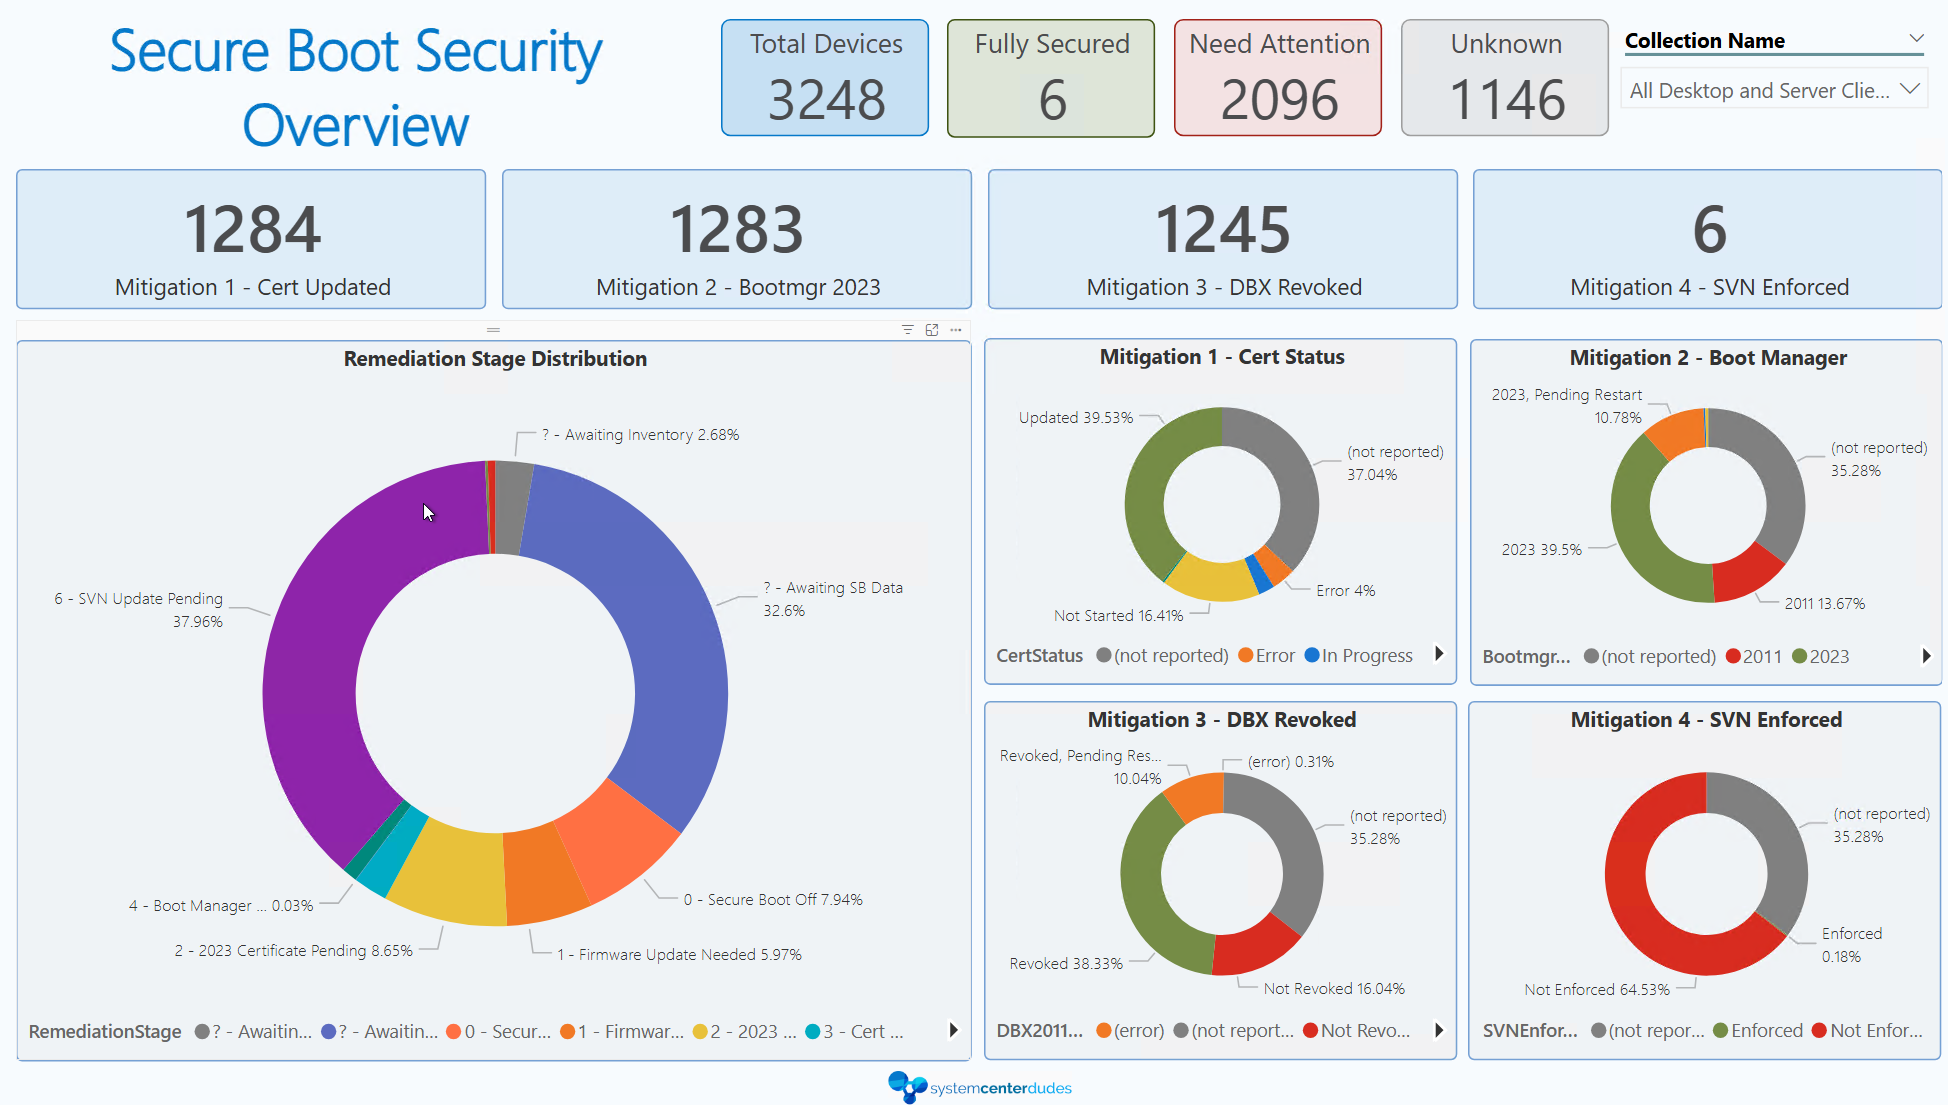
How to Read the Power BI Report – BlackLotus Remediation
The report exists to answer one question at fleet scale: where is every device in this four-step journey, and what is blocking the ones that are stuck? Here is what every value means.
The headline KPIs
- Total Devices : every device reporting Secure Boot inventory.
- Compliant : Mitigation 1 is done and confirmed: the registry Cert Status reads Updated. This is the single most important number, it’s the count of devices that have genuinely crossed the June 2026 finish line.
- Need Attention : devices that are reporting but not yet compliant. This is your work queue.
- Unknown : devices that have not returned Secure Boot inventory yet.
The four Mitigation cards
These count how far the fleet has progressed through the sequence. The key design decision, and the thing that makes the numbers trustworthy, is that Mitigations 2, 3 and 4 only count once Mitigation 1 is confirmed:
- M1 (Cert Updated): Cert Status = Updated.
- M2 (Bootmgr 2023): boot manager is 2023-signed and M1 is confirmed.
- M3 (DBX Revoked): 2011 PCA is revoked and M1 is confirmed.
- M4 (SVN Enforced): SVN is enforced and M1 is confirmed.
Why the dependency? Because a file or firmware variable can be written before Windows has rebooted and re-validated the chain. Until the registry Cert Status flips to Updated on the next successful boot, the device is not actually running the new trust model, it only staged it. Counting those as done would overstate your security posture. So the report holds them as Need Attention until the reboot confirms Windows it booted at least once from the 2023 boot loader.
The “Pending Restart” states
This is where staging shows up in the per-device tables. When the underlying change is in place but the registry has not yet confirmed it, you will see:
- Boot Mgr = “2023, Pending Restart” : the 2023 boot manager is on disk, but Cert Status is not yet Updated.
- DBX 2011 = “Revoked, Pending Restart” : the revocation is written, but not yet confirmed.
- SVN = “Enforced, Pending Restart” : the SVN is set, but not yet confirmed.
These are shown in orange. They mean “almost there : reboot to finish.” They do not count toward the mitigation totals until that reboot happens.
Cert Status values
- Updated : the certificate servicing phase is complete and confirmed. (Note: Windows only flips this to Updated once the certificate and the boot manager step are done, so a device can read “In Progress” while the certificate itself is already in the DB.)
- In Progress : Windows is actively applying the certificate servicing.
- Pending : a mitigation bit is set in
AvailableUpdatesand the device is waiting for its reboot. - Not Started : the servicing has not begun. Also shown when firmware is Not Ready, because in that case Windows is only retrying a 2023 KEK push that the firmware keeps rejecting. That is not real progress, so the report does not present it as “In Progress.”
- Blocking : an administrator has opted the device out via the High Confidence opt-out setting.
- Error : the servicing returned an error code (shown in the error detail fields).
- (not reported) : no Secure Boot data has been collected for this device yet.
Firmware Needed
Some firmware cannot accept the 2023 keys without an OEM firmware/BIOS update first. When Firmware Needed = Yes, the device is blocked at the very first step. No amount of re-running the mitigation will help until the OEM firmware is updated. These devices are the ones to route to your hardware/driver team rather than your patching team.
Remediation Stage
The single most useful field for planning. It places each device at exactly one point in the journey:
- 0 – Secure Boot Off : Secure Boot is disabled; nothing can apply.
- 1 – Firmware Update Needed : blocked at Mitigation 1 by unready firmware.
- 2 – 2023 Certificate Pending : ready for Mitigation 1 but not started.
- 3 – Cert Update In Progress : Mitigation 1 underway.
- 4 – Boot Manager Pending : cert done, awaiting Mitigation 2.
- 5 – DBX Revocation Pending : awaiting Mitigation 3 (this is where a device is still BlackLotus-vulnerable even though it has the new cert).
- 6 – SVN Update Pending : awaiting Mitigation 4.
- 7 – Fully Remediated : all four mitigations done and confirmed.
- X – Mit 1 Error / ? – Awaiting SB Data : an error during Mitigation 1, or no inventory yet.
The breakdown cards (within Need Attention)
- Firmware Needed : blocked on OEM firmware.
- Cert Not Received : firmware is ready, but the certificate has not landed yet.
- Pending Restart : a mitigation is staged and only a reboot stands between the device and progress.
- Cert Blocking : opted out via the High Confidence setting.
- Cert Error : servicing returned an error.
BlackLotus Remediation – Turning the Report Into a Roadmap
Once you can read the report, the roadmap writes itself. A sensible order of operations for most fleets:
- Close the data gap first. Drive Unknown toward zero so you are planning against real numbers, not blind spots.
- Triage Firmware Needed to your hardware team. These need OEM firmware updates and have the longest lead time : start them now.
- Sweep up Pending Restart. These are the cheapest wins: the work is already staged, they just need a reboot. A maintenance window clears the whole bucket.
- Push Mitigation 1 across “Cert Not Received.” Firmware is ready; these just need the certificate step.
- Prioritize stage 5 (DBX Revocation Pending) for security. Devices here have the new certificate but are still BlackLotus-vulnerable because the old boot managers are not yet revoked. From a pure risk standpoint, this is the most important group to finish.
- Finish with SVN (stage 6) to reach stage 7 : Fully Remediated.
The certificate expiration in 2026 is the deadline that gets this on your roadmap. BlackLotus is the reason you cannot stop at Mitigation 1. The report is how you prove, device by device, that you actually finished and how you tell the difference between a device that is genuinely secure and one that has merely staged the changes and is waiting for a reboot.
If you have questions about deploying the Configuration Item and the report in your own environment, or you run into a firmware combination that stalls at Mitigation 1, let us know in the comments.
Share
Get the latest insights and exclusive content delivered to your inbox


Only authorized users can leave comments
Log In