
How to gather OSD Task Sequence information in SCCM
SCD Consultant, Contributor. Specialized in Microsoft Endpoint Manager (SCCM, InTune), Windows Autopilot, Windows10 (11) and Office365 Deployment and maintenance.

Marc-Andre Chartrand
Table of Content
- Overview
- What Gets Collected
- OSD Task Sequence information – Prerequisites
- Part 1 — PowerShell Tattoo Script
- Part 2 — Hardware Inventory Extension (MOF)
- Part 3 — Verifying the WMI Data
- Part 4 — Importing the SSRS Report
- Part 5 — Querying the Data Directly
- Troubleshooting – OSD Task Sequence information


Share


Get the latest insights and exclusive content delivered to your inbox
Overview
When a device gets imaged through SCCM, the deployment context, which task sequence ran, the OS build that was originally installed, disappear the moment the task sequence ends. There is no built-in mechanism in SCCM to persist this information for later reporting.
This guide walks you through a complete solution that tattoos task sequence metadata directly into a custom WMI class on the device, collects it via hardware inventory, and surfaces it in a polished SSRS report right inside the SCCM console.
All tools from this guide are in our Free SCD Subscription. You can download it using the Get Free product button in the top toolbar and select the free subscription.
What Gets Collected
The solution captures the following at imaging time:
| Field | Source |
|---|---|
| Task Sequence Name | _SMSTSPackageName |
| Package ID | _SMSTSPackageID |
| Computer Name | OSDComputerName |
| OS Build Number | Win32_OperatingSystem.BuildNumber |
| Manufacturer | Win32_ComputerSystem.Manufacturer |
| Model | Win32_ComputerSystem.Model (or Win32_ComputerSystemProduct.Version for Lenovo) |
| Serial Number | Win32_BIOS.SerialNumber |
| Deployed By | _SMSTSLaunchMode (e.g. PXE, Media) |
| Tattoo Date | Script execution timestamp |
Lenovo note: Lenovo stores the friendly model name (e.g. “Yoga 7 Gen 11”) in
Win32_ComputerSystemProduct.Versionrather thanWin32_ComputerSystem.Model, which returns a cryptic MTM number. The script handles this automatically.
OSD Task Sequence information – Prerequisites
- SCCM Current Branch (tested on 2403+)
- SSRS is configured and linked to your SCCM site
- Administrative rights on the SCCM site server
- The new SCD Advanced Report Manager
Part 1 — PowerShell Tattoo Script
Create a new Package in SCCM (not an Application) containing the script below, or embed it directly as a Run PowerShell Script task sequence step.
Task Sequence Step Configuration
- In your task sequence, near the very end — after all software installs but before the final reboot.
- Add a Run PowerShell Script step.
- Set PowerShell execution policy to Bypass.
- Paste the script inline or reference your package.
- Set the step to Continue on error so a tattoo failure never blocks imaging.
Part 2 — Hardware Inventory Extension (MOF)
This MOF definition tells SCCM’s hardware inventory agent to collect the custom WMI class.
Importing the MOF into SCCM
- Save the block above as
OSD_TaskSequence_Tattoo.moffile. - In the SCCM console, go to Administration → Client Settings.
- Open your Default Client Settings policy.
- The default client setting is the only place where you can import a custom class, import will fail within a custom client setting
- Click Hardware Inventory → Set Classes → Add → Import.
- Browse to your
.moffile and import it. - Click OK and save. The MOF definition is now stored in the SCCM database — you can delete the file.
- You may uncheck the class from the Default client settings if you don’t want to gather this class for every device in your environment (like servers)
- Select the custom class within the Hardware Inventory settings of the desired Client Settings policy, deploy it to your target collection if not already targeted.
Note: After the first hardware inventory cycle following imaging, data will appear in the SCCM database and become queryable via SQL, CMPivot, and Resource Explorer.
Part 3 — Verifying the WMI Data
After a device has been imaged, you can verify the tattoo was written correctly by running this on the client:
You should also verify it was collected by SCCM by opening Resource Explorer on the device in the console and navigating to Hardware → OSD Task Sequence Info.

Part 4 — Importing the SSRS Report
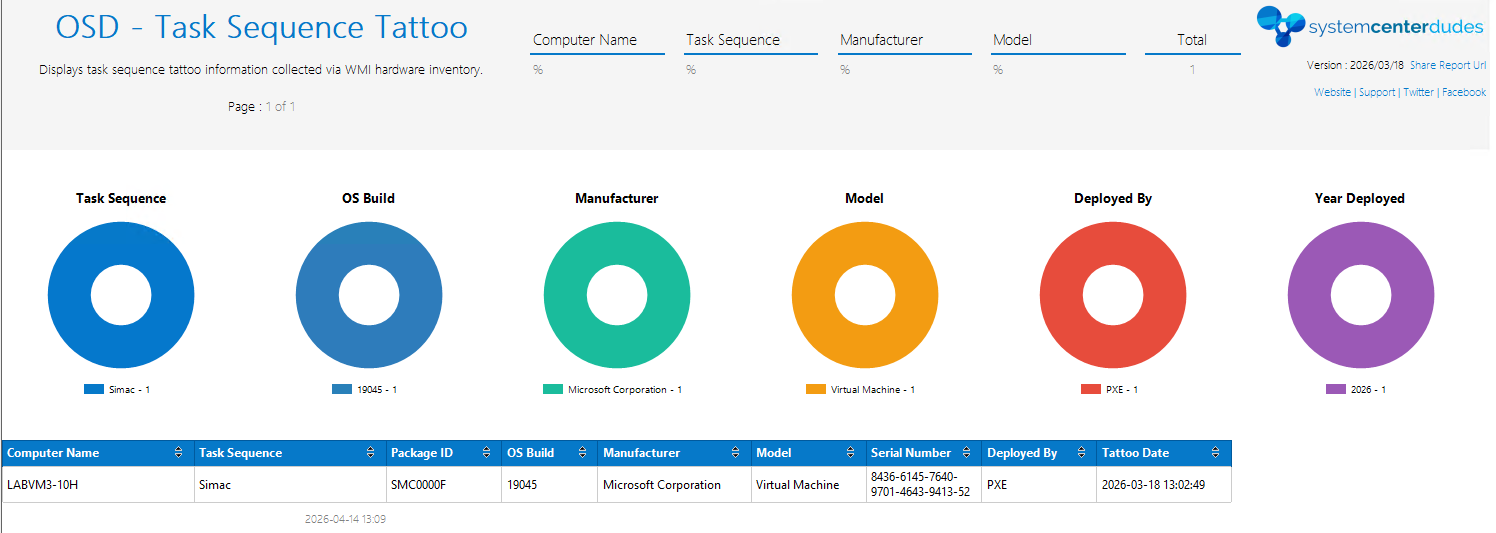
The report is a production-ready .rdl file built by System Center Dudes to show OSD Task Sequence information, featuring:
- 6 doughnut charts — Task Sequence, OS Build, Manufacturer, Model, Deployed By, Year Deployed
- Filter parameters — Computer Name, Task Sequence, Manufacturer, Model, Date range
- Sortable data table with all collected fields
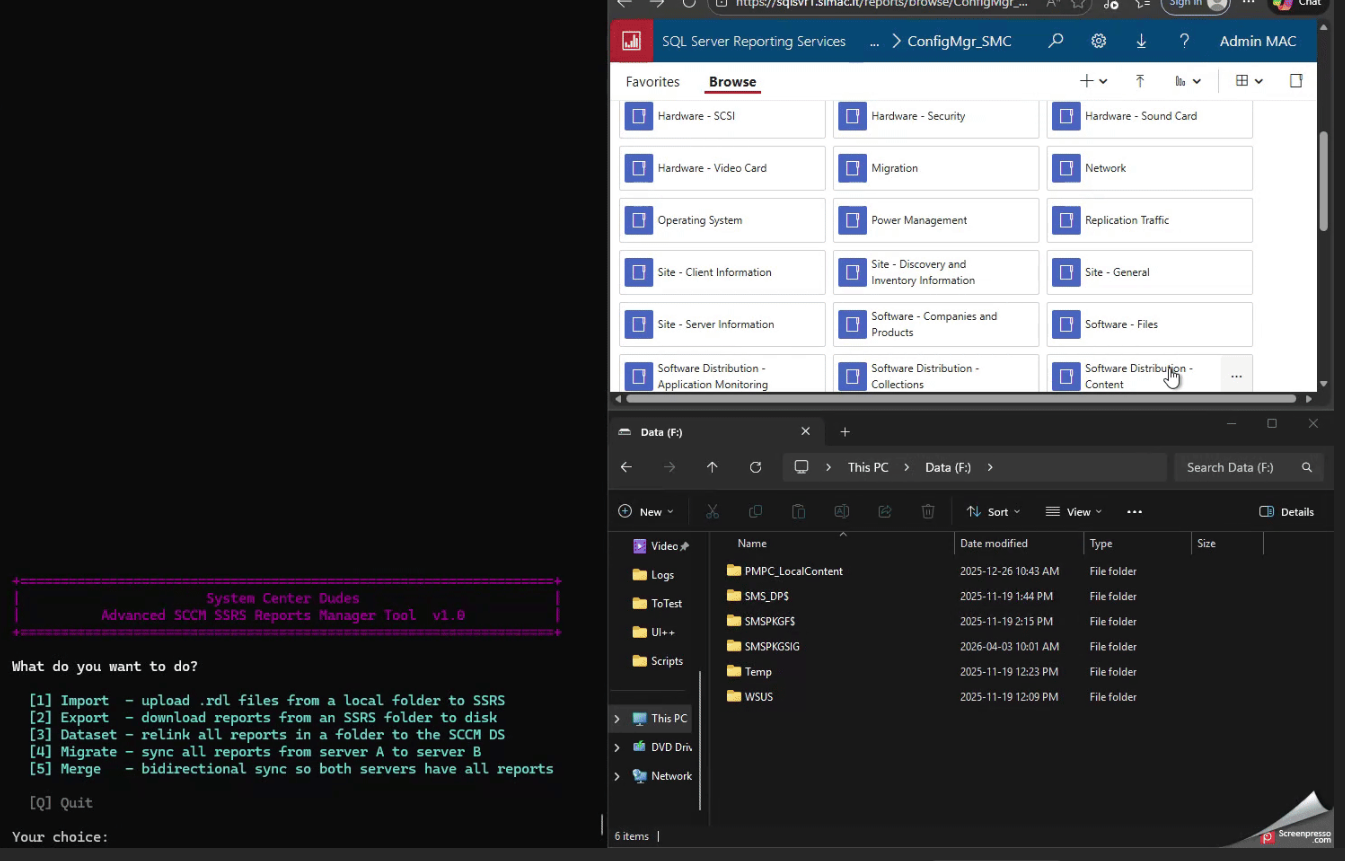
Import Using the SCD Advanced Report Manager
This tool is in our Free SCD Subscription. You can download it using the Get Free product button in the top toolbar.
- Launch the Script
- Select 1.Import
- Enter the name of your Report Server
- Select (or create) the SSRS folder where you want to import the report
- Select the folder containing the report
- Done! you can close the script and enjoy the report once some data has been collected.
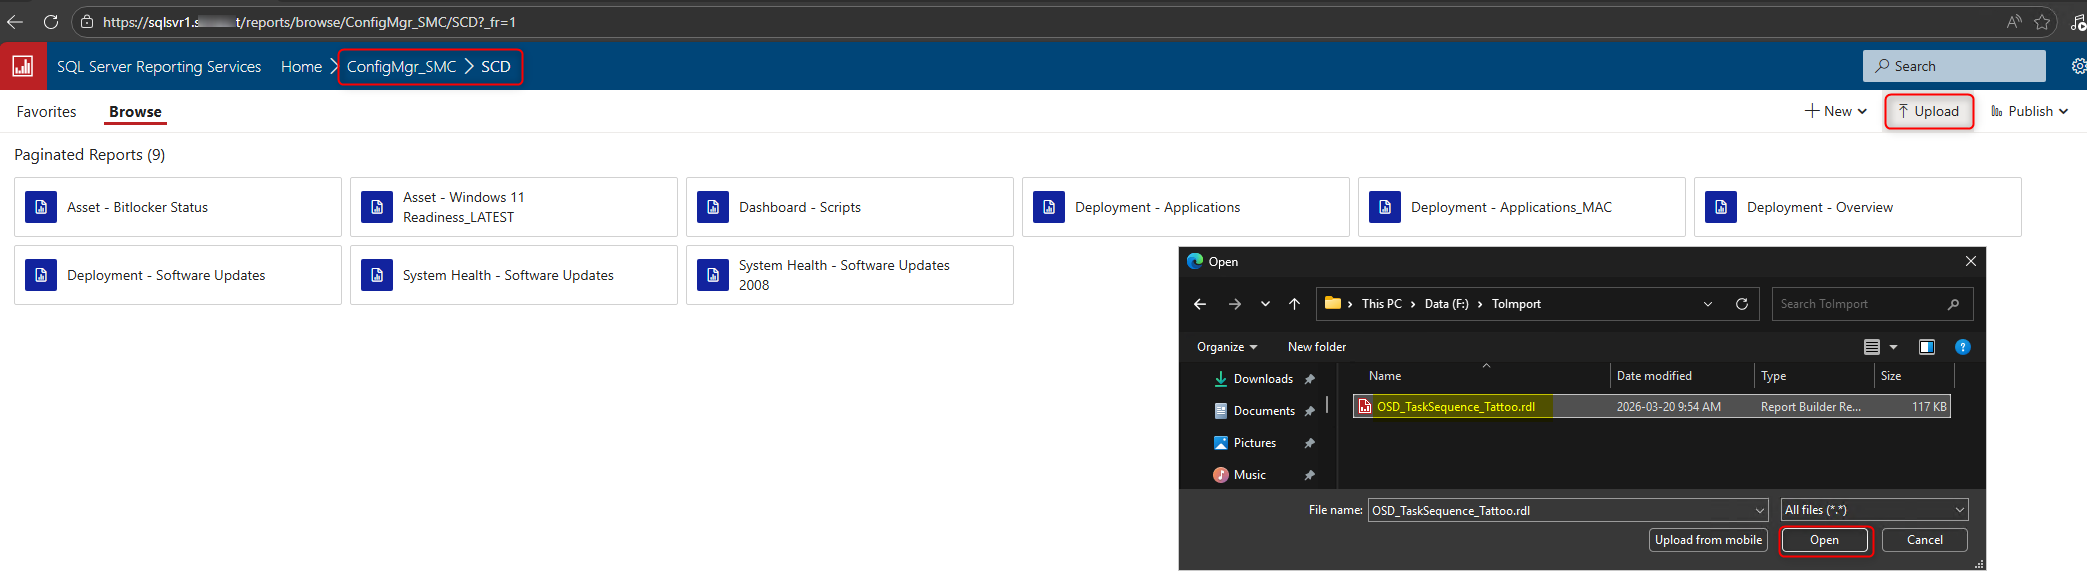
Manual Import (Alternative)
If you prefer to import manually:
- Open a browser and navigate to your SSRS web portal URL, typically
http://<YourSiteServer>/Reports - Browse to the folder where you want to store the report (e.g. ConfigMgr_ABC → SCD)
- Click Upload in the top toolbar
- Browse to
OSD_TaskSequence_Tattoo.rdland click Open
- Once uploaded, click the 3 dots on the right of the report, select Manage
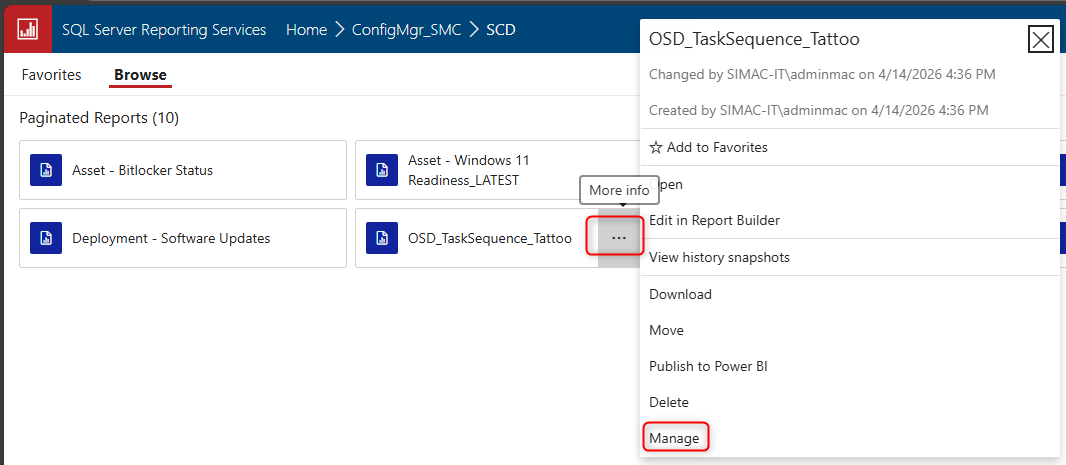
- In the left pane click Data sources
- Select A shared data source and click Browse
- Navigate to your ConfigMgr shared data source (typically located at
/ConfigMgr_<SiteCode>/) and select it
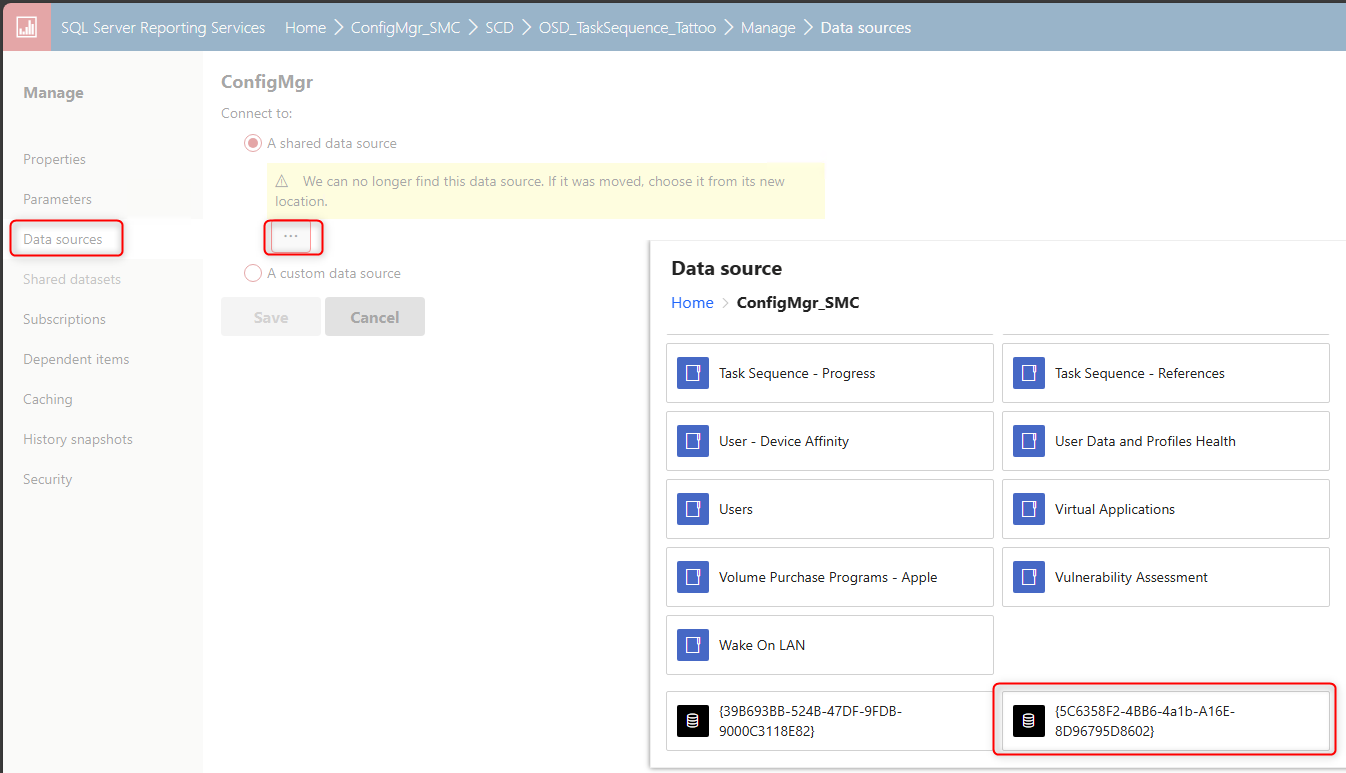
- Click Save
- Navigate back to the report and run it
Part 5 — Querying the Data Directly
If you need the data outside of the SSRS report, here is the SQL query against the ConfigMgr database:
You can also query it live via CMPivot without waiting for a hardware inventory cycle:
Troubleshooting – OSD Task Sequence information
WMI class not created / script exits with code 1 Check C:\Windows\Temp\SMSTSLog\smsts.log for the exact PowerShell error. The most common cause is the script running before WinPE has fully transitioned to the full OS — ensure the step is placed after the Setup Windows and ConfigMgr step.
Fields are empty in the database Confirm the hardware inventory MOF was imported and that a full hardware inventory cycle has run on the client. You can force one via Configuration Manager → Actions → Hardware Inventory Cycle.
Lenovo model shows MTM number instead of friendly name The script checks $Manufacturer -like "*Lenovo*". If your Lenovo devices report a different manufacturer string (e.g. “LENOVO” in all caps), adjust the comparison accordingly — Win32_ComputerSystem.Manufacturer is case-sensitive in PowerShell’s -like operator.
Report shows no data for a device that was imaged The tattoo only runs during OSD. Devices imaged before this solution was deployed will have no data. You can backfill by deploying the tattoo script as a standalone Configuration Item or running it via a collection script, though some TS-specific variables like _SMSTSPackageName will be unavailable outside a task sequence and will come back empty.
Share
Get the latest insights and exclusive content delivered to your inbox


Only authorized users can leave comments
Log In